PheMomenon has moved!

You should be automatically redirected in 5 seconds.

If not, please visit http://www.phemomenon.com and update your bookmarks and RSS feed.

Monday, March 31, 2008

This Post Is Bananas. B-A-N-A-N-A-S!


So, I spend a lot of time reading other people's blogs and dreaming of their food. I'm glad to say, that since it is always awe inspiring that I think this is a good pass-time for me. Especially, when I need to decompress.

I have found so many amazing blogs, but it just so happened that yesterday I had the opportunity to make recipes from two of my favorites - I'm sure you've found both of these by now, and I was so glad when I came across The Domestic Goddess about a year ago. It has only been in the past few months that I've really started reading more blogs and found Joy the Baker. I love, love, love both of these blogs.


Photobucket

I really had to laugh when I started to read this post on Serious Eats from Dorie about "languishing bananas". I had five of 'em in the kitchen doing just that. Languishing. Waiting til I had time to do something about it. My DH wanted to throw them away because they were getting so black. NO!!!


Photobucket

Yesterday was finally the day. I really didn't want to make a bajillion banana muffins or loaves of bread though (suffice it to say that my last pregnancy has turned me away from being able to stomach actual banana bread for a while).

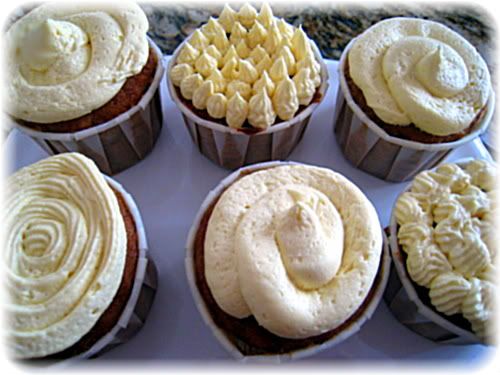
So, while I was looking for other ideas it was when I was going through Jennifer's archives that I was reminded of bookmarking her recipe for Banana Sticky Buns a while back. I had recently seen Joy's Banana Cupcakes, and well, since I had enough bananas at their leisure in the kitchen for both recipes, I went for it.


Photobucket

Actually, I made a half-size recipe of Joy's cupcakes because it is just us and the half recipe still made 12 cupcakes a 6-inch cake.


Photobucket

So, here is Joy's recipe and lovely pictures (much better than mine!). This was THE BEST Banana Cake recipe I have ever had. Plus, she gives you her recipe for THE BEST Brown Sugar Cream Cheese Frosting too. The cupcakes and frosting were both light, lovely and delicious. We left the chocolate out (I know - me, leave chocolate out of anything?! Not my choice.) because my husband prefers it without and I was trying to pass my latest sugar-holic creation off as "muffins." (Which, incidently, I did eat two of the cupcakes warm from the oven last night, and they were perfectly delicious without any embellishment at all).


Photobucket

Here is where you will find Jennifer's original Banana Sticky Bun recipe. My version is detailed below. Any changes made were pretty much only made because of availability of ingredients at our house right now (no cranberries). I tweaked the recipe only a bit to make the sticky part a bit gooier since I was using sliced almonds on top. These had a light banana flavor and were delicious and different. A great way to use up those ripe bananas.


Photobucket


And while you're here, don't forget to check out the
"Little Wonders" Event I'm hosting. I hope you can join in the fun and help a good cause!


Banana Sticky Buns
(Adapted from Jennifer, The Domestic Goddess)

Dough:
1 package active dry yeast
1/4 cup warm water (110 degrees F) + 1/4 teaspoon sugar
1 cup mashed ripe bananas
2 tablespoons unsalted butter – room temperature
2 large eggs
¼ cup buttermilk powder
3 tablespoons dark brown sugar
½ teaspoon salt
3 1/2 cups all-purpose or bread flour

Filling:
3 tablespoons dark brown sugar
2 tablespoons sugar
2 teaspoons ground cinnamon
¼ cup unsalted butter, melted

Sticky Bottom:
6 tablespoons unsalted butter + 1 teaspoon for pan
¾ cup packed dark brown sugar
2 tablespoons heavy cream
1 tablespoon honey
1/2 cup sliced, toasted almonds

(Note: Jennifer uses a vanilla sugar glaze (follow the link above) on the sticky buns as well, but since I had extra Brown Sugar Cream Cheese Frosting from making Joy's cupcakes, I just used some of that - SOOOO good!)


Directions:

1. In a large bowl mash the bananas with the butter to form a very soft, ever-so-slightly liquid paste. Combine the yeast with the warm water and sugar. Let sit til foamy, 5 minutes. Add the eggs, buttermilk powder, brown sugar, salt and flour and stir with a wooden spoon until a rough mass forms.

2. Scrape it all together with a bench scraper and transfer to a lightly floured work surface. Knead until it is smooth and elastic, adding more flour if necessary, about 5 minutes. The dough should be soft but not sticky.

3. Form the dough into a ball and transfer to a lightly oiled bowl and cover the bowl with plastic wrap. Allow to rise in a warm, draft-free spot (on top of the fridge works really well) until it doubles in size – about 1 ½ hours. (I got started on this in the evening, so I ended up putting the dough in the refrigerator overnight at this point).

4. Make the filling: in a small bowl, combine the sugars and cinnamon. Set aside.

5. Punch down the risen dough and turn out onto a lightly floured work surface. Roll out to a 14- by 9-inch rectangle. Brush the surface of the dough with the melted butter, then sprinkle evenly with the cinnamon-sugar combination and press it into the dough lightly. Beginning at the long side, roll jellyroll style. Pinch to seal seam and set aside, covered in a warm spot while you make the sticky bottom.

6. Lightly butter the bottom of a 9 by 13-inch baking pan. In a small saucepan, combine the butter and brown sugar and honey, cook, stirring until the sugar has dissolved. Stir in the cream and keep stirring until smooth and incorporated. Pour the mixture into the pan. Sprinkle with the almonds. Cut the buns into 12 pieces, about 1 ½ inches wide and arrange, cut side up in the pan with the sugar-butter-almond mixture. Cover and let rise in a warm, draft-free place for 30 to 45 minutes (or over night in the fridge) or until doubled in volume.

7. Bake in a preheated, 350 F oven for 25 – 35 minutes, or until caramel is bubbling and tops are slightly browned. Meanwhile, make glaze or frosting (go check out Jennifer's and Joy's blogs for your choice - the sticky buns are really good without any glaze too). When the rolls come out of the oven, allow them to cool slightly and then drizzle with the glaze while they are still warm. Pull apart and serve warm.

Sunday, March 30, 2008

How to Bake a Daring Cake - Dorie's Perfect Party Cake Revamp

Photobucket


This month the Daring Bakers are flooding the food blogging world with Dorie's Perfect Party Cake, as chosen by Morven of Food Art and Random Thoughts. She also decided that we could all play with the flavors to our hearts content as long as we used the original recipes as our base jumping off point.

So, while I made an orange-strawberry version with some dulce de leche, there are many surprises waiting at the Daring Bakers' blogroll .

Let me start by saying thank you to Morven for the theme and the recipe - I loved this cake! Making it was as much of a pleasure for me as eating it was. My only regret was adding the dulce de leche on top because it slid off (even more than in the pictures). Next time I will just serve that alongside for anyone who wants more than in the layers.

I also wanted to mention that, hands-down, my favorite part of the entire process was rubbing the zest with the sugar. I'm not exaggerating when I tell you that getting in there with your fingers and working the sugar until it is moist and fragrant had a completely calming effect on me. I think I would happily wake up and do this every morning to help wake up. It was awesome and I had to taste just a little of the orange sugar which, of course tasted like candy. I loved it so much that I sprinkled more on the top of the cake to highlight it. That was absolutely my favorite part!


Photobucket

I had actually never made buttercream before and though I gave some passing thought to not trying it this time either, I knew I wanted to make it and see what it was like. I am so glad that I did. I actually didn't have any trouble with it and it was a pleasure to work with. I added 1 teaspoon of vanilla bean paste to mine for flavor and the lightly speckled effect. I now know that I will use both recipes many more times to come.

Photobucket


I layered the cakes with strawberry buttercream (by taking 1/3 of the entire buttercream and mixing in some smooth pureed strawberry preserves) and a center layer of dulce de leche. It was awesome!


Photobucket


Here was the process of rubbing the sugar with the orange zest - I wonder if Blogger is working on smell-o-vision capabilities - oh well, until then, you HAVE to try this.

Photobucket

Here is where I added the butter and creamed it. As you can see, mine never got very light and fluffy, but I pressed on and it didn't seem to be a problem.

Photobucket

Here is the cake and the layering process. Yeah, now you can see the problem with the dulce de leche. The inside layer of the cake wouldn't have oozed as much if I hadn't poured it onto the smooth side of the cake. Next time I'll know better.

Photobucket

And here is the piece I ate for Easter. The orange-strawberry-dulce de leche combo was insanely good and the cake was devoured very quickly at a friend's house where I took it as Easter dessert. I was even told that it was the "best dessert" they had ever had. Since they have had some amazing desserts, this is high praise indeed. I am thrilled to have this recipe, and the ability to play around with the flavors, in my arsenal.

Photobucket

Orange Infused Party Cake with Vanilla, Strawberry & Dulce de Leche
(Adapted from Dorie's Perfect Party Cake)

For the Cake:
2 1/4 cups cake flour
1 tablespoon baking powder
½ teaspoon salt
1 ¼ cups whole milk or buttermilk
4 large egg whites
1 ½ cups sugar
2 teaspoons grated orange zest
1 stick (8 tablespoons or 4 ounces) unsalted butter, at room temperature
½ teaspoon pure vanilla extract

For the Buttercream:
1 cup sugar
4 large egg whites
3 sticks (12 ounces) unsalted butter, at room temperature
¼ cup fresh lemon orange juice (from 1 large orange)
1 teaspoon pure vanilla extract or vanilla bean paste

For Finishing:
1/2 cup strawberry preserves stirred vigorously or warmed gently until spreadable (puree in food processor to make it smooth if necessary)
1/3 cup dulce de leche

Getting Ready:
Centre a rack in the oven and preheat the oven to 350 degrees F. Butter two 9 x 2 inch round cake pans and line the bottom of each pan with a round of buttered parchment or wax paper. Put the pans on a baking sheet (I didn't have a big enough baking sheet so I just baked them directly on the rack).

To Make the Cake:
Sift together the flour, baking powder and salt. Whisk together the milk and egg whites in a medium bowl. Put the sugar and orange zest in a mixer bowl or another large bowl and rub them together with your fingers until the sugar is moist and fragrant. Add the butter and working with the paddle or whisk attachment, or with a hand mixer, beat at medium speed for a full 3 minutes, until the butter and sugar are very light. Beat in the extract, then add one third of the flour mixture, still beating on medium speed. Beat in half of the milk-egg mixture, then beat in half of the remaining dry ingredients until incorporated. Add the rest of the milk and eggs beating until the batter is homogeneous, then add the last of the dry ingredients. Finally, give the batter a good 2-minute beating to ensure that it is thoroughly mixed and well aerated.

Divide the batter between the two pans and smooth the tops with a rubber spatula. Bake for 30-35 minutes, or until the cakes are well risen and springy to the touch – a thin knife inserted into the centers should come out clean. Transfer the cakes to cooling racks and cool for about 5 minutes, then run a knife around the sides of the cakes, unfold them and peel off the paper liners. Invert and cool to room temperature, right side up (the cooled cake layers can be wrapped airtight and stored at room temperature overnight or frozen for up to two months).

To Make the Buttercream:
Put the sugar and egg whites in a mixer bowl or another large heatproof bowl, fit the bowl over a pan of simmering water and whisk constantly, keeping the mixture over the heat, until it feels hot to the touch, about 3 minutes. The sugar should be dissolved, and the mixture will look like shiny marshmallow cream. Remove the bowl from the heat. Working with the whisk attachment or with a hand mixer, beat the meringue on medium speed until it is cool, about 5 minutes. Switch to the paddle attachment if you have one, and add the butter a stick at a time, beating until smooth. Once all the butter is in, beat the buttercream on medium-high speed until it is thick and very smooth, 6-10 minutes. During this time the buttercream may curdle or separate – just keep beating and it will come together again. On medium speed, gradually beat in the orange juice, waiting until each addition is absorbed before adding more, and then the vanilla. You should have a shiny smooth, velvety, pristine white buttercream. Press a piece of plastic against the surface of the buttercream and set aside briefly. When you are ready to assemble the cake, place 1/3 of the buttercream into a seperate bowl and whisk in the strawberry preserves for in between two of the layers.

To Assemble the Cake:
Using a sharp serrated knife and a gentle sawing motion, slice each layer horizontally in half. Put one layer cut side up on a cardboard cake round or a cake plate protected by strips of wax or parchment paper. Spread it with one-half of the preserves/buttercream mixture. Top with another layer, spread with a layer of dulce de leche and then do the third layer the same as the first with the remainder of the strawberry buttercream. Place the last layer cut side down on top of the cake and use the remaining buttercream to frost the sides and top.

Serving:
The cake is ready to serve as soon as it is assembled, but I think it’s best to let it sit and set for a couple of hours in a cool room – not the refrigerator. Whether you wait or slice and enjoy it immediately, the cake should be served at room temperature; it loses all its subtlety when it’s cold.

Storing:
The cake is best the day it is made, but you can refrigerate it, well covered, for up to two days. Bring it to room temperature before serving. If you want to freeze the cake, slide it into the freezer to set, then wrap it really well – it will keep for up to 2 months in the freezer; defrost it, still wrapped overnight in the refrigerator.

Saturday, March 29, 2008

SHF Round-up Posted


Just a quick reminder to go check out the round-up for Sugar High Friday of Sweet Gifts. The theme was chosen and hosted by Danielle of Habeas Brulee. There are so many great entries, so go check it out. If you missed my entry before, then go take a look at these Chocolate Peanut Butter Truffle Cupcakes.

Friday, March 28, 2008

Blogging for Babies - An Invitation for Little Wonders

What some of you may not know about me is that I have been homebound since November 8, 2007. We have been in quarantine (and still are until at least May 1st).

Early last October I was 7 months pregnant with our second child. Another boy (heaven help me!). Roughly 8 weeks before my due date I started getting really sick. I was sick the entire pregnancy anyway, but this was different. This wasn’t normal, and it was intensely more painful. What I didn’t know at the time was that I had an uncommon form of pre-eclampsia in pregnancy - my body was giving up. Doctors don’t know what causes this or how it happens. I went for some tests to find out what was wrong and about two hours later Cole was here. All 3 lbs 6 oz of him. He was okay, but he was very small and underdeveloped for how far along I was.

Today is Cole's corrected four month birthday - but he is almost six months old. Happily, he is on track with his due date and doing well. After 28 days in the hospital's Newborn Intensive Care Unit, numerous hospital and doctor’s tests, a secluded winter and a very shaky start in life, he is happy and healthy. He probably won't catch up with his peers for a while, but we try not to worry too much about that. We are just grateful we have made it this far.

We are lucky. The reason we have been in such seclusion is because of RSV season which, while critical for all infants, is especially deadly to preemies who basically didn't have a chance to develop enough to have gained any kind of immunity to survive what for most would be a simple cold. We have had our share of trials, but we are so grateful they aren’t what they could have been.

There are so many babies that are born premature or with complications for one reason or another every year. There are aspects to the reality of having a child born under these circumstances that are far too painful to comprehend on so many levels.

That is why I am so grateful for the March of Dimes. Last year Aidan and I did the WalkAmerica event for March of Dimes with his preschool and raised about $200. I was just two months pregnant with Cole at the time. Little did we know that in five more months we would be one of the families that would desperately need the knowledge and research the March of Dimes helps to fund for our family.

Because of this, we are going to March for Babies (formerly WalkAmerica) this year as a family in Cole’s honor. So, here as “ambassador” for our fundraising efforts is Cole to introduce our little food blogging event to help find sponsors for the walk. (Cole’s Aunt Sorina gave him this cupcake hat and Cole felt it was appropriate to wear it here since this is, after all, a food blogging event.)

The Hanks Family LITTLE WONDERS TEAM for the MARCH FOR BABIES invites you to:


Blog for Babies by
Making Little Wonders


To help us get the word out about our March for Babies, even if you can’t enter the event below, please just post about the event on your blog so that we get the word out to as many people as possible. Please help us tell people how they can sponsor us in our March. If you are interested I can even send you the code for one of the link widgets you see at the top and side of this blog.


FOR THE EVENT:

Since the March for Babies is all about the littlest among us, the event is for little creations.

That is the only requirement. Make something (or many somethings) in miniature or small sizes.

If you have a baby story to share, that would be great as well! Let your imagination go wild.

In your post, please include the paragraph and link below so that people know how to sponsor us if they can.

Please feel free to use the event badge on the left in your post. That is Cole with his regular sized pacifier. He was five days old, and it was the day I was discharged, and he was not. He was still on oxygen, but he was growing.

Since we are trying to direct everything to the fundraiser, I don’t really have any great gifts or prizes for you at this point, but there may be some surprises along the way. I am working on some prize ideas and I will keep you posted. If I can't come up with anything, then I hope you will still help and forgive me - either way, even just for reading this or mentioning it, you have our undying gratitude.

So that we can try to get as much sponsorship before the walk as possible and get the word out as much as possible, I'm asking that you post your entries by APRIL 21st (our March for Babies takes place on May 3rd). Any help you can give in sponsoring us or getting the word out to help us find sponsors would be amazing.

Thank you for helping us help more babies get their full nine months.

Please email your entry to me at: phemomenon AT gmail DOT com


Include:

Your Name
Your Location
Your Blog Name
Your Blog URL
Your Post URL (permalink)
A photo (250 x 250 pixels if possible)

Please make sure that your post links back to this post and if possible, include the paragraph below with the link to our team page. If you have any questions or problems with this, please let me know.


Here is a paragraph you could include in your blog to let others know how to find our
"Little Wonders Team" page to sponsor us.

Direct Link: http://www.marchforbabies.org/personal_page.asp?w=81000739&u=hhanks

FUNDRAISER PARAGRAPH:

Want to know more about Little Wonders March for Babies Team? Fantastic!! Here is the Team Page. Any amount that you can sponsor is extremely appreciated. Please, please help spread the word and sponsor Little Wonders if you can! Thank you!

So, to all you amazing food bloggers out there, you will never know how much your friendship, comments, kind words and encouragement have saved my life (at the very least, my sanity) this winter. I am so blessed to be home with my sweet boys and I am so grateful to have them and I have been so amazed by this community and being able to be a small part of it.

If you want to see why I am passionate about this, here is a video of pieces of Cole’s first month of life. I will warn you that, though there isn’t anything gruesome in the video, it isn’t easy to watch. Again, compared to what happens to other families, I still feel so lucky. It is just a small clip - about three minutes, that covers our journey to where we are now. If you want to really see who we are you are welcome to look at our family blog here.

Thank you!

Cupcake Week on Martha Stewart - Contest

So, apparently, Ms. Stewart is holding a "cutest cupcake"contest starting on Monday, March 31st. Just wanted to let everyone know. You can get the details here, but I'm sure there will be more details next week. Good luck!

Thursday, March 27, 2008

Art You Eat #2 Round-Up - Eggs!


All the entries are in and the round-up is posted and ready for voting. Make sure to vote for your favorite of the three finalists, as chosen by Inge of African Vanielje, last month's challenge winner for chocolate and the creator of this month's theme - Eggs & Egg Shapes.

We had amazing entries from even more amazing bloggers. Thanks again to everyone that participated and I hope you will all join in the fun again next month. Once all the votes are in I'll announce the winner and their chosen theme.

For my contribution to the Eggs & Egg Shapes theme I chose to try to utilize some of both, eggs and their shapes. It may seem like a simple idea to do, but I couldn't quite get the egg shells right (I have shell-coloring issues - go figure) and ended up with a lot of white streaks and spots. Oh well, the chocolate truffle filled egg was still delicious to eat and fun to try to make.

For the directions I used Martha Stewart's website with directions here (except, admittedly, I did not break out the drill and I didn't have a syringe around to blow the egg out - next time I will try to use all the tools suggested and see if this works better.)

Next year, I will try this again, but I want to try filling them with caramel, raspberry white chocolate, Nutella or peanut butter, just to name a few flavor combos I've thought of so far.

Now, enough about me, go check out the round-up!

Thanks again everyone!

Wednesday, March 26, 2008

Mississippi Mud Brownie Cupcakes. 'Nuff Said.

Photobucket

I couldn't pass up the chance to participate in my first Cupcake Hero since this month's theme was marshmallows, which since there is usually no dairy in it makes it a treat near and dear to Aidan's heart. In fact, at his request two Christmases ago we even started making homemade marshmallows for the holiday. I love Laurie's blog, Quirky Cupcake, and I've wanted to send something in for the competition for a while now.

It is obvious that I love chocolate, so these cupcakes should come as no surprise. You may remember that I recently posted about some Dark Chocolate Raspberry Spiked Brownies (and the lameness of my kitchen that I don't even have a real sized (8 or 9-inch) square baking dish for some reason). Anywhoo, in that post I also mentioned that I used the other half of the batter for something else - well, this was it!


Photobucket

I made this recipe with six jumbo cupcake cups filled 3/4 full using a 2-inch high liner (if you don't use a liner, just grease the cups and fill them 2/3 full). If you use the full batter for this, then I'm sure you would easily get 12 jumbos out of it, probably more.

I topped these with homemade Marshmallow Creme, Dark Chocolate Ganache and Homemade Praline Crumbles. Get the recipe for the brownie base here.

Make sure you have a nice glass of cold milk handy with these Mississippi Mud Brownie Cupcakes. They are rich, but not too dense and the marshmallow creme and other toppings balance each other out perfectly.


Photobucket

Homemade Marshmallow Creme
2 large egg whites
1/2 cup sugar
1/4 cup light corn syrup
2 tablespoons water
1 1/2 teaspoons pure vanilla extract

Combine the ingredients with a pinch of salt in a metal bowl set over a saucepan of simmering water and whisk constantly until thick and hot to the touch. Remove from heat and using either a handheld electric mixer at high speed or standing mixer with whisk attachment until thick and glossy, about 10 minutes. Spread a thick layer onto each cupcake and allow to set for at least 5 minutes before dipping into the warm chocolate ganache.


Photobucket

Dark Chocolate Ganache
4 oz fine-quality bittersweet or semisweet chocolate
½ cup heavy cream

Finely chop chocolate and place in a heat-proof bowl. Heat the cream in a small saucepan until hot, but not boiling. Pour over the chocolate and let it sit for a few minutes to melt the chocolate. Whisk together until the chocolate is melted and smooth. Allow it to cool til it is just slightly warm. Dip the marshmallow creme topped cupcake into the chocolate and invert and sprinkle immediately with the praline crumbles.


Photobucket

Praline Crumbles
(Adapted from Recipe by Gale Gand)
Show: Sweet Dreams
Episode: Cajun Sweets

1/2 cup sugar
1/2 cup brown sugar
1/2 cup cream
1 tablespoons butter
3/4 cup roasted chopped pecans

In a heavy saucepan combine the sugar, brown sugar, and cream and bring to a boil. Cook on medium heat to softball stage (238 degrees F), then add the butter and pecans. Continue cooking until hardball stage (245 degrees F). Spoon large dollops of it onto a silicone mat or parchment lined baking tray. The pralines will spread and crystallize as they cool. After they have cooled enough to touch break them up into small pieces to use as topping. Store any leftovers in an airtight container.


Photobucket

Tuesday, March 25, 2008

Seriously, you might win an iPod Touch!

OK, why not. I'll try - and you should too! Head on over to Jerry's blog Cooking by the Seat of My Pants to find out how you can get your chance to win an Apple iPod Touch. Seriously. Jerry is doing this amazing giveaway and you can see the details here!

While you are at Jerry's blog, make sure to check out just what it is he's cooking. Me, if I can't win the iPod I'll just comfort myself with Jerry's Sinfully Good Hot Dark Chocolate and some Snickerdoodles. Not a bad consolation prize plan, eh?

Good luck!

When Life Gives You Raspberries...


Photobucket

Only in the past few months did I first hear of Donna Hay. While I am glad to have found her, I am still somewhat bummed that I didn't find her a long time ago. I feel slightly jipped by this. Oh well, at least now I know. And I am SO glad!

The last HHDD round was for Coconut Chocolate Tarts and we were to put a twist on them. I chose to add some raspberry flavor and make these Chocolate Coconut Raspberry Swirl Tarts. They were incredible. Since then, it seems like I keep coming back to the chocolate-raspberry connection.

Which brings us to this post. I found this recipe on Epicurious and thought that their photograph was so beautiful that I knew I would have to try this. Now, I am so glad I did. Though my photography skills aren't as good as the pro's at Epicurious, I think these lstill ook pretty fantastic. I have to tell you, they taste even better.

If you love a brownie that is slightly dense, dark and a little cakey, with a little fudgeiness too (is that even a word?), then this is a great choice for you. I will however mention, that, as you can really see in the photo with the Vanilla Frozen Custard below that these brownies are dark. If you aren't into dark chocolate, then I imagine you could easily substitute semisweet. I, however, love dark chocolate, but my husband wasn't as impressed as they were too dark for him.

For some reason I realized that I don't have a 9-inch square baking pan (seriously! what is up with that!?) in my kitchen I had to use a 7-inch dish that I have. Obviously this didn't fit all the batter, so I will show you in another post what I did with the rest of the batter. However, the measurements below are for a 9-inch pan, since I'm sure the rest of the world isn't as lame as I am. (I think I had a pan, and it broke, and I've still never replaced it!)


Anyway, these Raspberry Spiked Brownies were incredible and easy to make, as brownies should be. Yet they look all dressed up and impressive. Since these brownies got all dressed up, I couldn't leave them with nowhere to go and show off, so I am sending them over to the Monthly Mingle for Spring Fruit Sensations, hosted by Abby of Eat the Right Stuff for this round on behalf of Meeta, the event's creator.

I ate my brownie all by itself, because it really didn't need anything else in my opinion. However, since I had just made a batch of Vanilla Frozen Custard (too rich to be just "ice cream") I served a huge bowl of ice cream with one of the brownies to my husband (he is an "ice cream" fanatic). I've given you the recipe for both the brownies and the frozen custard below. They are amazing, together or each on their own.

Photobucket

Raspberry Spiked Brownies

200 grams (7 ounces) dark chocolate, chopped
250 grams (8 ounces) butter
1 3/4 cups brown sugar
4 eggs
1 1/3 cups plain (all-purpose) flour
1/4 teaspoon baking powder
1/3 cup cocoa, sifted
1 1/2 cups raspberries, fresh or frozen* (I used only about 3/4 cup since it was a much smaller pan)

*If using frozen raspberries there is no need to defrost them first. You can also use fresh or frozen blueberries.

Photobucket

Preheat the oven to 180°C (355°F). Place the chocolate and butter in a small saucepan over low heat and stir until melted and smooth. Place in a bowl with the sugar and eggs. Sift over the flour, baking powder and cocoa and mix to combine. Pour into a 23 cm (9 inch) greased square cake tin lined with non-stick baking paper. Top the mixture with the raspberries and bake for 30–35 minutes or until set. Serve warm or cold with thick (double) cream or vanilla bean ice-cream.


Photobucket

Vanilla Frozen Custard (Extra-Rich Ice Cream)
(Adapted from Williams-Sonoma Vanilla Bean Ice Cream Recipe - Book: Ice Cream)
1 1/2 cups half-and-half
1 1/2 cups heavy (double) cream
7 large egg yolks
1/2 cup plus 2 tablespoons sugar
1 tablespoon pure vanilla extract

In a heavy 2-qt saucepan, combine the half-and-half and 1 cup of the cream. Cook over medium heat until bubbles form around the edges of the pan, about 5 minutes.

Meanwhile, combine the egg yolks, sugar, and remaining 1/2 cup cream in a bowl. Whisk until the mixture is smooth and the sugar begins to dissolve.

Remove the cream mixture from the heat. Gradually whisk about 1/2 cup of the hot mixture into the egg mixture, whisking constantly, until smooth. Pour the egg mixture into the saucepan. Cook over medium heat, stirring constantly with a wooden spoon and keeping the custard at a low simmer, until it is thick enough to coat the back of the spoon and leaves a clear trail when a finger is drawn through it, 4-6 minutes, approximately. Do not let the custard boil. Strain through a fine-mesh sieve into a bowl.

Whisk in the vanilla extract. Place the bowl in a larger bowl partially filled with ice cubes and water. Stir occasionally until cool. Cover with plastic wrap, pressing it directly on the surface of the custard to prevent a skin from forming. Refrigerate until chilled, at least 3 hours or up to 24 hours.

Pour the custard into and ice-cream maker and freeze according to the manufacturer's instructions. Transfer the ice cream to a freezer-safe container. Cover and freeze until firm, at least 3 hours or up to 3 days, before serving.

Makes about 1 Quart


Photobucket

Do I have to cut this into bars? I think this one could just be my piece!

Friday, March 21, 2008

Another Shameless Plug! Art You Eat Event - Eggs & Egg Shapes


OK, Easter weekend is here. That means that if you are doing something with eggs, or making something shaped like an egg, now is the time to create it, blog it, post it and email it to me at:

artyoueat AT gmail DOT com for the Art You Eat Event.

Remember, the deadline was extended to the 25th, so that gives everyone time to chime in with your fabulous eggy creations!


For more info on the event go to the Art You Can Eat site.

Thanks!


My New Favorite Thing - Taste & Create VII

Photobucket


Photobucket


I decided to RSVP for the latest round of Taste & Create again. I had such fun the last go around and this is such a fun and unique event. I am so glad that I did because my partner, Michelle, of Sugar & Spice has so many amazing posts. First off, I love, love, love her blog - the name, the layout, the recipes, everything about it is amazing. Without Taste & Create I'm still sure I would have found Michelle's blog, but I'm so glad that this event helped me find it that much sooner.

There were so many things that I wanted to make, and have bookmarked to do so, but when I was trying to figure out what to make, I kept coming back to a TWD recipe for Pecan Sour Cream Biscuits. Now, I know that this item has already been blogged by all the TWDer's back in January, but I decided to give it a go anyway. I had already decided to make a big pot of chili for dinner and I decided, since the chili I was going to make promised to be savory and rich (yes, I add a little bittersweet chocolate to it). These biscuits would be perfect with it. And, oh, I wasn't disappointed. Even with my own little mess up in the recipe (umm, 5 Tablespoons of butter, Holl, not a full stick - whoops - this blog should probably be renamed "cooking while distracted"), these biscuits were still tender, flavorful and amazing.


Photobucket

I think the thing I love most about these biscuits, is well, the pecans and brown sugar. No shocker there that I am a huge fan of both brown sugar and pecans. I think I have proved that already on this blog. Anyway, they were absolutely wonderful with the chili (which I will provide the recipe for as well soon) and aside from that I had a last minute idea to serve the biscuits. I usually slather mine with butter, but this time, since I still have some Dulce de Leche from the other day, I decided to put a little of that on it. All I can say is WOW. I mean, seriously, WOW. Of course, it is no shocker that this would be a natural combination, but still, the result was nothing short of delicious.


Photobucket

So, without further ado, here is the recipe for the biscuits. I will post that chili soon, but I will definately be making these biscuits often.

Thanks to Nicole at For the Love of Food for creating this event and to Michelle over at Sugar & Spice for her lovely blog.

Pecan Sour Cream Biscuits
(Source: Dorie Greenspan “Baking: From My Home to Yours” p.25)

(Makes about 12 biscuits)

2 cups all-purpose flour (or 1 3/4 cups all-purpose flour and 1/3 cup cake flour)
1 tablespoon baking powder
1/2 teaspoon salt
1/4 teaspoon baking soda
1/4 cup (packed) light brown sugar
5 tablespoons cold unsalted butter, cut into 10 pieces
1/2 cup cold sour cream
1/4 cold whole milk
1/3 cup finely chopped pecans, preferably toasted

Getting Ready:
Center a rack in the oven and preheat the oven to 425 degrees F. Get out a sharp 2-inch-diameter biscuit cutter and line a baking sheet with parchment or a silicone mat.

Whisk the flour(s), baking powder, salt, and baking soda together in a bow. Stir in the brown sugar, making certain there are no lumps. Drop in the butter and, using your fingers, toss to coat the pieces of butter with flour. Quickly, working with your fingertips (my favorite method) or a pastry blender, cut and rub the butter into the dry ingredients until the mixture is pebbly. You’ll have pea-size pieces, pieces the size of oatmeal flakes and pieces the size of everything in between– and that’s just right.

Stir the sour cream and milk together and pour over the dry ingredients. Grab a fork and gently toss and turn the ingredients together until you’ve got a nice soft dough. Now reach into the bowl with your hands and give the dough a quick gentle kneading– 3 or 4 turns should be just enough to bring everything together. Toss in the pecans and knead 2 to 3 times to incorporate them.

Lightly dust a work surface with flour and turn out the dough. Dust the top of the dough very lightly with flour, pat the dough out with your hands or toll it with a pin until it is about 1/2 inch high. Don’t worry if the dough isn’t completely even– a quick, light touch is more important than accuracy.

Use the biscuit cutter to cut out as many biscuits as you can. Try to cut the biscuits close to one another so you get the most you can out of the first round. By hand or with a small spatula, transfer the biscuits to the baking sheet. Gather together the scraps, working with them as little as possible, pat out to a 1/2-inch thickness and cut as many additional biscuits as you can; transfer these to the sheet. (The biscuits can be made to this point and frozen on the baking sheet, then wrapped airtight and kept for up to 2 months. Bake without defrosting– just add a couple more minutes to the oven time.)

Bake the biscuits for 14-18 minutes, or until they are tall, puffed and golden brown. Transfer them to a serving basket.

Thursday, March 20, 2008

Raspberry Swirly Goodness

Photobucket

When I signed up for this month's Cookie Carnival I didn't know what the recipe would be. When Kate over at the Clean Plate Club, the event's creator, sent me the recipe I had to laugh because I've been using coconut and raspberries together a lot lately. I have to admit though that I really wanted to fiddle with the recipe because for some reason I just didn't think I would like it. I decided to make them anyway and find out. Thank you Kate for what proved to be an absolutely lovely recipe.


Photobucket

While I didn't entirely love the directions for the recipe I did know that I would have to try at least one cookie. Oh, am I glad that I did. I will be making these again and again. They were nothing short of sublime. This is one of those recipes that blends together beautifully while still highlighting and showcasing the individual flavors and textures at the same time.

These cookies are definatelly worth a try - as is, no changes needed. While I can still think of some other variations that I'm sure will be lovely, this one has me hooked. Use the best quality ingredients you can because their flavors will shine through. The cookies were soft with a little bit of a nice sugary crispness on the browned edges.

Aidan was the one that wanted cookies, so here he is enjoying the spoils. That is one happy boy!

Photobucket

Raspberry Swirl Cookies
Bon Appétit February 2004

Makes 2 dozen

Ingredients
2 cups all purpose flour
1 teaspoon baking powder
1/4 teaspoon salt
1/2 cup (1 stick) unsalted butter, room temperature
1 cup sugar
1 large egg
1 teaspoon vanilla extract
1/2 cup raspberry jam
1/2 cup sweetened flaked coconut
1/4 cup chopped toasted walnuts

Preparation
Sift flour, baking powder, and salt into medium bowl. Using electric mixer, beat butter in large bowl until smooth. Add sugar and beat until blended. Beat in egg and vanilla. Add flour mixture and beat until moist clumps form. Gather dough into ball. Flatten and shape into rectangle. Wrap in plastic and refrigerate until cold, at least 1 hour. (Can be made 1 day ahead. Keep refrigerated. Soften dough slightly before rolling out.)

Roll out dough on lightly floured surface to 13x10-inch rectangle (about 1/4 inch thick). Mix jam and coconut in small bowl to blend. Spread over dough, leaving 1/2-inch plain border. Sprinkle nuts evenly over jam mixture. Starting at one long side, roll up dough jellyroll style into 13x2 1/2-inch log (I used a long clean ruler to help me pick the dough "up" while rolling to keep it from tearing. I think it would even be a good idea to roll the dough out on the plastic wrap directly.). Wrap in plastic and chill 30 minutes.

Preheat oven to 375°F. Line 2 baking sheets with parchment paper. Unwrap cookie log; cut 1/2 inch off each end and discard. Cut remaining log crosswise into 1/2-inch-thick rounds. Arrange rounds, cut side down, on prepared sheets, spacing 1 inch apart; reshape into neat rounds, if desired. Bake cookies until edges and bottom are golden, about 20 minutes. Transfer cookies to racks and cool.

Photobucket

Tuesday, March 18, 2008

Ding Dong... Who's There? More Cake.

Photobucket

Well. More cake. Hmmm. More chocolate too. Why? To be honest, I don't know why I've been craving so much cake, but I don't mind eating it. However, there was a method to my madness this time. Besides, as far as I'm concerned chocolate is its own reason and never needs an excuse. That must be why I recently made this and this too.


Photobucket

When I was growing up I loved Ding-Dongs. Every now and then, even though I know they are going to be a dry, waxy chocolate disappointment to me now that I've had good cakes, I still have to have one. During our recent hospital stay while Cole was in the NICU I had to "board" in one of the hospital rooms to be near him. Between the NICU and me was a vending machine. There really wasn't that much in it that was good, but when you have been starved for seven months anything sounds good, and I was ravenous. They still weren't what I wished they could be... until now.

Ever since I read this post over at Smitten Kitchen I haven't been able to stop thinking about attempting to make my own Ding-Dongs. Then I could use the good ingredients that the packaged kind were missing and, hopefully, satisfy my craving. I also saw an idea for using your measuring cups for something other than measuring. Baking cakes in them. Since the idea came from Thomas Keller, it seemed like a good idea. Unfortunately, now I can't find that post to save my life. Anyway, it was a darling idea and knew I would have to try it.

What you see here is the result of both experiments. Cole is five months old now (3 1/2 months corrected age) and we are planning a family "debut" party for May when we are finally able to leave the house after this dreadful winter. So, I'm testing all kinds of things that could be served for the party and dreaming of summer. See, here's the metod to my madness that I promised (umm, yeah, that's it). Thus, all the cupcakes lately.

You can go to Smitten Kitchen for the original recipes. The only change I made was the pans and, of course, I still had to omit the coffee - I just used hot water - sigh. This is a supermoist cake! While the original made two 10-inch round cakes (that's alot of batter!) I ended up making six measuring cup cakes, 12 regular cupcakes and one 9-inch round, which I froze for later use.

So, here is what I did.

First I took a sheet of parchment paper and placed all 6 measuring cups onto the sheet then traced them and cut them out inside the lines.

Photobucket

Then I buttered the inside of each cup. Then I placed each round into its cup and buttered and floured that as well.

Photobucket

Fill each cup to barely half full with batter (I put in too much and they overflowed and sunk).

Photobucket

Here is a closer picture of the batter.

Photobucket

Here are the cakes. Since they are all different sizes keep an eye on them. The smallest took about 20 minutes at 300 degrees F. The biggest took closer to 50 minutes. Allow them to cool in the pan, then remove to rack to cool completely.

Photobucket

Here are the cakes, over a baking dish to catch the ganache after it is poured over the cake.

Photobucket

Here is the ganache glaze for the cakes. I didn't wait for it to cool very much since I wanted it to pour down the sides.

Photobucket

Then I lifted the cakes with a small spatula and plated them on a platter with some cocoa powder.

Photobucket


Then I piped on the marshmallow frosting.

Photobucket

Let the cakes chill to harden the ganache before serving.

Blog Widget by LinkWithin