PheMomenon has moved!

You should be automatically redirected in 5 seconds.

If not, please visit http://www.phemomenon.com and update your bookmarks and RSS feed.

Tuesday, July 28, 2009

TWD: Vanilla Bean Ice Cream Profiteroles with Hot Fudge Sauce


Lynne of Cafe LynnyLu decided on Vanilla Ice Cream for this week's Tuesdays with Dorie recipe. I wasn't sure if I was going to try to make this because a few weeks ago, when we made the Honey Peach Ice Cream, my ice cream maker pretty much died on me. The motor itself is fine, but the bowl leaked out most of the freezing liquid. I decided to give it one last shot and see if it could make it. The ice cream maker is now officially 'dead' (the bowl anyway). It was only slightly churned and somewhat runny, so the texture wasn't as creamy as it could have been. The vanilla bean was nicely prominent in the flavor of the ice cream and the custard itself wasn't difficult to make.


I decided to make profiteroles out of the ice cream. I used the choux pastry recipe from the Daring Baker Eclair challenge a while back. It is delicious and fairly easy to work with. I used Dorie's recipe for Hot Fudge Sauce from the back of the book and it was easy and delicious as well.

Make sure to check the Tuesdays with Dorie blogroll to see everyone's ice cream variations this week!


Cream Puff Dough / Pâte à Choux

Source Pierre Herme

  1. Preheat your oven to 375 degrees F (190 degrees C). Divide the oven into thirds by positioning the racks in the upper and lower half of the oven. Line two baking sheets with waxed or parchment paper.
  2. Fill a large pastry bag fitted with a 2/3 (2cm) plain tip nozzle with the warm cream puff dough. Pipe the dough onto the baking sheets in 1-inch rounds. Leave about 2 inches (5 cm) space in between each dough round to allow them room to puff. The dough should give you enough to pipe 30 puffs.
  3. Slide both the baking sheets into the oven and bake for 7 minutes. After the 7 minutes, slip the handle of a wooden spoon into the door to keep in ajar. When the puffs have been in the oven for a total of 12 minutes, rotate the sheets top to bottom and front to back. Continue baking for a further 8 minutes or until the puffs are puffed, golden and firm. The total baking time should be approximately 20 minutes.

Wednesday, July 22, 2009

TWD: Strawberry Blanc-Manger


Well, I'm a day late, so this is really my Wednesday with Dorie, but you get the idea. I finally decided on Tuesday afternoon to just try to put the blanc-manger together. I didn't have any raspberries on hand so I used some strawberries instead. I put together two small ramekins making only a 1/4 recipe (thanks to converting to grams and ounces). I think I may have incorrectly converted the almond meal though since there was quite a bit in mine, but who knows.

While the dessert was different than I expected, it was a happy difference for me. I expected it to have a real "gelatin-y" texture to it which I wasn't looking forward to. Instead it was creamy and light with just some texture from the almond meal and strawberries.

So, while it wasn't something I will probably make again, I'm glad that I went through with it and found out it wasn't what I expected.

This week's recipe was chosen by Susan at Sticky, Gooey, Creamy, Chewy, where you will find the recipe. Make sure to check the Tuesdays with Dorie blogroll for more versions!

Monday, July 20, 2009

Honey Vanilla Yogurt Panna Cotta with Strawberries


I don't know about where you are, but here in Utah, it is hot. Actually, it is more like HOT! The average temperature lately seems like it has been in the mid to high 90's and that is just in the Northern part of the State - I'm sure that Southern Utah is beyond sweltering!

Though ice cream is a wonderful choice for dessert any time as far as I'm concerned, it seems that sometimes you just want something a little different. Why not give panna cotta a try?

It is smooth, creamy, tangy, a little sweet, cool and refreshing. It is made more creamy and tangy by the use of some great Organic Greek Yogurt with the Oikos brand from Stonyfield Farms. I was contacted by Stonyfield Farms recently and asked if I would like to give this a try and use it to make something. The email literally came to me on the day I was looking at this recipe, so it seemed kismet. Using the yogurt makes this version even pretty good for you as far as desserts go.

If you are looking for a dessert that looks elegant, but takes the absolute minimum amount of time in the kitchen (aside from chilling) and no oven time at all, then this the dessert for you! I went ahead and topped our little servings with some strawberries that I sliced and soaked in some sugar and vanilla for a few minutes. You could really change up the fruit to whatever you would like - a mixture of berries, sliced peaches, plums, mango, whatever you like best - for a delicious summery treat.


Honey Vanilla Yogurt Panna Cotta with Strawberries

Adapted from Bon Appétit

Yield: Makes 4 large servings or 8 small servings

1/8 cup water
1 1/4 teaspoons unflavored gelatin
2/3 cup whipping cream
1/4 cup sugar
1 cup Greek Yogurt, Oikos Honey flavored or other flavor
1/2 teaspoon vanilla extract

Strawberries for topping, tossed with a little sugar and vanilla to taste, if desired

Pour water into small bowl; sprinkle gelatin over. Let stand 10 minutes. Bring cream and sugar to simmer in heavy medium saucepan over medium-high heat, stirring until sugar dissolves. Remove from heat. Add gelatin mixture and whisk until dissolved. Whisk in yogurt and vanilla. Divide mixture among your desired serving dishes. Cover and chill overnight. (Can be made 2 days ahead. Keep refrigerated.)


Cut around edges of each panna cotta to loosen. Set each cup in shallow bowl of hot water for 10 seconds. Immediately invert onto plate. Top with fruit.

Tuesday, July 14, 2009

TWD: Brioche Plum Tartlet


This week was almost the first week I really thought I just wasn't going to be able to make the recipe happen for Tuesdays with Dorie. It would have been the first time I've missed a week since I started back in April '08 and I was really sad at the prospect. I sent out a tweet to my friends on Twitter and got back the support and encouragement I needed to just go for it. The recipe this week was chosen by Denise at Chez Us, and I'm glad I didn't miss out.

I've made brioche before - which is why the amount of time I needed to make it was worrying me. I really wanted to make this recipe because it was just so intriguing to me to be using the brioche dough as a tart crust. It was that time commitment which just seemed to be out of my realm of possibility this week. It was yesterday afternoon when I sent out my tweet and had my friends give me just the boost I needed.

Yesterday was my oldest son's 6th birthday and I just didn't know when I was going to fit this in. Thank you Kayte, Caitlin, Nancy, Tracey and Di for being there to give me just the boost I needed! Tuesdays with Dorie is an amazing group - and I'm telling you people, when you add that to the power of Twitter, incredible things happen!


I threw the brioche together in my KA mixer yesterday while I was making dinner. After we ate I put the dough in the fridge and ignored it until I could do something with it this morning. I made the entire brioche recipe (because I figure I'll find something to do with it) and only made one small little 5-inch tart. I used what I had on hand for the filling and just let the chips fall where they may.

My filling consisted of seedless black raspberry jam, two little plums I got from my friend Lisa (check out her new food blog at - cutest word EVER - Gourmified - I made the header for her so I'd love to know what you all think). I then sprinkled a few sliced blanched almonds I got from Oh Nuts! and some sugar for the topping.

This tart really did remind me of the Bakewell Tarts we recently made for Daring Bakers, but overall, I still preferred the Bakewells - probably more than anything though just because of the almond cream. While the brioche dough did take a long time before it was ready - the actual active time on my part was miniscule. I am so glad that I have great foodie friends who encourage me!

Make sure to check out the Tuesdays with Dorie blogroll for oodles of variations and fillings!


Sunday, July 12, 2009

Moms Who Make It Conference Ticket Winner


Congratulations go to Catherine at Fahrenheit 350 who left comment #2:

Fahrenheit 350° said...

I'm grateful that my husband has a job. it breaks my heart to hear everyday of someone losing their job, or getting their pay cut!

Thursday, July 9, 2009

BBA #7: Cinnamon Rolls and Sticky Buns


For round 7 of the Bread Baker's Apprentice Challenge I decided I didn't want to choose between making the cinnamon rolls vs the sticky buns because I really love them both. It was easy enough to just cut my log of dough into 12 pieces (just under 1 1/2-inches each roughly) and to bake six as cinnamon rolls and use the other six for sticky buns.


I then made a half batch of the caramel glaze mixture and placed it in the bottom of a 9-inch round pan, placed the rolls, covered, held them in the refrigerator overnight. All I had to do was get up a bit early the next morning and sit them out on the counter for a couple of hours to rise.


While this dough was delicious, and a joy to work with, I really preferred them as the sticky buns because I really didn't particularly care for the lemon zest in the dough. I liked it - but just ok. I wouldn't probably put it in again - though I WILL switch it to orange next time and turn these into orange rolls instead with an orange cream cheese glaze.


The dough was tender, easy to make, easy to work with and the sticky bun glaze was easy to make and really delicious!

Wednesday, July 8, 2009

Win Two Tickets to the Moms Who Make It Conference!


If you have been following any of the Backstage Bloggers (aka the Sexy Six) in the past day or so then you probably have already seen or heard that the mini-class tickets and all-day tickets for the Moms Who Make It Conference have SOLD OUT! Holy Cow! I can't begin to tell you how excited I am that I get to meet, mingle and get inspired with so many great women next week!

What you may not have realized is that you can still come to the afternoon/evening session of the conference and hear some amazing speakers and get really inspired to be empowered and change your life for the better. To be honest, as excited as I am about the amazing selection of mini-classes and being able to attend the conference all day, I am really looking forward to the afternoon and evening as well. The dinner is going to be awesome (let's face it - we all know I think about the food a ton!) but aside from that it is an opportunity to learn from some amazing women about how to take what life throws at us (which is a LOT) and not let our circumstances dictate who we are.

That is why I am so excited that the amazing gals at CreatedbyMom.com and all the sponsors of the conference are making it possible for us Backstage Bloggers to win a pair of tickets to the ENTIRE DAY OF THE CONFERENCE - meals included AND you get to attend the mocktail party afterwards as well. It is going to be amazing!

Obviously, you need to be able to attend the conference (in South Jordan, Utah on July 16, 2009) but other than that all I am going to ask is one thing enter to win the pair of tickets here. Just name one thing - simple, complicated, big, small, whatever - that you are grateful for right now.

It is really for me, because I know I have the most amazing, talented, passionate and wonderful readers and frankly, I can use all the reminders of why I should be grateful that I can get. So, please, make sure to leave an email address or way for me to contact you. You can enter until this Saturday, July 11th at midnight MST and I will announce the winner on Sunday. Oh, and by the way, if you already purchased tickets, they will reimburse you for them if you win.

Want to really up your chances? Check out the other Backstage Bloggers for more chances to win tickets from them! And if you don't win, remember - there are still tickets for the afternoon session available!

April at Sweet Life in the Valley
Lauren at SuperMom Central
Joanie at Keeping Up with MOM
Vanessa at I Never Grew Up
Evonne at Sell Party of...

BBA #6: Ciabatta

I made the poolish version first, found it delicious and easy to work with.
I did use some milk in the dough as well, as one of the options.

Sometimes life just happens in funny ways. Sometimes bread is just made in funny ways. Sometimes bread just looks kind of funny. In this instance, that is pretty much what this Ciabatta bread was all about for me.

The sixth recipe section in the Bread Baker's Apprentice Challenge is the Ciabatta, which had several different options for how to make it. I have actually made Ciabatta a few times in the past, but these recipes were vastly different than the one I used before. The funny thing about this for me is the fact that I am just now finally posting this bread. You see, I actually made this in week one - but the past few weeks have just been filled with other things going on and I am just finally getting around to posting this. Thankfully, I'm not the only one!

What is funnier to me is that I actually made this twice since we started the challenge. You know, sometimes things just work out that way. So, since it is very late at night and I just don't want to wait any longer before I get this going (because I have the next challenge all ready to post too!) I am just adding my rather weak thoughts and notes about the Ciabatta bread under each photo and hope you will forgive my total lack of writing prowess and wit tonight.

Perfect holes and beautiful texture - this tasted soooo good!

Ciabatta made with biga mixture - didn't go so well and didn't taste as good to me.

The loaves I made with the biga were more difficult to work with and didn't end
up with the proper texture at all - probably more my fault in not handling gently
enough or something, but I really didn't like this version.

Totally just personal preference for me here but I loved the version made with the poolish. It was easy to work with, turned out just right, tasted lovely and we really enjoyed it. The biga was not quite as easy to work with for me and I really didn't enjoy the results for all the extra steps that were involved.

We ate the first loaves from the poolish with butter and just scarfed it down. The other loaves we turned into french toast since the texture was already rather heavy anyway. I will definitely make the poolish version again in the future!

Tuesday, July 7, 2009

Moms Who Make It - Almost Sold Out!


I can't believe that the time for the Moms Who Make It Conference is almost upon us! You still have a few hours left to get your tickets to the upcoming conference at the lower price (price goes up at midnight tonight (Tuesday) MST!).


In fact, if you haven't gotten your tickets yet, you need to hurry because they are selling out fast! The mini-class and full-day tickets are almost gone! There are still some available and there are still many tickets available for the afternoon/evening portion of the event - this is when the main keynote speakers will be talking about women, business and how to take the hardships life throws your way and turn them into positive experiences - the afternoon/evening session is nothing to be missed!


Go get your tickets now!

TWD: Tribute to Katharine Hepburn Brownies


I'm always excited when the recipe for the week involves chocolate, but when it comes in the form of a brownie - well, then I'm ecstatic!

My thanks go out to Lisa of Surviving Oz, winner of the logo contest and friend of our very own Jaime at Good Eats & Sweet Treats, chose this week's recipe - the Tribute to Katherine Hepburn Brownies. My thanks also especially go out to Dorie for including them in the book in the first place! These are just our kind of brownies - when we want one with stuff in it that is. If I am going for a just chocolate brownies, I will probably still turn to the ones from Baked.

The brownies which Dorie dubbed a tribute to Katharine Hepburn are a version of a recipe she tweaked. I did a Google Search for Katherine Hepburn brownies and got over 9,000 results. Safe to say there are probably many, many versions of the recipe that she was reported to have used out there already. Now this week, there will be several more variations from the other TWD Bakers!


Thank you Katharine for making pants stylish!

Love has nothing to do with what you are expecting to get -
only with what you are expecting to give - which is everything.

Katharine Hepburn


My take on these brownies was to undo a few of Dorie's tweaks - really just personal preference because I'm sure that the addition of the coffee and cinnamon are lovely. When I was making the brownies I left the coffee out because we just don't use it, and the cinnamon because I didn't feel like it. I also realized that I was short on chocolate to put in the brownies so I subbed toffee chips.

So, the low down on my brownies was cocoa, butter, sugar, eggs, a bit of flour, etc. + walnuts, chocolate and toffee chips as my mix-ins. They were a breeze to make and bake for me. I baked them the allotted amount of time with no problems and did bake them in a metal pan that I lined with a parchment sling. I allowed them to cool for probably about 45 minutes before ever trying to cut them. They were nicely fudgey and moist, but not gooey as some others experienced. All in all, I really enjoyed these - especially the ease of making them, and the fact that I wasn't faced with a huge batch - just a little 8x8 square pan's worth - and I know I will be making these again.

After recently reading up on high altitude baking (due to some terribly spreading chocolate chip cookies) I've started to realize that in some situations the recipe and directions may just not coincide with where I/you/we all live and really be no fault of the recipe at all.

Case in point, the recipe for the chocolate chip cookies that basically melted on me, was from the Baked book - assuming that the recipe was created at the Baked shop in the Red Hook area in NY - as well as the main three places I think Dorie probably created and tested her recipes - Paris, New York and Connecticut which are all basically at Sea Level (or less than 100ft elevation) and I am at roughly 4,300ft and it becomes fairly obvious that there can be quite a discrepancy there. It was actually just this past week (yes, after living in Utah for almost 12 years) that in a conversation on Twitter with another local food blogger, Barbara at Barbara Bakes, that she pointed out that perhaps this was my problem. I am a bit chagrined to admit, that because I moved down a couple thousand feet, I just never gave it much thought and haven't adjusted for high altitude in years most of the time. Usually, things have turned out fine, but I think I'm really on to something now about those things that have been going awry on me. Thanks Barbara!

So, I suggest if you have problems, and perhaps like me, thought that maybe you didn't need to worry about high altitude baking (seriously, I thought for a while that for the most part I was in the clear - after all, I used to live at almost 7,000ft - you might want to review this information on the King Arthur Flour website and see if any of it helps when a recipe gives you trouble.


Sunday, July 5, 2009

Fresh Cherry Limeade & Winner of the Pace Giveaway


I know there are still lots and lots of people out there who haven't been converted to the joys of Twitter - and to be honest, I know a lot of people just wonder what the point is altogether. If you, like me, have a targeted audience that 'follows' you and that you 'follow' then I think the beauty of Twitter is the access to people with your same interests.

The story of this Fresh Cherry Limeade is the perfect example of the reason I use Twitter. This creation, though the final measurements came together from my experimenting, was actually born last Friday through the information, expertise and efforts of myself and several other foodies who all chimed in to help. I can't take full credit for this recipe, because I couldn't have done it without these ladies. Here are the tweets that bring you this fantastic and refreshing drink.

My thanks go out to @HighChair @tspegar and @jo_jo_ba for answering my call! I really was stumped in finding what I wanted and you ladies helped me through! I think the only original addition to this drink (which really was quite the awesome addition if I do say so myself) was the vanilla in the syrup - which, even then was confirmed by my girls. I love you all and just can't say it enough!

I even had several requests for the recipe already and emailed it out - I know for a fact that @FieldsofCake has already made it and taken some stunning pictures (waaaay better than mine) and is posting her version which is a bit stronger flavored than mine. Mine was smooth, a little sweet, a little tart but not super strong (there were kiddos I knew wouldn't want it stronger - though some adults did). So, use your own judgment and decrease the water or increase your limes and cherries accordingly.

Here are the tweets that bring you this fantastic and refreshing drink:

PheMom: CALLING ALL FOODIES: Anyone made cherry limeade from scratch? I'm not finding any recipes so far using fresh cherries & limes.

HighChair @PheMom No idea, but I would haul out my juicer for those cherries.

@HighChair No juicer, but I'm thinking of pitting, pureeing and straining. Then making simple syrup w/ van bean then combine all?

HighChair@PheMom Vanilla would be amazing with the cherries. I would hold the lime juice until the very end, just before serving

tspegar@PheMom i love to juice 6 limes/2 gal water, add 1 1/2C vanilla simple syrup and chill 2 hours. pit cherries and puree. add puree mixture

jo_jo_ba@PheMom I used to do a lime-zest flav simple syrup, freeze then thaw 1/2 cherries + puree, add whole ones to pitcher + soda, syrup

tspegar@PheMom oh! :) haha... i use 2-3C cherries... i love cherries! if you use 3C, i would cut the simple syrup to 1C to allow the lime tartness.

@tspegar thanks! Can't wait to make this today now!

tspegar@PheMom i think i might too :) sounds good now...mmmmm

jo_jo_ba@PheMom it was an experiment a few summers ago and it worked! Love it

jo_jo_ba@PheMom it's nice with gingerale too

Thanks again ladies! Couldn't have done it without you!

Now tell me, where but on Twitter could I have instantly created a recipe with three other gals when there was no other resource to be found for what I was looking for?

Fresh Cherry Limeade Recipe
Makes just under 2 gallons

First make the simple syrup:

Vanilla Bean Lime Infused Simple Syrup

2 C water
2 C sugar
Zest of 4 limes or 1 T tightly packed zest
1 whole vanilla bean, split lengthwise and scraped and cut into 2-inch pieces

Stir sugar and water together in a medium saucepan till the sugar dissolves, add the vanilla bean pieces and bring to a low boil and allow to thicken a bit and add the zest, stirring. Simmer 1 minute more and remove from heat and allow to cool and steep with zest and vanilla bean.

1 C fresh lime juice - 7 limes for me - strained

3 C whole pitted sweet cherries
1/4 C sugar

Purée til smooth and liquid strain to make about 1 C thick juice

Combine cherry puree, lime juice, simple syrup and divide in half to make two batches. 1 batch = 6 cups cold water to half the cherry lime mixture - 12 cups water total for full batch. Serve in sugar rimmed glasses on ice.


And the winner of the giveaway from Pace is Rebecca who said:

Rebecca said...

I would just throw it in the crock pot with pork as well. I'm a no frills cook, and that is one of our favorite meals. We put it in tortillas with a little bit of cheese, some tomatoes, and sour cream. MMmmmmmmm

So, Rebecca, please send me an email with your full name and mailing address and we will get your prize package of salsas and picante sauces on their way to you!

Friday, July 3, 2009

GNO Pizza Party + Nominate a Mom


If you have ever been on Twitter on a Tuesday evening and seen lots and lots and lots of #GNO hashtags start popping up like crazy then you may have wondered what is going on. Of course, most of us know that GNO stands for Girls Night Out. What you may or may not have known was that #GNO is a weekly virtual night out with the girls - featuring tons of great information and wonderful people.

A couple of weeks ago, at the first tweetup for the Moms Who Make It Conference I was lucky enough to meet Jyl of Mom It Forward - the genius behin the #GNO phenomenon. She is a wonderful lady, and if you live anywhere near the Wasatch Front then you should head to Rock Creek Pizza next Tuesday, July 7th from 7pm to 9pm to meet Jyl and many more fun ladies to tweet and eat with. You can see more at the event page on Facebook and RSVP as shown below. If you can't attend in person, you can still tweet with #GNO and be part of the virtual party and fun!

Here is what Jyl had to say about it:

Hi gals! Want a little "me" time—a night out with just the girls? Want to meet other local mom bloggers and women in social media? If you blog, tweet, use facebook, text, and love chatting with other women that do too, this event is for you. (This event is all about fun. Party only! No requirements!)

What: Pizza Party!
Where: Rock Creek Pizza (1276 West 12600 South in Riverton... just west of the 12300 exit off of I-15)
When: Tuesday, July 7 from 7-9 p.m.
Who: You and any of your favorite girlfriends! Feel free to invite others :).
Cost: The price of your dinner (Enjoy a 25% discount!)
Bring (Optional!): If you'd like to participate in the #GNO Twitter party, please feel free to bring your laptop or phone. Rock Creek Pizza offers free wi-fi. We're happy to teach you the Twitter ropes real time too!

This party is sponsored by Quinn from http://createdbymom.com and hostess of the Moms Who Make It conference and moi!

Please RSVP by visiting our Facebook Group here: http://www.facebook.com/event.php?eid=138013805504&ref=mf. Or, search for the group in Facebook under this name:

Girl's Night Out - #GNO IRL "Me Time"

Hope to see you there!

Jyl
Mom It Forward
http://momitforward.com


DO YOU KNOW A MOM WHO IS MAKING IT?
Send in your nominations for your favorite inspirational mom who spreads joy, uplifts, creates and is just all around wonderful - she could be one of the 10 lucky winners who will be honored at the Moms Who Make It Conference evening session and receive some great swag plus entrance to the exclusive VIP mocktail after party. To make a nomination go here!

Catering Review for the Moms Who Make It Conference


Earlier this week I mentioned that I would have more information to share about the food at the upcoming conference. What I actually have for you is a recipe from Chef Steven Swallow, of Utah Celebrations Catering, for one of their most popular menu items - the Chicken Marsala.

We got to sit down with Lani, the owner, event coordinator and wedding planner for Utah Celebrations Catering and have a great chat about their company too. I loved their philosophies of making their dishes from scratch and from the freshest and best ingredients available. I also loved that this company has been a long time dream - now come true - for her. You can really tell the difference when someone is truly passionate and cares about you, your event and what they do - that is Lani and Chef Steven to a T.

Utah Celebrations Catering will be providing a delicious and fun dinner buffet for the Moms Who Make It Conference! Seriously, where can you get dinner for that small an amount - especially a dinner selection of Chicken and Beef Fajitas on fresh, hot tortillas and also some luau type selections like their Kahlua Pork.


They have many other menu selections for your event - you want a carving station with some delicious beef? The chicken marsala? How about a crepe station with all the decadent fixings for your dessert table - or maybe, like me, you get a serious kick out of anything set on fire and want to have the bananas foster station. You can choose any of those options, and more!


I didn't get a great picture of it, but even their drinks are delicious - probably one of my favorite items of the night was their peach lemonade - I am usually the person who just drinks water, water and more water - but that peach lemonade was sweet, a little tart, cool, refreshing and dreamy.


Chicken Marsala
Source: Utah Celebrations Catering, Chef Steven Swallow

4 Boneless, Skinless Chicken Breasts, Trimmed
2 teaspoons salt
Flour, for dredging

2 Tablespoons Unsalted Butter
1 Tablespoon Garlic, minced
1 Tablespoon Shallots, minced
1 Cup Sweet Marsala Wine
1 Cup Heavy Cream
1/4 cup Parmesan Cheese, grated
1 Tablespoon Fresh Basil, finely chopped
Salt to taste

Preheat oven to 350 degrees F. Season chicken breast with the salt and dredge in the flour. In a saute pan on high heat, melt the butter and add the chicken. Sear till the outside is golden brown, remove from the pan and place the chicken in a baking dish and place in the oven to finish cooking through, approximately 15 to 20 minutes. In the same pan the chicken was seared in, over medium heat, sautee the garlic and shallots until just slightly golden brown. Add the wine to the pan with the garlic and shallots and deglaze and reduce till a syrup consistency is reached. Add the heavy cream and reduce the sauce until it coats the back of a spoon and leaves a line when a finger is drawn through the sauce. Add the Parmesan cheese and basil and salt to taste. Pour sauce over the chicken and enjoy.

Thursday, July 2, 2009

Slow Cooked Shredded Pork - Infinite Possibilities


Slow Cooked Shredded Pork, Shredded Cheese, and Fresh Cilantro on Corn Cup "Gorditas"

Probably my most favorite way to cook a pork roast is in the slow cooker or crock pot and my favorite way to cook it is to just add a couple of simple things - salsa and brown sugar. Since you basically just put everything in the pot and walk away, it is a perfect choice for any upcoming parties for the Independence Day holiday - and believe me, everyone is going to love you for making it and you get to enjoy the day instead of being in the kitchen all day!

Recently, Nicole at M80 asked if I would like to try a sample of Pace's new specialty salsas I jumped at the chance because I had this recipe on my mind. I also realized that I have never shared with you how to do this so the timing couldn't have been more perfect.

Pace has actually always been the brand of salsa I buy. It was what I grew up on. Surprisingly though, I really don't just eat salsa - it is always something I use in something else. The perfect example is this recipe. It just doesn't get any easier than this! Start it in the morning and by dinner time you have infinite possibilities of what to do with it.

I chose to use the Pineapple Mango Chipotle Salsa from Pace's new line of specialty flavors this time around and it really added a nice sweet undertone to my usual recipe. The really great thing about this recipe is that you can do this with chicken or beef too. The chicken will take a lot less cooking time, but a beef roast takes about the same amount of time. It will all depend on your cut of meat. I use a pork loin roast because it doesn't have too much fat. If you use a cut with more fat, your cooking liquid will be too fatty to make a good sauce.

I say that this recipe has infinite possibilities because, once you have the shredded meat, there is just no limit to what you can do with it. I like to just eat it with a little cheese and sour cream in some fried corn tortillas, or you could make corn up "gorditas" as in the first picture. You could use it on pizza, nachos, in burritos or enchiladas, on a salad or on a sandwich bun. It is really up to you.

If you would like to WIN 2 bottles of salsa - 1 Specialty flavor and 1 Picante sauce - plus a recipe guide and a coupon for a free 16 oz jar of Picante sauce or salsa - from Pace just leave me a comment and tell me an idea for what you would do with your salsa. The winner will be chosen by Random.org on Sunday, July 5th.


Slow Cooked Shredded Pork
Original Recipe by Holly

1 3lb pork loin (not tenderloin) roast
1 bottle Pace Pineapple Mango Chipotle Salsa
1/2 cup packed light brown sugar
Optional for added sweetness and flavor 1 can cola

Place the pork loin roast in the crock pot and pour the other ingredients into the pot on top of the roast. Allow to cook on low for 8 hours or until the roast falls apart and shreds easily. Add the shredded pork back into the pot with all the good juices and salsa liquid and serve warm on warm tortillas or as desired.

Recipe for Corn Cup "Gorditas"

Wednesday, July 1, 2009

Red, White & Blue Tie Dye Cookies

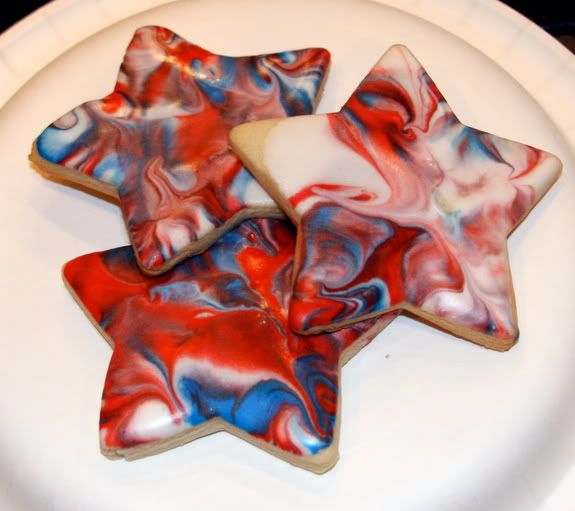
Red, White and Blue 'Tie Dye' Cookies - a fun and easy treat for Independence Day!

Last night's hype party for the upcoming Moms Who Make It Conference was a success if I say so myself! The moms got to mingle and chat, kids got to play at Gardner Village and decorate star shaped sugar cookies and have a great time.


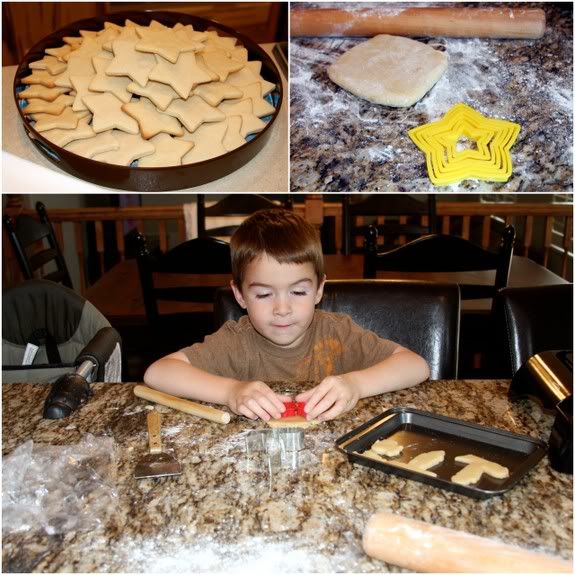
As you can see from my son's smile, he loooooves sugar cookies. This is our favorite way to decorate them because (1) he can do it himself and (2) no piping for me to mess up!

Besides, the effect is so pretty!


He also dearly loves getting the scraps to roll out at home and play with.

Lauren of SuperMom Central helping decorate cookies

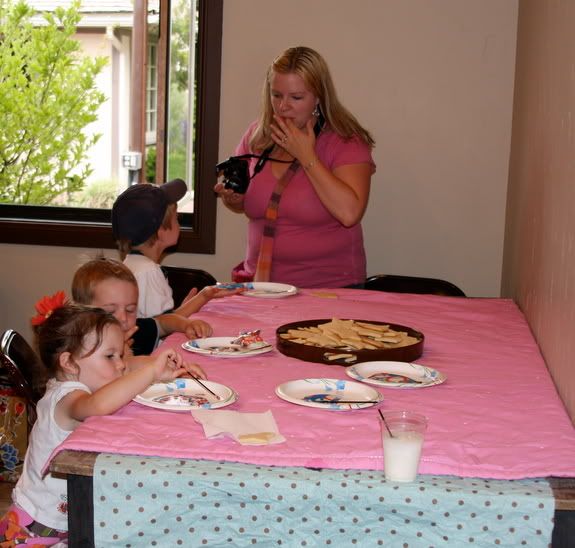
The kids seems to get a kick out of swirling their frosting colors together and then dipping their cookies to decorate them - before eating them while the frosting was still wet.


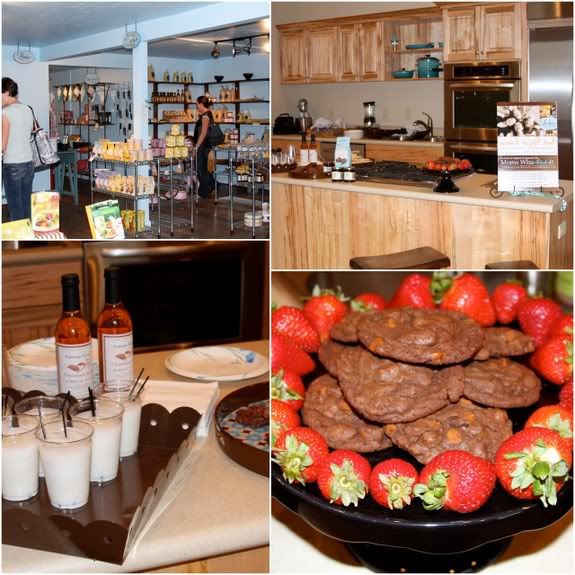
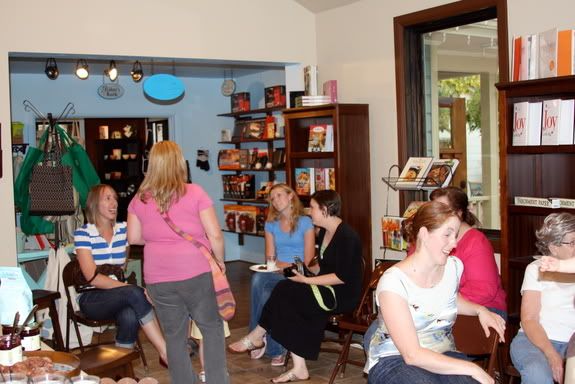
While the kids dipped and ate some cookies, the moms got to enjoy some chocolate fudge cookies with cinnamon chips, cinnamon italian sodas, fresh strawberries, and chocolate hazelnut scones with blackberry jam - all provided by Tiffany, the fabulous owner of Lorken Food Finery. In fact, the scones, jam, and cinnamon syrup for the sodas are all items available at her store!

All of the 'Sexy Six' Backstage Bloggers were present - I just didn't get pictures - but it is always so fun to hang out with these ladies. They are so inspiring and such a joy! Speaking of inspiring ladies who are a joy, it was so great to see Emily and Quinn again!


Perhaps, my most favorite part of the evening though was the fact that Tiffany gave all of us a discount on items purchased that night at buy one, get one half off. I can't wait to tell you more about what I scored! I am sooooo excited! Besides, how could you not be happy shopping in a store as cute as this!


Vanilla Roll-Out Cookies

  • 10 tablespoons (1 1/4 sticks) unsalted butter, room temperature
  • 1/2 cup sugar
  • 1/4 teaspoon salt
  • 1 large egg
  • 1 1/4 teaspoons vanilla extract
  • 2 cups all purpose flour

Using electric mixer, beat butter in large bowl at medium speed until smooth and creamy, about 2 minutes. Add sugar and salt and beat until pale and fluffy, about 2 minutes. Add egg; beat until well blended, about 1 minute. Reduce speed to low and beat in vanilla. Add flour and beat on low speed just to blend. Gather dough into ball; divide in half. Form each half into ball and flatten into disk. Wrap disks separately in plastic and chill until firm, at least 4 hours. DO AHEAD: Can be made 2 days ahead. Keep chilled.

Position rack in center of oven; preheat to 350°F. Line 2 baking sheets with parchment paper. Working with 1 disk at a time, roll out dough between 2 sheets of waxed paper to 1/8-inch thickness for smaller (2-inch) cookies and 1/4-inch thickness for larger (3- to 4-inch) cookies. Using decorative cookie cutters, cut out cookies and transfer to prepared sheets, spacing 1 inch apart. If cookies become too soft to transfer to baking sheets, place in freezer on waxed paper for 5 minutes before continuing. Gather scraps, roll out dough, and cut more cookies, repeating until all dough is used. If not icing cookies, decorate with sprinkles or other sugar toppings, if desired.

Bake 1 sheet at a time until cookies are firm on top and golden around edges, about 10 minutes for smaller cookies and up to 14 minutes for larger cookies. Cool completely on rack. Decorate with Royal Icing, then sprinkles or other sugar toppings, if desired. Let stand until icing sets. DO AHEAD: Can be made 4 days ahead. Store between sheets of waxed paper in airtight containers.

Royal Icing

3 1/4 cups (or more) powdered sugar, sifted
4 teaspoons meringue powder + 4 Tablespoons water = 2 egg whites (easier to work with and safer for kids)
1 teaspoon pure vanilla extract

Assorted food colorings (optional) - I use gel food colors to get the vibrant shades seen here

Using electric mixer, beat 3 1/4 cups powdered sugar with meringue powder and water until thick and shiny, adding more powdered sugar by tablespoonfuls if mixture is too thin to spread, about 3 minutes. Add vanilla. Divide icing into portions, if desired, and add different food coloring to each. Cover until ready to use.

DIRECTIONS FOR RED, WHITE & BLUE 'TIE DYE' COOKIES:

Divide icing into three bowls - keeping about half of the frosting white and dividing the other half into two portions. Color each of the other portions, one blue and one red.

On a small plate, place a large spoonful of white icing. Using separate spoons for each color, drizzle a little of each of the other colors on top of the white. Using a toothpick, swirl the frostings together a bit to get a pretty marbled effect.

Dip a cookie 'face down' into the frosting without moving it. Gently lift the cookie straight back up, set aside on a rack to set - or just eat while the frosting is glossy and wet. Enjoy!

Blog Widget by LinkWithin