PheMomenon has moved!

You should be automatically redirected in 5 seconds.

If not, please visit http://www.phemomenon.com and update your bookmarks and RSS feed.

Monday, October 26, 2009

Holly's Perfect Crepes


My apologies to my TWD friends, but I am missing out this week. The Cherry Fudge Brownie Torte, chosen by April of Short + Rose sounds like fun, but also sounds a bit too rich and complex for the simple things my tummy can handle these days. I definitely have it bookmarked for down the road and can't wait to see how others turned out!

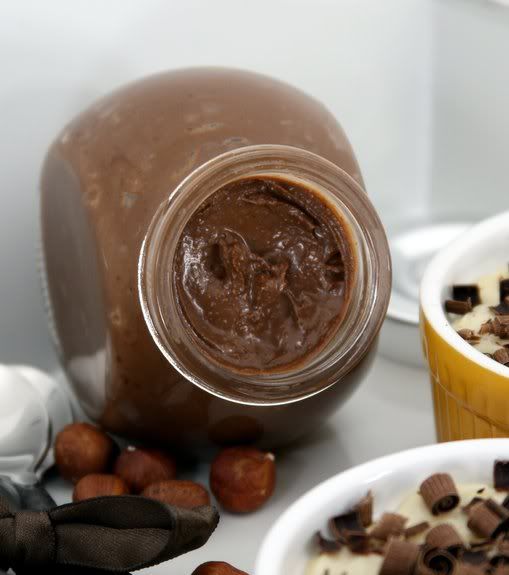
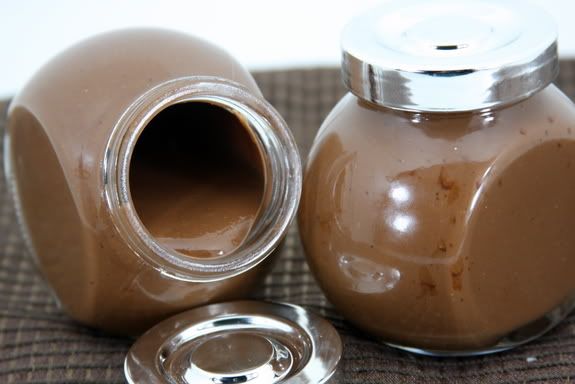
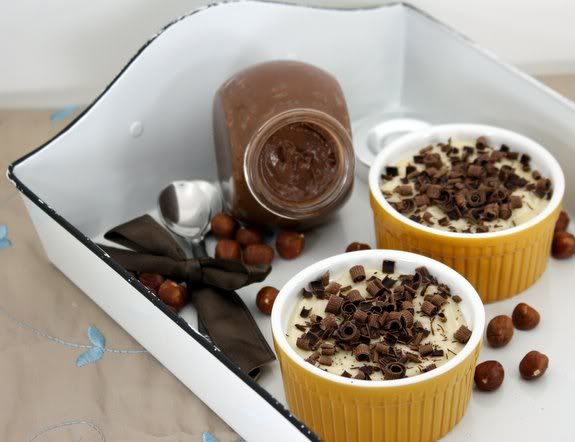
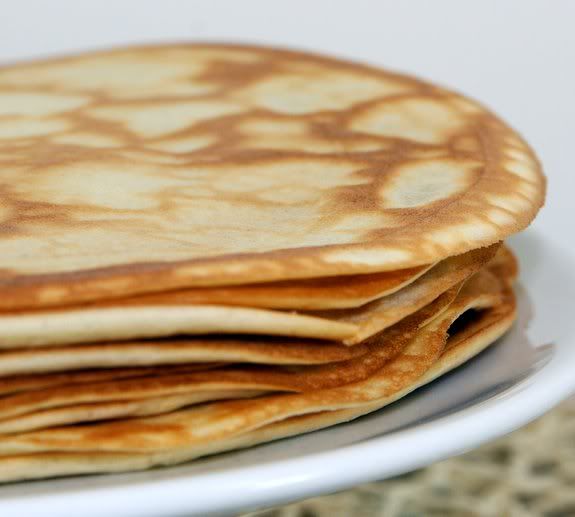
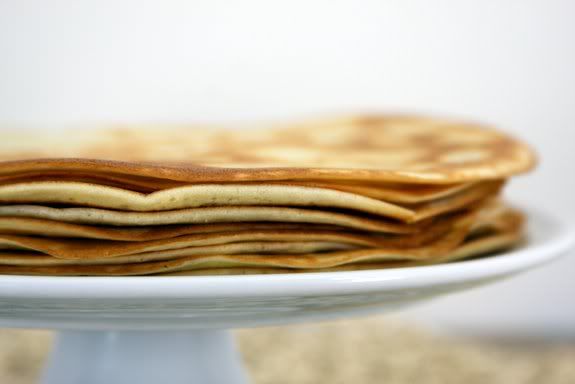
In the mean time, it occurred to me when I was posting the recipe for the Homemade Chocolate Hazelnut Spread that I hadn't shared or even written down my recipe for the crepes in the last picture. Since it is my own recipe (via several versions I've tried over time and tweaked, then tweaked some more, then have finally been satisfied with perfectly).

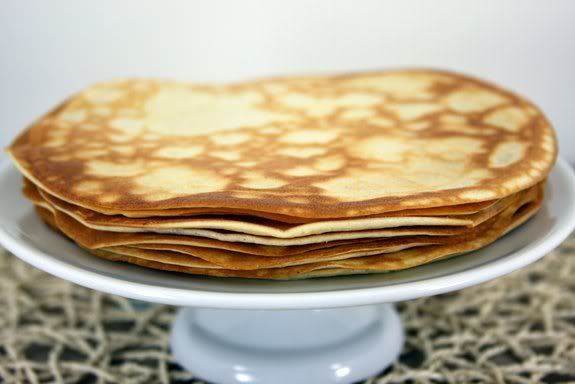
Whether or not my recipe is perfectly 'authentic' or not, I don't really know, nor does it matter to me. My criteria for the perfect crepe is one that has great flavor, great texture and is a user-friendly, not fussy batter that doesn't make me want to swear. My other criteria is that, though they keep nicely, I don't want a recipe where I have to stand at the pan or griddle and make 30+ crepes from one batch. Since, more often than not, I am making breakfast for myself and my two little boys. My hubs isn't often around for breakfast, and when he is, this recipe still stretches just enough for us.


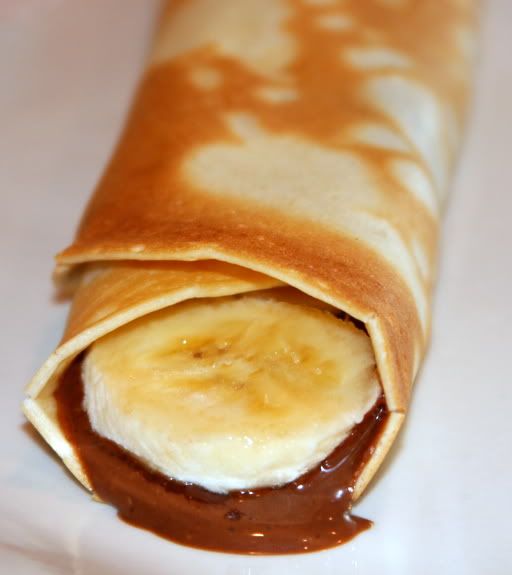
The really nice thing is that, since it is so easy, and with no weird measurements, it can easily be doubled to make more. The edges get a little nice and crisp, while the crepe itself is still flexible and supple.

More often than not we just eat these with some homemade strawberry jam, but like I said before, they are great with some of that homemade spread and some bananas, or strawberries, or ice cream as a dessert. Really, since they aren't too sweet, they pair nicely with most anything, though if I were going for a savory crepe I would probably reduce the sugar or take it out all together, and leave out the vanilla.


Sunday, October 25, 2009

SMS: Devil's Food Cake (Cupcakes) with Peanut Butter Frosting


Happy October to all! This is one of our favorite months around our house - Fall is in full swing, Cole has just had his birthday (turned 2) and as far as Aidan is concerned the entire month should be all about Halloween. The fact that is was Cole's birthday is the reason I chose the Devil's Food Cake with Peanut Butter Frosting for my recipe choice for Sweet Melissa Sundays!

I made a scaled down version of the recipe to come up with 12 cupcakes - mainly just because since we were doing Cole's birthday celebration with just the four of us, there was really no reason to have a full sized big cake. I hadn't really read the recipe all the way through when I made the selection and hadn't realized first, what a big cake it would make, and second, the incredible amount of butter called for to make the peanut butter frosting (which was really much more of a buttercream frosting with a light peanut butter flavor). I know that some SMS Bakers scaled down the amount of butter significantly and increased the peanut butter flavor - personally, I felt I should try to stay as close to the original as possible, for the sake of trying it first, but in the future I will definitely increase the amount of peanut butter since the flavor was very subtle and I would have liked it even more featured just a bit more prominently.


All that said, the birthday boy, his big brother, and his papa and myself, were all very happy with these cupcakes and really enjoyed them. Perhaps my favorite thing about them was the fact that they were even better the next (and the next) day - which is how long it took us to work through our dozen cupcakes. I hate to admit that most of that dozen was still eaten by me!

While I have managed to make a couple of the recipes for Sweet Melissa Sundays since this crazy thing called pregnancy started back in June, I swear, managing to post anything has been a bit ridiculous around here. I'm not entirely sure why, and I'm going to attempt to do better since I am getting more and more (and more behind)! Present count is that I have at least 16 items ready to write up and post, pictures and all - but can't seem to get my act together. So, my point is, I wanted to send out an extra huge thank you to the other SMS Bakers for baking with me this week and for continuing to stop by during my craziness and to all my loyal readers for visiting when I do get my rear in gear, so to speak.

I have included the original recipe below, but if anyone is interested, I did keep track of the conversions I actually used to take the recipe down to a dozen cupcakes (the math was a bit crazy) and can share that recipe as well.


Devil’s Food Cake with Peanut Butter Frosting

from The Sweet Melissa Baking Book

Makes one 9” cake

For the Cake:
6 oz best-quality unsweetened chocolate, coarsely shopped
2/3 cup vegetable or canola oil
2 2/3 cup sugar
1 2/3 cup all-purpose flour
1/3 cup best-quality unsweetened cocoa powder
1 tsp baking soda
¾ tsp kosher salt
2/3 cup sour cream
3 large eggs
1 1/3 cups hot strong brewed coffee (I just used hot water)

For the Peanut Butter Frosting:

1 pound confectioner’s sugar, sifted
1 ½ pounds unsalted butter, softened
2 tsp pure vanilla extract
3 Tbsp whole milk
½ cup smooth peanut butter, at room temperature

Position a rack in the center of your oven. Preheat the oven to 350. Butter and flour two 9×2-inch round cake pans, Line each pan with a 9-inch round of parchment paper.

To Make the Cake
1. In the top of a double boiler set over simmering, not boiling, water, melt the chocolate, stirring occasionally. When the chocolate is completely melted, whicsk in the vegetableoil until smooth. Remove from the heat, but keep warm over the hot water.

2. In the bowl, of an electric mixer fitted with the paddle attachment, combine the sugar, flour, cocoa powder, baking soda, and salt, and mix well.

3. In a separate bowl, whisk together the sour cream and eggs until smooth.

4. Add the egg mixture to the flour mixture, and mix until combined. Be sure to scrape down the sides of the bowl. Add the melted chocolate mixture and mix until combined. add the hot coffee (or water) in a stream, and mix until combined. (Again, scrape down the sides and bottom of the bowl.) The batter will be loose.

5. Divide the batter evenly between the prepared cake pans. Bake for 35 to 40 minutes, or until a wooden skewer inserted into the center comes out clean. Remove to a wire rack to cool in the pans for 25 minutes before turning out the layers onto the rack. Cool completely before finishing.

The baked layers may be stored tightly wrapped in plastic wrap at room temperature for 2 days. For longer storage, wrap tightly in plastic wrap and refrigerate for up to 5 days, or freeze wrapped in plastic wrap and them aluminum foil for up to 2 weeks. Do not unwrap before thawing.

To Make the Frosting
1. In the bowl of an electric mixer fitted with the paddle attachment, combine the confectioner’s sugar, butter, vanilla, and milk, and beat until light and fluffy, 2 to 3 minutes.

2. Add the peanut butter and mix until combined. Use the frosting immediately, if possible. It may be stored in an airtight container at room temperature overnight, or in the refrigerator for up to 4 days. Let the frosting come to room temperature and briefly rebeat it in the mixer before using.

Friday, October 23, 2009

Easy Cocoa Snack Cake Recipe


If you are like me then you probably get cravings for chocolate cake at random odd moments and don't have time to do anything about it - or don't want to commit any large portion of your chocolate stash to a large cake that when there isn't a special occasion. While I know there are mug cake recipes running around out there, it isn't entirely the same thing for me and doesn't cure that craving in the same way.

So, if you are like me, then here is the cake recipe for you. It uses a minimal amount of ingredients, relies solely on cocoa powder for the cake itself and is equally delicious topped with whipped chocolate ganache (shown here) for a fancier effect or with a sprinkle of powdered sugar and served with a tall cold glass of milk. Incidentally, while I wasn't setting out to make any kind of substitute for this cake that used to be an indulgence when I was growing up, it tastes almost just like I remember that one tasting - only much, much better with a nicer texture. I kept mine in the fridge for a few days and just cut indulged in it cold as well as at room temperature and it was fantastic and chocolatey either way.

If you give it a try, please let me know. I'd love to hear what you think!


Tuesday, October 20, 2009

TWD: Sweet Potato Biscuits


This week's recipe pick for Tuesdays with Dorie for the Sweet Potato Biscuits comes to us from Erin of Prudence Pennywise.

These are your basic biscuit, given an extra twist from Dorie by substituting mashed, cooked sweet potato for the liquid in the recipe. I think the possibility for error on these biscuits was increased for quite a few TWDer's due to the substitution of the liquid. The recipe calls for two 15-oz cans of sweet potatoes, drained, to mash and come up with 3/4 to 1 cup of mashed sweet potato. I had one 29-oz can that drained gave me almost 2 cups of mashed sweet potato. I'm not sure if it is Dorie's intention to use the full amount from both cans or not since the 3/4 to 1 cup measurement is actually contained in the notes before the recipe. I think that either way, you would have to use the measurements as a guideline.

Either way, I think, due to weather and how you measure your flour (or over measure in a lot of cases if you are like me) you may need more of the mashed sweet potatoes to come up with an amount that will actually bring your dough together into a soft, workable, biscuit like dough without overworking it. In my case, I actually ended up using about 1 1/2 cups of the sweet potatoes to bring the dough together and it still may not have been enough since I think I overworked my dough just a bit still.

The sweet potato flavor wasn't overwhelming and it was good when at room temperature with some thinly sliced roasted pork loin. The biscuits made for nice and easy little sandwiches. For a sweet topping alternative, I think some lightly warmed dulce de leche would be delicious on these.


Tuesday, October 13, 2009

TWD: Allspice Crumb Muffins


Tuesdays with Dorie this week is for the Allspice Crumb Muffins, chosen by Kayte at Grandma's Kitchen Table. Thank you Kayte for choosing something easy and delicious that my poor tired self can handle!

I find it is appropriate that these muffins are being posted today since they were nice and sweet and spicy - just like my crazy sweet and wild little Cole - who is two years old today! Yes, it has already been two years since all the craziness happened that brought us our wonderful little tornado.


Incidentally, Cole really loved these little muffins and thoroughly enjoyed digging in to them. This is definitely a recipe we will make again. The muffins were simple to make (thank goodness), moist, tender and sweet with just enough delicious spice.

Friday, October 9, 2009

Homemade Hot Cocoa Mix


I don't know about you, but I can't stop thinking about all the lovely Fall treats and options that I feel so much more inclined to make these days. With how hot it was here in Utah all Summer, I find myself, probably for the first time in my life, really looking forward to the cooler weather of Fall.

I'm not going to go so far as to say I'm looking forward to Winter, because frankly, dealing with doctor appointments, school trips to and from Aidan's school every day, and just the day to day doings of life, I'm not looking forward to being in my third trimester (in other words, even clumsier than I already am!) in the snow and ice. I'm sure it will just be awesome. Yeah, that's what it will be.

Ahem. Anywho.

Now that cooler weather is here, I'm actually able to think of making warm drinks for me and the kids. Aidan is a big hot chocolate (warm really) fan and he must get this from me because I could really drink it every day - when I'm not excessively hot from weather/pregnancy/etc.


What I don't always have on hand is good chocolate to chop up and melt in some hot milk - which is frankly my favorite way to have hot chocolate. That said though, sometimes what I really want is some really good hot cocoa. I can't stand any of the hot cocoa mixes they sell in stores though, so that leaves me with measuring and mixing together cocoa from scratch myself.

That can become rather tedious when I just wish I had the convenience of the mixed packets, so I've come up with a perfect solution in this homemade hot cocoa mix. It is rich, creamy, decadent and infinitely drinkable. It is really nice to make the mix yourself from scratch because you can make it in bulk and customize it to your heart's desire. The mix I make below uses powdered milk so that I can just take it anywhere if we want and mix it with very hot water.


HOMEMADE HOT COCOA MIX

12 oz non-fat dry milk (powdered milk) - great resource for more info here - any brand
3/4 Cup unsweetened cocoa powder - I used dutch processed
1 1/4 Cup packed light brown sugar
1 to 1 1/2 teaspoons sea salt

Combine all ingredients together well. It will be a little grainy and lumpy from the dry milk and the brown sugar, but should mix fine. I like to dump everything into a big bowl and whisk well to combine. Store in an airtight container.

Makes enough hot cocoa mix for 10 - 12 6 oz servings, depending on how rich you like your cocoa.

To mix a serving, heat 6 oz of water to very hot. Pour into a heat proof cup with 3-4 Tablespoons of mix in the bottom (it mixes a lot easier and smoother this way and is easier to heat the water in bulk if you are making more than one serving at a time). Stir well and enjoy!

Options:

- 1 T vanilla powder - boosts the flavor, you could also add just a small splash of vanilla extract to your cocoa after you've heated it and stirred it in

- 1 T ground cinnamon - gives a slight spiced flavor for a Mexican cocoa effect

Substitute Non-Dairy Powdered Creamer for part or all of the dry milk powder above for a richer, creamier texture and taste

- 4 T mix to 6 oz very hot water


- You can make the mix without the powdered milk and use regular milk instead. If you do this, you will have a much smaller amount of mix and will only need to use 2-3 Tablespoons of mix per 6 oz cup of hot milk.

Wednesday, October 7, 2009

Homemade Chocolate Hazelnut Spread


As promised, here is the recipe for the homemade Chocolate Hazelnut Spread I used in the Split Level Pudding from the other day. The texture of the homemade spread is rougher than Nutella, but, as much as this may come as sacrilege to the legions of Nutella lovers out there, I think the flavor is worlds better. After tasting the homemade stuff, and then tasting the Nutella again, honestly, I couldn't taste the chocolate or the hazelnut as much as the additives in it. Plus, there is the added benefit of using really good chocolate that you love. If you want a smoother texture, just be less impatient than me and process the mixture for a bit longer. The mixture was also fairly runny when it was warm and took a while to set up into the thicker texture. (You can see the thinner texture below).


Chocolate-Hazelnut Spread

1 cup hazelnuts, toasted and peeled
2 tablespoons canola oil
2 tablespoons confectioners' sugar
1 tablespoon unsweetened cocoa powder
1/2 teaspoon pure vanilla extract
12 ounces good quality milk chocolate, chopped and melted

To toast and peel the hazelnuts, heat the oven to 350 degrees F. Toast the hazelnuts in one layer on a baking sheet for 12 to 15 minutes, until browned and the skins are slightly blistered. Wrap them in a clean tea towel and rub continuously for a few minutes to remove the loose skin. Not all the skin will loosen enough to come off, just do your best and that's fine. Let the hazelnuts cool before grinding.

To melt the chocolate, chop it into small pieces. Place a heat proof bowl over barely simmering water (not deep enough to touch the bottom of the bowl) in a medium saucepan - about 1 inch should do it. Stir the chocolate a few times and let it melt slowly. Once it is mostly melted, remove it from the heat and let the residual heat finish melting the rest of the chocolate.

Grind the hazelnuts well in a food processor to make a paste. Add the oil, confectioners' sugar, cocoa powder, and vanilla and continue processing. Add the melted chocolate and blend well. Strain the mixture through a fine-mesh strainer into a bowl, to remove any large nut pieces. The mixture will be thin and a little warm. Pour it into a jar and let it cool and thicken slightly. The spread keeps for a month in an airtight container at room temperature.

Makes about 1 1/2 cups.

Delicious in crepes with some bananas!

Tuesday, October 6, 2009

TWD: Split Level Pudding - Vanilla and Chocolate Hazelnut


My participation in Tuesdays with Dorie has obviously become rather sporadic of late. I'm thinking with the line-up of recipes for October that I should be able to manage for the most part, but who knows, right?

Anyway, I did get my act together enough to make this week's recipe, chosen by Garrett of Flavor of Vanilla, for the Split Level Pudding - in my case with a layer of Homemade Chocolate Hazelnut spread, that, though not as smooth, definitely rivals Nutella in a taste test. The recipe for the spread comes from Gale Gand and as soon as I get organized just a bit more, I will share the recipe here as well.


The only other change I made to the recipe was to make a one-third portion, which was just perfect for two 4 oz servings, which is all I needed since it was only myself and my two little kiddos eating the pudding. I layered about two tablespoons of the chocolate hazelnut spread in the bottom of each ramekin and then made the pudding, which literally took about 5 minutes. I skipped all the stovetop directions and food processor as well since it was such a small amount to manage. If I were making the full version of the recipe, I would probably go ahead and take advantage of the food processor, but the microwave was just faster and easier in this case.

I really enjoyed the pudding - which was a little surprising for me since I usually don't enjoy puddings much at all (unless they are in a pie or tart shell). I think I liked it more here because of the texture of the hazelnut spread - and of course all those pretty chocolate curls on top don't hurt anything either!

I am still bummed at myself that I didn't get my act together enough to make the tart last week, and it is definitely on my to-do list for some time when I have more energy and time because I've had that recipe bookmarked for a long time.


My apologies to my fellow TWDer's for all my slacking lately, but since I know you understand, I won't whine about it more here. As for my pregnancy, it is going as well as we can expect - which is to say, I'm still sick and we're still waiting to see what happens when the third trimester rolls around in a few weeks. In the meantime, I've started feeling the baby bumping around in there, so that is good and on time. We still haven't found out what we are having since the Doctor wants to do an in depth ultrasound with us on the 15th - so an announcement one way or the other is eminent!

Thank you again and again you all for visiting! I treasure all your comments and hope to get some time and energy soon visit your blogs and get caught up - I have been so out of touch!

Thursday, October 1, 2009

Cookie Carnival: Black-Bottom Coconut Bars


I can't seem to get ahead these days, even when I'm ahead! I made these cookies for September's Cookie Carnival a couple of weeks ago and just now am finally getting them up. Whether they make it into the roundup or not, these little babies deserve their moment in the spotlight.

Bars with a chewy, roasty-toasty coconut top and a soft chocolately-chewy brownie-like bottom. What a great idea!


What did I love about these cookies? Pretty much everything. Granted, you have to really like coconut, because, well, of course there is a lot of it, but it is really good! I didn't make any changes to the recipe at all, even though several people who rated the recipe on Martha's website mentioned having different problems. I think if you just follow the directions and make sure you are checking your layers for the doneness clues given, and not just going by the time, then you'll be all set (and incidentally, so will your cookies).

My kiddos really loved these bars too - they loved the soft brownie-like bottom the most, but were also equally willing to eat the coconut top part. Thanks to Kate for choosing this recipe for us!

Blog Widget by LinkWithin