PheMomenon has moved!

You should be automatically redirected in 5 seconds.

If not, please visit http://www.phemomenon.com and update your bookmarks and RSS feed.

Friday, December 31, 2010

FFwD: Sweet and Spicy Cocktail Nuts - Sugared Pecans


One of the recipes from Around My French Table chosen for this month's French Fridays with Dorie was for Sweet and Spicy Cocktail Nuts - a mixture of nuts, tossed in egg white and a combination of sugar and spices.  I only had pecans around the house, but wanted to try the recipe because I've never seen or heard of tossing them in egg white first.  My favorite way to make candied pecans up till now - which is a bit of a process and a bit of a mess, but oh so good - is to boil them, then let them dry a bit, then toss them in powdered sugar, and then they are deep fried, then allowed to cool (a method we used long ago from the Sky High cakes book for The Cake Slice Bakers).  While they are crazy good that way, as you can imagine, they are definitely a treat and not anything I feel good about snacking on.  That is why Dorie's method seemed like an interesting and worthwhile alternative.

That said, you know I never leave well enough alone, and since the only cocktails involved around our house involve juice boxes, I bagged the spices in our version.  I used the same amount of sugar called for, then just upped the amount of cinnamon and added a small splash of vanilla.  I have to admit, I'm sure the nuts would have looked nicer had I followed Dorie's directions to remove them from the egg whites individually to get rid of the excess.  Let's face it though.  With three small kids around, there was no time for that.  I tossed, mixed, stirred, dumped and baked.  I did give them a stir in the oven about half way through to help break up all the extra sugar and egg white I dumped in there with them, which was bubbling a bit more than I expected, but didn't seem to do any harm.  So, bottom line, when my pecans were all done they were just a bit clumpier and not as pretty, but they still tasted really good!  

This recipe and method is a definite keeper - we love tossed candied nuts in our salads and this ended up being a lot less messy and not as labor intensive (at least when done the lazy way like me!).

Happy New Year everyone!  Visit the French Fridays with Dorie site to see all the links to this month's recipes under the LYL posts.  I hope you all had a wonderful 2010 - now on to 2011!

Thursday, December 23, 2010

Sour Cream Coffee Cake with Chocolate-Cinnamon Swirls and Hazelnut Crumb Topping

Photobucket


There is just something about the holidays that cry out for decadent breakfast treats.  I love desserts - that's no surprise.  And I love making treats - the cookies, candies, etc.  But what I really, really love is taking the time to make something extra special and different for breakfast or brunch.


Add some insanely good hot chocolate to the menu, and as far as I'm concerned, you can call it good.  For a killer hot chocolate mix - which would make a stellar last minute Christmas gift - you can try my new recipe I came up with to follow up to last year's Hot Cocoa Mix.  This time around I shared a recipe for a homemade, from scratch, ridiculously decadent and addictive Salted Caramel Hot Chocolate Mix over on my friend Jyl's site, Mom It Forward.  I know there are many versions out there you can buy pre-made, but I wanted to come up with something that could be made completely at home. If I do say so myself, the recipe I came up with really knocks it out of the park.  Let's put it this way.  The recipe makes 2 1/2 lbs (but could easily be cut in half if you want) - I only made it about a month ago... and ended up only giving out about three small jars of it.... and it's all gone.  I'm pretty sure I'll be making more of the mix over the weekend - hopefully in time for Christmas morning.  Mommy is a whole lot nicer after she's had a good cup o' chocolate.  I'm just sayin'.

Photobucket

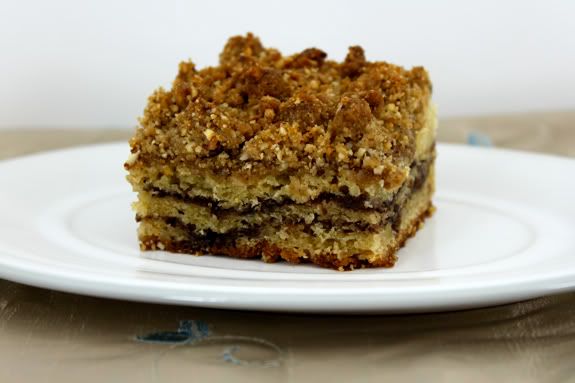
While I love a good coffee cake, when given a choice, any recipe that involves chocolate is going to come out ahead of the pack as far as I'm concerned. This particular cake - with it's tender sour cream crumb, nutty topping and chocolate-cinnamon swirls layered throughout - isn't terribly cumbersome to put together and makes plenty to share. It does take some baking and cooling time - you'll need just over an hour and a half, start to finish to mix, bake and cool this cake - so unless you are up early, it may be more of a brunch item - perfect after a round of gift exchanging and opening on Christmas morning.  I've included a few tips on how to cut your time down if you do want to serve it earlier in the morning - but that said, it keeps really nicely, so there isn't really any reason you couldn't just make it all the day before.


Sour Cream Coffee Cake with Chocolate-Cinnamon Swirls and Hazelnut Crumb Topping
Adapted from Baked: New Frontiers in Baking


For the Crumb Topping:
3/4 cup all-purpose flour
3/4 cup packed light or dark brown sugar
1/2 teaspoon salt
3/4 cup toasted, skinned hazelnuts
6 tablespoons cold butter, cut into small cubes

For the Chocolate-Cinnamon Swirls:
1/2 cup sugar
1 tablespoon good quality cocoa powder
1 teaspoon ground cinnamon

For the Sour Cream Cake:
3 1/2 cups all-purpose flour
1 teaspoon baking powder
1 1/2 teaspoons baking soda
1/2 teaspoon salt
1 cup (2 sticks) unsalted butter, a little bit softened, but still cool, cut into pieces
1 1/4 cups sugar
1 cup packed light brown sugar
4 large eggs
16 ounces sour cream
2 teaspoons pure vanilla extract

Make the Crumb Topping:
Pulse the flour, sugar and salt together in a food processor to combine.  Add the hazelnuts and process until finely chopped and mixed together.  Add the butter and pulse a few times to combine.  The mixture should look like coarse sand.  Place the mixture in a small bowl, cover with plastic wrap and keep the mixture in the refrigerator until ready to use.*

Make the Chocolate-Cinnamon Swirl:
Whisk the cocoa, sugar and cinnamon together in a small bowl.  Set aside.**

Make the Sour Cream Cake:
Preheat the oven to 350 degrees F. Butter a 9x13-inch baking pan, then line it with a piece of parchment with the edges hanging over the long sides to make a sling.  Butter the parchment and set the pan aside.

In a medium bowl, whisk together the flour, baking powder, baking soda and salt.***

In the bowl of an electric mixer with paddle attachment, beat the butter until well creamed and smooth.  Scrape down the sides of the bowl and add the sugars.  Beat the mixture until it is fluffy and light.  Add the eggs, one at a time, beating well after adding each egg.  Scrape the sides down again and then beat the mixture for 30 seconds more.

Add the sour cream and vanilla and beat the mixture until just mixed.  Add the flour mixture in three parts, scraping down the sides of the bowl in between each addition until just mixed - don't over mix!

Pour one-third of the cake batter into the bottom of the prepared cake pan and spread it evenly.  Sprinkle half of the chocolate mixture over the batter, covering the entire surface of the batter.  Spoon half of the remaining cake batter over the swirl mixture and spread it evenly.  Top the batter with the remaining swirl mixture, covering the surface again.  Spread the remaining cake batter evenly over the swirl, then sprinkle the crumb topping over the cake batter.

Bake the cake in the center of the oven, rotating the pan halfway through baking, for 1 hour or until a skewer comes out clean.  Let the cake cool in the pan on a wire rack for 30 minutes before serving.  Serve from the pan, or use the parchment as a sling to gently lift the cake out onto a cutting surface to cut into squares and serve.  The cake keeps well for up to 3 days, tightly covered, at room temperature.


* Make the Crumb Topping the day before you want to bake the cake and keep it in the refrigerator.
** Make the Chocolate-Cinnamon Swirl the day before you want to bake the cake to save a few minutes measuring and whisking.
*** To really cut down on your mixing time the morning of making this cake, measure and mix together the dry ingredients and set aside till ready to make the cake the next day.

If you follow all the pre-measure shortcuts, you'll just be left with creaming and mixing the actual cake batter and baking it the next day.


Photobucket

Friday, December 17, 2010

FFwD: My Go-To Beef Daube


I actually found some time last Sunday to make something other than grilled cheese.  Around our house lately, that is nothing short of a miracle!  I planned ahead.  I shopped.  I prepped.  I cooked.  It was awesome.

As much as I loved eating this recipe for Dorie's 'Go-To Beef Daube,' I think I may have enjoyed getting back to cooking the way I love even more.  I really don't get to do it very often any more.  While this recipe - which is basically like a really good, thoughtful, beef stew, isn't really anything fancy, it is just the kind of dinner I like to make.  Especially in the cold months.

I bought a nice sized (just over 3lb) beef chuck roast, trimmed and cut it into large chunks, just like Dorie suggests, then browned those in my Dutch oven.  I followed all the directions, adding the shallots, onion, carrots, etc.  The only change I made to the recipe was to just substitute good beef broth in place of the wine.  The recipe was definitely more time consuming than when I usually throw a roast into the slow cooker and walk away, but I tend to think that is partly the point of a book like this.  It is thoughtful food - not just food for the sake of eating.  I guess that is when something actually becomes nourishment.


Here's the thing though.  Remember above when I said that the recipe was thoughtful?  I felt like I took the time to slow down, enjoy what I was doing and get in touch with the process.  Choosing the ingredients, prepping them and taking the time to get them ready with some actual thought and care - not just hurry, hurry, hurry.  Now, the fact was that often the hurry, hurry, hurry happens when the hubs isn't here and I feel like I have to run in a million different directions all at once.  Last Sunday, he was home.  He helped with the kids while I made dinner.

I even made some crusty French rolls (recipe at the bottom) to go with the beef daube, as well as some really good mashed potatoes.  I started the roll dough right after I slid the daube into the oven and they all ended up being done around the same time.  I just let the daube rest in the covered Dutch oven on the stove top while the rolls baked.  The rolls were also great for making little sandwiches with leftover beef the next day.

When we finally sat down to eat dinner it was more relaxed and I felt more in touch with what I was eating than I have in a while.

The point of the story.  I need to find a way to slow things down again more often.  I seem to have forgotten that this is my therapy.  Taking time to take a deep breath is good for you.  Turns out breathing onion fumes can be good for you too. Who knew?

For more reviews of this month's recipes from my fellow French Fridays with Dorie participants, head on over to the site and click on the LYL post for today (or any Friday).  As always, this recipe can be found in Around My French Table (which incidentally would be the perfect gift for any food / cooking lover you know - or anyone who wants to learn for that matter).


Crusty French Rolls (aka Pistolets or Split Rolls)
Makes 8 large rolls

2 1/2 teaspoons active-dry yeast
1 1/4 cups water + up to 1/3 cup more, as needed
3 1/2 cups all-purpose flour
1 1/2 teaspoons salt

Put the 1 1/4 cup water into a small bowl and sprinkle the yeast over the top.  Set aside and let dissolve for 5 minutes, then stir.  Meanwhile, mix the flour and salt in a large bowl, make a well in the center.  Pour in the dissolved yeast, then stir enough of the flour in from the sides to make a thick paste.  Cover the bowl and let it sit for 20 minutes.

Mix the remaining flour into the wet mixture and add a little of the extra water at a time to make a soft, sticky dough.  Turn the dough out onto a lightly floured work surface and knead the dough until it is soft, smooth and slightly elastic.  Try not to add too much extra flour to the dough while kneading.  This process will take about 10 minutes of kneading.  You can do all this part with a kneading attachment on a mixer, and it will only take about 6 minutes.

Put the dough in a clean bowl and cover it again.  Let the dough rise for 1 hour or until doubled, then deflate the dough (punch down), cover it again and rise for 45 minutes more, then punch the dough down again, cover and rise 45 minutes again.  This process seems drawn out, but it lets the dough develop a really nice flavor and helps get that crust.

Deflate the dough gently one last time and divide the dough into 8 equal pieces (you could do smaller rolls if you want and easily get 12 - these rolls were fairly large, about 1 per person).  Roll the dough pieces into a tight ball and place them on a lined baking sheet, or sprinkle a little cornmeal onto the baking sheet.  The rolls shouldn't be touching, so leave a couple of inches between the dough.

Use the handle of a clean wooden spoon to push a 'split' down the middle of each dough ball, going all the way to the bottom, but not hard enough to cut the dough in half, just to leave a huge indentation - it will spring up some anyway on this last rise.  Sprinkle a little flour over the indented rolls then cover them and let them rise 30 minutes.

Heat the oven to 425 degrees F and bake the rolls 20 minutes or until lightly golden.  Serve warm or at room temperature.

Blog Widget by LinkWithin