PheMomenon has moved!

You should be automatically redirected in 5 seconds.

If not, please visit http://www.phemomenon.com and update your bookmarks and RSS feed.

Friday, April 15, 2011

Moving on up! PheMOMenon.com

Vanilla Eclair with Chocolate Ganache for French Fridays with Dorie - posted on the new site!

Well friends, it has finally happened.
I've moved on over to my very own URL at PheMOMenon.com!

I hope you'll join me over there for more fun and lots more to come. I'll still be bringing lots of recipes and goodies, but I'll also be sharing more of the 'Mom' side of things as well. I hope that you'll update your bookmarks and keep visiting me because I've got a lot of fun projects that have been in the works and are about to start launching.

I can't wait to see you over there!

Hugs,

Holly

Monday, April 4, 2011

Ham and Cheese Rösti with Spinach and Pan Roasted Asparagus

Photobucket


Rösti.  Seriously, I think that is just a fun word. Don't ask me why... maybe it's because with those little dots over the 'o' it looks like the 'o' is ready to eat a slice of this ridiculously easy and yummy dinner, lunch or breakfast.  I don't know where this idea has been hiding my whole life either, but it was so good, everyone loved it and dinner was ready in 15 minutes flat.


Not too shabby, huh?!


So. It is basically a thinnish, pan fried, potato pancake with extras mixed in - ham and swiss cheese and spinach in this particular case.  You could vary what you mix in there however you like I'm sure, but those are ingredients I generally have on hand.


For a double bit of green with our dinner I also quick pan roasted some asparagus.  Including all the prep (which isn't much) and cooking time on everything, seriously, who wouldn't want dinner ready in 15 to 20 minutes tops (including very little to clean up).  Genius.


Speaking of genius moves... PheMOMenon is being redesigned in the next couple of weeks, so I hope you'll stay tuned for lots of fun changes! I'll be taking a little break in the meantime while all those details are worked out, but I'll be back soon!

Photobucket


Ham and Cheese Rösti 

Printable Version

1 large egg
5 ounces (approximately 1 cup) diced ham, whatever you have - I just used deli ham
1 cup shredded cheese, swiss, gruyere or whatever you like
1-2 shallot cloves, minced or about 1 tablespoon finely chopped onion
1 teaspoon fresh rosemary or other herbs of your choice, finely minced (or 1/4 teaspoon dried)
1 teaspoon dijon mustard
pinch of salt
1/2 teaspoon freshly ground black pepper
1 large russet potato, peeled, grated and rinsed in cold water, then patted dry between paper towels
2 tablespoons extra-virgin olive oil, divided
pinch of freshly ground red pepper flake or ground cayenne pepper
1 cup baby spinach leaves, chopped

In a large bowl, combine all the ingredients, except for the olive oil and 1/4 cup of the cheese, and beat well.

Heat 1 tablespoon of olive oil in a large skillet (9 to 10 inch) over medium-high heat.  Pour the potato mixture into the pan and cook until golden, about 6 to 7 minutes.  Cover the pan with a plate (or use the pan lid) and flip the potato cake out onto the plate by holding it over the pan and flipping the pan over (like you would a cake out of a cake pan onto a rack).  Add the remaining 1 tablespoon of olive oil into the skillet and slide the potato cake - uncooked side down - back into the pan.  Sprinkle the remaining cheese onto the top (cooked) side of the cake and cook the cake until golden, about another 5 to 6 minutes and the cheese is melted.  Remove the cake from the pan, cut into wedges and serve warm.

Pan Roasted Asparagus

1 lb asparagus spears, ends trimmed
1 teaspoon extra-virgin olive oil
sea salt or kosher salt and freshly ground black pepper to taste
1 teaspoon fresh lemon juice (optional)

Heat the olive oil in a skillet over medium high heat.  Add the asparagus spears, cook 1 minute moving the spears around the pan gently and season with the salt and pepper.  Cook 1 to 2 minutes more until bright green, still crisp and hot. Sprinkle with a little lemon juice and serve hot.

Photobucket

Tuesday, March 29, 2011

TWD: Pecan Powder Puffs


There are certain recipes that I've never made that have absolutely nothing to do with difficulty or ingredients.  The Pecan Powder Puffs (aka Mexican Wedding Cookies) for this week's Tuesdays with Dorie, chosen by Tianne of Buttercream Barbie, happen to be one of those recipes.  In fact, I've been ignoring the fact that a really easy recipe for these cookies has been sitting in the book. I was doing a good job of ignoring it up until now too.  

Why?

They are dangerous. Severely dangerous. Sigh.

Years ago, when I first moved to Utah, I was working in a law firm where the secretaries all loved putting treats out on their desks during the holidays. I was working in the firm as a runner (basically a gofer, just like it sounds :) and therefore was exposed to all the various treats hiding around all three floors of the office. These happen to be the only treat I remember.


Anyway, one of the secretaries always brought a huge tub of these cookies and every time I went by I couldn't resist grabbing another one.  When you figure that in an 8-hour shift I went by her desk at least 8 times... well, you can imagine the problem. I fully justified it because working as a runner, on a 3-floor office I figured out that I was walking about 40 miles per week (no joke!) and therefore my 19-year old body could eat whatever the heck I wanted and get away with it (and did).

Fast forward a generous handful of years and that is no longer the case.  I cookie that is cobbled together of pecans, sugar, butter and a bit of flour, then dipped in more sugar before eating and you can imagine that having these babies in my vicinity is a recipe for major weight gain.  Therefore, until today, I had never made them.

Now, my cookies didn't turn out as puffy as the cookies I've usually seen, but I expect is has something to do with oven temperature or high altitude.  Bottom line, they were still incredibly tasty and crumbly and melt-in-your-mouth delightful, so I really didn't care.

And guess what? I was right, they are dangerous, because the batch is already over half gone... and I'm pretty sure I'm the only one who has been eating them.

For more delicious cookies, visit the TWD blog and LYL post.

Friday, March 18, 2011

FFwD: Salted Butter Breakups


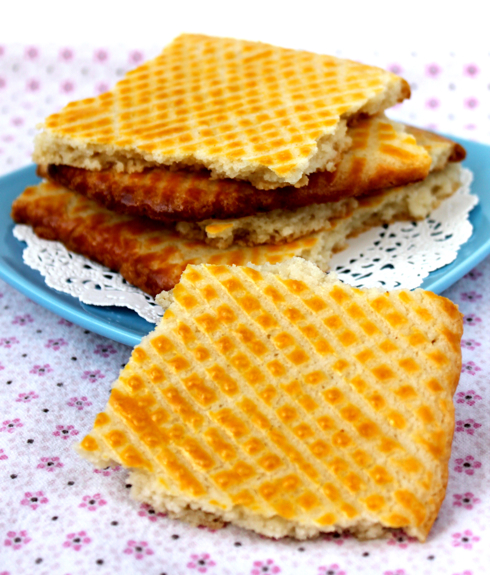
The recipe for this week's French Fridays with Dorie was for an intriguing cookie that you bake in one big piece then, as the name suggests, break in pieces.  The dough is extremely similar to some of my favorite tart dough recipes - only with a distinctively saltier (in a good way) taste.  In fact, the cookie dough is chilled thoroughly, rolled, glazed with an egg wash and decorated in the cross-hatch pattern with a fork before baking.  

Once cooled and broken, all I could think with every bite was that it was like eating tart dough... only slightly different.  Seriously, what's not to like about tart dough, so we enjoyed making these. 

Though the overall time commitment to make the cookies takes at least a couple of hours, it is all in the chilling and baking. The dough comes together in the food processor and ridiculously quick to make.  Add to that the fact that you don't have to do much to the dough once it's rolled out and these may be one of the least fussy cookies around. 

For more cookies, be sure to visit the French Fridays with Dorie site.


Tuesday, March 15, 2011

TWD: Citrus Sunshine Muffins


The Citrus Sunshine (Currant) Muffins for this week's TWD were the perfect choice as far as I'm concerned. Especially in light of the fact that it was Daylight Savings on Sunday (thank goodness my phone updates itself because I completely forgot!) and this coming Sunday is the Vernal Equinox - SPRING!

Now, if only the weather decides to cooperate and stops dumping snow on us (like last week - seriously, that was our backyard on the 8th) then I would be thrilled!  I am SO over Winter!


Conversely, I think it is pretty funny that the main season for citrus around here is WINTER! There has to be some really brilliant reasoning behind the Powers That Be deciding that. What better way to get some sunshiney feelings in the midst of the snow and darkness!


These muffins were perfectly delightful in delivering on the promise of the citrus and sunshine double hit of happy.  I was happy while I was making them - I love rubbing the zest and sugar together - I could seriously just smell that all day!


I made a couple of small modifications to the recipe this time which were a big hit around our house. I didn't have any currants, and didn't know if any of us raisin haters would like them anyway, so I didn't bother getting any.  Instead I chopped up some good white chocolate and added some chunks to the muffin batter in place of the currants.  I also didn't have any lemon extract, so I just zested the lemon and rubbed it into the sugar along with the orange zest.  I also added a small splash of vanilla to the batter because I love the combination of citrus and vanilla in a big way.

These muffins were wonderful - tender, citrusy and bright, a little sweet and oh so good!  I'm so glad that Lauryn of Bella Baker chose them for this week's recipe because I have overlooked them for far too long.  Make sure to visit the Tuesdays with Dorie blog and see how the other muffin makers made out!


Tuesday, March 8, 2011

White and Dark Chocolate Chunk Cookies


I'm not sure what it is, but I've noticed lately that the desserts I gravitate toward are those where I don't have to choose between my favorite flavors - chocolate and vanilla. I don't want to choose. I want both.

These cookies definitely fall under that category. The pictures are deceiving because they look like they might be really big cookies, but they're not. They're actually only about 2 1/2 inches across, which compared to the enormous sizes of most of the cookies I make, these are delightfully diminutive. 


Their small stature not withstanding, they are chock-full of chocolately goodness of both the bittersweet variety and white chocolate. For both chocolates I used Callebaut because the quality of the chocolate will make a difference here.  You could probably still have a good cookie if you use some chocolate chips and white chocolate chips, but you wouldn't end up with the huge pockets and chunks of chocolate, which is really one of the main attractions of this cookie.

The other thing I love about this recipe is actually that it is a make ahead kind of dough. You will end up with two 'logs' of cookie dough, stashed in your refrigerator or freezer, that you can slice as needed and bake up a whole batch, or just a few cookies at a time and prolong the enjoyment. Nothing makes me happier on a hard day than knowing that I can bake up some cookies in a few minutes with no effort on my part. (Especially useful after days spent shuttling sick kids to doctors, hospitals and pharmacies - OY! I am SO over Winter!)


White and Dark Chocolate Chunk Cookies


Makes about 5 dozen cookies
6 oz bittersweet chocolate, cut into 1/4-inch chunks
4 oz white chocolate, cut into 1/4-inch chunks
1 3/4 cups all-purpose flour
1/2 teaspoon baking soda
3/4 teaspoon sea salt
8 tablespoons (1 stick unsalted butter, cold, cut into tablespoons)
1/2 cup sugar
1/3 cup packed dark brown sugar
1 large egg
1 1/2 teaspoons pure vanilla extract
Note: This dough needs to chill in the refrigerator for at least 2 hours and up to one week, so plan ahead.
In a medium sized bowl whisk together the flour, baking soda and salt. Set aside. In the bowl of a standing mixer with paddle attachment, cream the butter pieces, still a bit cold, until fluffy and pale yellow, about 2 minutes. Scrape down the sides of the bowl and paddle and add the sugars while continuing to beat until smooth, another 2 minutes. Add the egg and vanilla on low till combined. Still on low, gradually add the flour mixture and beat until just incorporated.  Add the chocolate chunks and mix them into the dough.
Place a piece of parchment paper or wax paper on a clean work surface. Use a spatula or scoop to scoop out one half of the dough. Form it into a log about 2-inches in diameter. Roll the log in the paper, then roll that in plastic wrap or foil. Repeat with the second half of the dough on another piece of parchment or wax paper. Wrap the logs tightly and refrigerate for at least 2 hours or up to one week.  You can also stash the dough in your freezer for up to a month (just allow to thaw slightly before trying to slice and bake).
To bake the cookies, preheat the oven to 350 degrees F with a rack in the lower portion of the oven. Line a baking sheet with parchment. Cut the logs, using a serrated knife, into 1/4 to 1/3-inch thick slices. Place the cookies on the prepared baking sheet about 1 inch apart. If the slices come apart a bit when you are slicing them, just press the dough bake into a ‘slice’ shape (not into a ball).  Bake the cookies for 10 to 12 minutes. They are done when they are golden around the edges and bottom. Remove the cookies from the oven and cool on racks. Store airtight. 
Note: To bake more than one sheet at a time, just rotate the sheets, front to back, top to bottom halfway through the baking time. I prefer to only slice a few cookies as needed and bake them fresh when we want a treat.

Wednesday, March 2, 2011

Babble's Top 100 Food Mom Blogs, 2011 - I made the list!

I can't begin to tell you how excited I was when I received an email a few weeks ago from the editors of Babble that I made their list of the Top 100 Food Mom Blogs for 2011. Honestly, with the company I find myself in I couldn't be more thrilled or flattered. What an honor to be included!


I noticed several who are some of my favorite bloggers (and friends) made the list as well like Rachael, Paula, Amanda, and Lori but I was especially proud of how many fellow Hive members who are here in Utah made the list as well, including Dara, Jaime, Lindsay, and Jen. 

Congratulations to all!! I'm so proud to be in such amazing and inspiring company!

Tuesday, March 1, 2011

TWD: Catch-Up! Chocolate Pots de Creme & Toasted Almond Scones


Since we have basically all been a bunch of germ magnets for the past two weeks (some longer than that!) I am playing a major game of catch-up around home and in life.  I've actually made the past 3 or 4 Tuesdays with Dorie recipes and never had a chance to photograph and/or post them. Oy!


I am not much of a pudding fan. However, if you put something in front of me that I know used really good ingredients, I won't say no. I also really like the texture of baked custards, which is basically what these Chocolate Pots de Creme seemed like to me. I finagled the recipe to only make a half-batch and ended up with 4 cups total - which was a good thing because I'm pretty sure I would have ended up eating the entire full batch and not sharing. 

There are only three cups pictured because I ate one last night before chilling the pots - I wanted to try both the room temperature texture and the chilled texture. Although it was really good at room temperature, I'm inclined to agree with Dorie that the texture and taste is much better when chilled thoroughly. 

It doesn't hurt if you add some whipped cream and shaved chocolate either. Just sayin'.

Aidan (my 7YO) ate one of these today and I think he summed up what we thought of these the best. 

Direct quote: "If I was wearing socks right now, this would knock them off." 

Ah, kids! ")


As for these bad boys from last week, I've actually made them several times in the past few years. They were one of the first recipes I tried in the book and they are a definite favorite of ours. I accidentally overbaked them just a little this time so they were a tad dryer than normal, but it really didn't matter. We love these Toasted Almond Scones.


The Chocolate Pots de Creme were chosen as this week's recipe by Christine of Black Cat Cooking.

The Toasted Almond Scones finally saw their day in the sun thanks to Mike of LivingOutWest.

My thanks to you both for great choices that really hit the spot!

For many more links to all the other Tuesdays with Dorie bloggers who made these recipes you can visit their respective LYL posts here and here.

Once I get life just a bit more under control and can avoid spending the entire week at hospitals, doctors, InstaCare and assorted pharmacies I will sit down and actually write some posts to go with the plethora of drafts sitting in my files. 

In the mean time, I hope you are all having an absolutely fantabulous start to March!

Monday, February 14, 2011

Mexican Hot Chocolate and Buñuelos


Although most people will be celebrating Valentine's Day today, around our house we have a much more important occasion to celebrate - Kayla's birthday!  

I really can't believe it has already been a year since our sweet baby girl arrived and turned our world upside down - in the best of ways.  At the beginning of our journey with Kayla everyone kept telling us what a blessing she would be in our lives. I didn't doubt them, but I sure didn't know how it was all going to work out. Most days I still don't, but I do know that all I have to do is hold her and a whole world of stress can flow away. She is an absolute joy and the light of our entire family. She is a total Daddy's girl and her brothers absolutely adore her. She couldn't be more loved if we tried and she certainly makes it easy to love her.

I've shared more of Kayla's story over on my other (neglected) blog, but I have to take today to celebrate this last year with my darling girl.  Admittedly, this picture of her is a bit old, but it is one of few where you can see all of her cute face... and honestly, she hasn't changed all that much. Once I get to take some updated pictures this week I will show the birthday girl off some more.


Choosing how to celebrate Kayla's birthday has been a little bit of a struggle because of where we are at developmentally still (she is much more in line with a 6 month old than a 12 month old at this point). There will be no cake smashing because she hasn't been able to have any solids yet, so we will cross that milestone when we come to it - whenever it may be.  We have to balance that with what her brothers expect for celebrating a birthday though so there will be a celebration, even though the birthday girl won't really know - but someday she'll care, so it is a good thing she has her brother's to watch out for her.  I mean really, just look at how they are celebrating with her already! (Because, after all, she is our princess!)


I'm choosing to celebrate the day in small, quiet ways. Like having a cup of really good hot chocolate and taking the time to sit, relax and reflect on the past year and everything that we have grown through together as a family.

I also want to take the time to think about where we are headed in our crazy life in the near future and stop to breathe and enjoy my family more. It is very easy to become wrapped up in the go-go-go attitude of a busy life and end up missing the small, important moments. I want to embrace those more so that when hard times come (which they inevitably always do) I can pull those out and hold them close to help get through it. I don't do that enough.


My boys are very funny.  They absolutely love having little parties with me - whether we are having a carpet picnic in the family room with a funny movie, or whether we are having a little 'tea' (aka hot chocolate) party in the kitchen while they get to help make a treat.

One we really love to celebrate with is doughnuts. We are absolute doughnut fanatics - can't get enough of them... which is why I don't make them too often. It would be a very dangerous habit to cultivate.  
Aside from the fact that doughnuts are dangerous, more often then not I don't have the forethought to actually plan ahead for them - only on special occasions really.

That is the beauty of Buñuelos - they are basically a fritter or doughnut made with a quick, almost biscuit-like dough. This makes them dangerously quick to make, but so satisfying when nothing else will do.

The dough that I make is slightly spiced with a little nutmeg and cinnamon and once fried is dusted with confectioners' sugar. I love eating these warm, but if you can wait the flavors are actually more noticeable when they have cooled a bit.  

These are fantastic to make with kids because everything is easily mixed in a bowl by hand and there is no real shaping that needs to happen - you just pinch off smallish pieces of dough, roll them a little or smash them, whichever you prefer and then fry them up.  The boys loved helping with this and it makes this a great family activity.


Add in some amazing, homemade hot chocolate mix lightly spiced with cinnamon and a little chile powder and you'll feel like celebrating too.

I came up with this Mexican Hot Chocolate mix recipe not too long after I created the Salted Caramel Hot Chocolate Mix recipe for Mom It Forward.  There is something I really just can't resist about having a jar of chocolate mix on the counter, ready to go, and knowing exactly what went into it and customizing it to our tastes.  It really is so easy to make that I haven't bothered to buy any store-bought mixes of any kind for the past few years now.  

Buñuelos
Makes approximately 18 fritters


1/4 cup milk
1 large egg
1 teaspoon pure vanilla extract
1 tablespoon vegetable shortening
1 cup all-purpose flour + extra as needed
1 teaspoon baking powder
1/8 teaspoon cream of tartar
pinch of salt
pinch of freshly ground nutmeg
1/8 teaspoon ground cinnamon

Vegetable oil for frying
Confectioners' sugar for sprinkling

In a small bowl whisk together the milk, egg and vanilla.

In a medium bowl, whisk together the flour, baking powder, cream of tartar, salt, nutmeg and cinnamon. Rub the shortening into the flour mixture using your fingertips.  

Add the milk mixture to the flour mixture and toss and stir together with a fork to create a slightly sticky dough.  Add enough flour to get this consistency, without making the dough too dry.

In a large pot, add enough vegetable oil to have it at least two inches deep.  Heat the oil over medium-high heat to about 350 degrees F. Use a frying thermometer if you have one, otherwise heat the oil for about 4-5 minutes, then use a small piece of dough to test it - it should sizzle and float immediately when added to the hot oil - if it doesn't, then the oil isn't hot enough.  

Pinch off small pieces of dough and shape them into small balls or flatten a little with your hands - it should be about a rounded tablespoon's worth of dough.  Add a few pieces to the hot oil at a time, but don't over crowd the pot.  Fry the fritters on all sides, turning as needed, for about 1 minute total or until golden.

Remove the fritters from the oil and let them rest on a paper towel lined plate or baking sheet to cool.  Sprinkle the slightly cooled fritters with confectioners' sugar and serve warm or at room temperature.

Mexican Hot Chocolate Mix
Makes 1 Cup of Mix (6 ounces by weight or 15 tablespoons) - enough for 4 to 6 servings


2 ounces good quality bittersweet chocolate, chopped (or chocolate chips)
1 to 2 teaspoons ground cinnamon
1/8 teaspoon ground ancho chile powder
1/4 teaspoon sea salt
1/3 cup dark brown sugar, packed
1/4 cup unsweetened cocoa powder, preferably Dutch processed

Combine everything in the bowl of your food processor and process the mixture until it is as fine a powder as you can get, without letting the machine heat too much or start melting the chocolate - it will take only about 4 to 5 minutes at the most, depending on the size of the chocolate pieces you started with.

To make a serving of the hot chocolate, combine 1 cup of hot milk for each 2-4 tablespoons of mix, depending on how rich you like your hot chocolate (pictured with about 3 tablespoons per cup of milk).  For a little extra you can add a small splash of vanilla extract as well.

Topping ideas:
whipped cream - plain or with a little cinnamon
cinnamon or cocoa powder sprinkled on top of whipped cream
marshmallows
cinnamon sticks for stirring

Wednesday, February 9, 2011

Kayla Cuteness Continues - Please Vote!

In case you haven't already seen my posts on Facebook (where you can even see some of the hideous pictures of me from my childhood that my sister was *kind* enough to share with the world) and Twitter about the cute baby Valentine's picture contest Babble is currently having, here is a link to the page - I don't know if Kayla will win or not, but I'm doing my best to get the word out there since it is her birthday on Valentine's Day after all... seriously, how cute is this picture!!

So, pretty please, go vote for my baby girl for her birthday.

This is me, shouting from the rooftops that I have one ridiculously sweet and cute little sweet pea here!

 Please Vote Here!

Chile Honey Chicken


I have such a plethora of recipes to tell you about in my drafts box that it is getting a bit ridiculous (30 and counting), just waiting for me to find the time to sit down and type. That said, this fast, simple chicken dish I threw together on a whim the other night was such a success that it is usurping the other recipes in the hopper because I just can't wait to tell you about it.

I'm not kidding, this one really hit it out of the park.  In fact, it was so good that when I made it the first time, I didn't even get any pictures and had no problem making it again the very next day so that I could share it with you.

The process for making this couldn't be easier, and honestly, even though it uses a few items from the Asian section you may not have in your pantry all the time, but once you make this you'll have no problem keeping them on hand - especially since they aren't expensive or too hard to find.


The first 'special' ingredient is sweet chile sauce.  I use this brand, because I like it and have had good success with it and have found it in most of the major stores, but you can make your own fairly easily.  It is, as the name suggests, a little sweet and a little spicy.  I love to keep it on hand for tossing in with veggies and chicken when we want a quick stir fry for dinner.

The second is Ponzu sauce. It is a citrus flavored sauce that is great in marinades on chicken, pork, beef, seafood, whatever. It really adds a nice, fast, bright burst of flavor.


The chicken pieces are first marinated in a mixture of the sweet chile sauce and ponzu, just for about 30 minutes. Then tossed in a little cornstarch to create a crust when they are then fried in a little bit of hot oil. The cornstarch helps to thicken the finished sauce a bit too.

Now, making the chicken this way is a little messy.  I'm not gonna lie.  But it is just SO good, that the little extra mess is worth it to me. However, if it's not to you, just skip the cornstarch step all together and follow the second set of directions in the recipe for just stir frying the chicken pieces and move on. You won't have that extra little crusty, crunchy layer on the chicken, but it will still be incredibly good.

Once the chicken is fried, it gets sauced.  This is where this dish gets so delicious that you'll be craving it again while you are still eating it.


Making the sauce couldn't be easier.  It is just a combination of some more sweet chile sauce with some honey and a little seasoning.  Pour it into the pan after the chicken has cooked to deglaze your pan (after you've poured out the oil if any was left of course) and let it reduce a little.  Slide the chicken pieces back in and coat them in the sauce.  Toss in a handful of sugar snap peas and let it all simmer together for a couple of minutes while the sauce thickens and reduces down to a glaze and that's it.  Just serve it all over since nice hot rice or noodles and dinner is done.

The finished dish isn't really too spicy at all, just more of a sweetness with a little bit of heat.  In fact, A. hates spice and he chowed down on this meal like I was going to snatch it away from him.  That is quite the feat for him these days, so I know we'll be making this often.  If you however like things a little spicier, just add a few chile pepper flakes to your sauce and you can up your heat quotient to your liking.


Speaking of the rice though, I like to make my rice on the stovetop... because I don't have room for a rice cooker, nor do I have a decent one.  Someday that will change, but in the mean time, I am loving this recipe. It really is the best rice I've ever made, and I love that it makes plenty (because the best fried rice the next day is made with cold, leftover rice - seriously).

Chile Honey Chicken
Original Recipe from PheMOMenon


Printable Recipe


Makes 4 Servings
For the chicken:
2 lbs. boneless skinless chicken breast or tenderloins
1/3 cup ponzu sauce
1/4 cup sweet chile sauce
2/3 cup cornstarch
2-4 tablespoons vegetable oil
1 cup fresh sugar snap peas
For the sauce:
1/4 cup honey
1/4 cup sweet chile sauce
3 tablespoons butter, melted
2 tablespoons water
1/4 teaspoon garlic powder or 1 clove garlic, minced very fine
Pinch red pepper flake, to taste
Trim and cut the chicken into bite-size pieces and place them in a large ziptop bag with the ponzu and sweet chile sauces. Mash the chicken in the bag a bit to get it all covered in the marinade. Set the bag aside in the refrigerator for 30 minutes (I usually start the rice or noodles now so it will be ready when the chicken is done).
While the chicken is marinating, make the sauce by whisking the honey, chile sauce, butter, water, garlic and pepper flake together in a small bowl. Set aside until ready to use.
Use a colander over the sink and pour the chicken out in the colander, discarding any marinade left over. Toss the chicken pieces lightly in a large bowl with the cornstarch, preferably working a few pieces at a time.
Heat 2 tablespoons of vegetable oil in a large frying pan or wok over medium-high heat. When the oil is hot, fry a few pieces of chicken at a time until golden on all sides, about 2 minutes total. Work in batches so you don’t crowd the pan. Remove cooked pieces and set them aside while cooking the remaining chicken. About half way through the batches you can add more oil to heat if needed.*
Once all the chicken is cooked, pour any remaining excess oil out of the pan, but don’t worry about any other little bits, they will be absorbed in the sauce. Turn the heat down to medium and add the sauce to the pan. Use a wooden spoon to stir the sauce and let it boil in the hot pan for 1 minute before adding the chicken pieces into the pan.  Stir the chicken in the sauce to coat. Toss in the peas and stir to coat. Allow the mixture to simmer and cook in the sauce until everything is hot, glazed and the sauce is almost completely absorbed - about 3 to 5 minutes.
Serve hot over rice or noodles and enjoy!
*NOTE: Alternatively, you can skip the cornstarch frying process and follow the directions below for a simple stir fry.
Stir Fry Chile Honey Chicken Directions:
Marinade the chicken pieces as described above, then drain the marinade.  Heat 1 tablespoon of vegetable oil in a large frying pan or wok over medium-high heat and add the chicken, still in batches and cook on all sides till just golden. Proceed as usual with the rest of the recipe.
Recipe Source: © PheMOMenon, All Rights Reserved

Monday, February 7, 2011

Mad Libs Monday - I'm Featured! And What Valentine's Day is REALLY about!

Just a quick note to let you all know that my darling friend Emily was kind enough to let me be her featured Mad Lib Monday guest this week on her blog is this REALLY my life?  It's all about commitment, so I hope you enjoy how it turned out!

Thanks for including me Emily (@emihill)!  It was so much fun and I love how my mad lib turned out. (Defenestration game - ROFL!!)


Now, completely unrelated, but I can't resist telling you anyway, today marks only ONE WEEK until Valentine's Day... or, if you really want to know, around our house, it's the holiday formerly known as Valentine's Day.

All because it is this little sweet pea's very first birthday!!!  Only one week to go and I just can't believe it!  It has been a crazy year, which has often made me ask exactly the question Emily asks, if this is really my life. It is, and I love it, but I have to admit, it has been quite a roller coaster.

This picture of Miss Kayla (or K La La, aka Baby Kayla, aka Kayla Boo - depending on who you are talking to in our family) is from a few months ago, toward the end of summer when she was almost completely off her oxygen during the day.


Around the end of September K. caught a cold.  Just one little cold. That's all it took.  That little cold has hung on and on and on, finally resulting in RSV last week.  She has weathered the RSV like the little champ she is, but the past 5 months has been a non-stop sick baby fiasco. She is fantastic and absolutely couldn't be sweeter if she tried, but the issues with her health have been draining, and I'm sure will continue to be.

That said, there have been a lot of great times too, and I am trying to make a conscious effort to focus more on those times so that the hard things are more bearable.  

So, since there are any number of things that I have missed out on with having my baby girl with Down syndrome, I want to tell you about the things that make me lucky.  This is going to be an ongoing effort for me to work at being more positive.  The Down syndrome isn't actually what bothers me anymore, it is the health problems.  I need to remember that and cherish K. for the incredible little person she is.  Our family definitely would not have been complete without her.

My friend Dara recently reminded me that there is NO reason for me to feel like I need to only share the pictures of K. where everything looks perfect (aka, no oxygen) - especially since those pictures don't happen often lately.  So, just in case you haven't seen her recently (even though she actually hasn't changed much in recent months) here is one of my favorite pictures from this Winter.  I'll be sharing more Kayla-cuteness here all week for her birthday celebration, so if you need a daily dose of cuteness - stay tuned!


We have tried about everything we can think of to keep her cords from getting too tangled up (something you just don't have to worry about when you have a wifi style baby).  It never works, because K. loves playing with her cords, so no matter what, she has almost always tangled them somehow.  This time in particular was because right before I took the picture above, she was sleeping like this:


I hope you don't mind me sharing more about K. here, but I want to spend this week before her birthday really celebrating her with you so you'll know what we've been up to for the past year.  We are actually trying to focus on milestones more than dates, but every baby deserves a great birthday celebration!

Thanks for hanging in there with us!


Happy Monday!

Blog Widget by LinkWithin