PheMomenon has moved!

You should be automatically redirected in 5 seconds.

If not, please visit http://www.phemomenon.com and update your bookmarks and RSS feed.

Showing posts with label brownies. Show all posts

Tuesday, July 13, 2010

TWD: Brrr-ownies

Photobucket

Tuesdays with Dorie this week was a pretty lucky pick for me since I just made these brownies a few weeks ago for a friend to celebrate the birth of her first baby - she is a peppermint patty lovin' fiend.  I knew the brrr-ownies time would come someday, so I went ahead and took pictures then VOILA! There time is already here!

Photobucket
The brownies were much like most other brownie batters, with the addition of chopped up peppermint patties.  Many other bakers ran in to problems with the peppermint patties melting into goo and disappearing in the batter.  I'm not sure why this didn't happen to me, but I did make sure to chop my candies in fairly large pieces for the most part - I really wanted there to be chunks of candy in the brownies.

Photobucket

These brownies were a hit with my friend and here at our house, so thanks go out to Karen at Welcome to our Crazy Blessed Life for choosing this one! Make sure to check out the TWD Blog for more brownie posts!

Photobucket

Tuesday, June 1, 2010

TWD: White Chocolate Brownies with Raspberry Coulis

Photobucket

I am a project collector. I take on too many things at once and should really learn to not spread myself so thin. I know all this, and yet, I don't seem to be able to stop myself. Why?

I guess to a certain extent, I thrive on the energy of accomplishing the things I set out to do. Unfortunately, the flip side of that is being a perfectionist who is forced to underperform and let slide too many things each day because, although I said a while back I was trying to find a way to fit more hours into the day, it just isn't happening. So, until I learn how to stop spreading my time out so thinly, I'll just keep trying to juggle the best I can. I hope you'll continue to bear with me as I have some important things I need to tell you all about but just can't seem to find the right time or the right way to say it. It will be soon though, because the lack of communication on my part is driving me nuts. My most sincere thanks to you for still coming here and visiting, even though I've been strangely out of touch lately. I promise to shed some light on that all soon and am sure you'll all understand. UPDATE: Please visit my new blog Sweet and Simple and read the start of my explanation about what is happening in our life. I am finally no longer going to be strangely silent. Love you guys!

Speaking of things that were spread thin recently (like that ridiculous segway?) what about the meringue on this week's White Chocolate Brownies for Tuesdays with Dorie? I know several people mentioned they had decided their brownies were going nekkid, but I chose to just stick to the recipe and see what they turned out like. I've never made any type of brownie that had white chocolate, ground almonds, fresh raspberries and then meringue spread on top of the unbaked batter - very unique, and therefore, I wanted to see what they were meant to be like.

The White Chocolate Brownies were chosen by Marthe of Culinary Delights, but I have to give a little shout-out to Ms. Clara who has been waiting **oh so patiently** for someone to finally choose this recipe :) Actually, I was really excited too and we really enjoyed them.

Photobucket

I made the full batch to take to a family BBQ where they were pretty much devoured. I was concerned when making the recipe due to the fact that so many people were having trouble getting them to bake all the way through. I think I ended up baking mine for a good 10 minutes extra and the middle portions were still quite gooey. I'm still not sure what that was all about or how to fix it, but I've decided that next time (like our host, Marthe) I will probably do cupcake sized portions and not have to worry so much about the gooey-ness.

I think I would also like to try a version with ground hazelnuts instead of the almonds, but the almond meal was really wonderful in it. I went ahead and made the raspberry coulis like Dorie suggests for serving on the side, but frankly, they didn't really need it. Overall, it was very different and fun to make, they were delicious and I'll definitely make them again some time.

Be sure to check out the Tuesdays with Dorie blogroll to see how the others fared this week!

Photobucket

Wednesday, May 12, 2010

Outrageous Chocolate Cookies

Photobucket

It has been quite a while since I joined in with the Cookie Carnival fun, but this month we had two choices - and as you can see here, one of those choices involved oodles of chocolate. I've actually had this recipe from Martha Stewart bookmarked for a while and had a wicked chocolate craving (as opposed to the rest of the time when I just want chocolate).

This recipe's time has finally come, and I must admit, since it was so quick and delicious that its time will come again (and again and again). I actually made only a half batch though because of the extreme amounts of ingredients required. It would be safe to say, with 20 ounces of chocolate (that is well over a pound of chocolate for only two dozen cookies people!) that this cookie has definitely earned its 'outrageous' moniker.

These cookies are literally just melted chocolate, sugar and a few other ingredients, plus a lot more chocolate chunks, cobbled together with a smidgen of flour. That being the case, it is a safe statement that the overall flavor you are going to end up with is the taste of the chocolate you use. Therefore, I would caution you to make sure to use a chocolate that you really like. I used a bittersweet chocolate that I like for baking, but not necessarily for just eating out of hand, and it made a difference in the end product.

Photobucket

That said, my most favorite thing about these cookies - and the reason I know I'll make them again - is that they were shockingly similar to a really good brownie - but just the melty chocolate, fudgey texture AND lots of chewy edges and shiny crisp outer shell. In other words, if you are like me and love pretty much all types of brownies and have ever wondered what it would be like to have one with all your favorite aspects rolled in to one - this is your cookie.

The best part about that is that they could be eaten almost immediately out of the oven - but were ah-ma-zing when just cooled to room temperature. A definite keeper.

Photobucket

Outrageous Chocolate Cookies

- HALF BATCH MEASUREMENTS - MAKES 1 DOZEN COOKIES

10 ounces semisweet chocolate, chopped into chunks - divided

2 tablespoons unsalted butter

1/3 cup all-purpose flour, spooned and leveled

1/4 teaspoon baking powder

1/4 teaspoon salt

1 large egg

1/3 cup + 1 tablespoon packed light-brown sugar

1/2 teaspoon pure vanilla extract

Preheat oven to 350 degrees. Heat 4 ounces of the chopped chocolate and butter in a microwave-safe bowl in 20-second increments, stirring in between, until almost melted; do not overheat.

In another bowl, whisk together flour, baking powder, and salt.

In a mixing bowl, beat egg, brown sugar, and vanilla on high speed until light and fluffy. Reduce speed to low; beat in melted chocolate. Mix in flour mixture until just combined. Stir in remaining chocolate chunks.

Drop heaping tablespoons of dough 2 to 3 inches apart onto parchment lined baking sheet. Bake until cookies are shiny and crackly yet soft in centers, 12 to 15 minutes. Cool on sheets 10 minutes; with a thin metal spatula, transfer to racks to cool completely.

Tuesday, February 9, 2010

TWD: Rick Katz's Brownies for Julia


Tuesdays with Dorie this week is all about Rick Katz's Brownies for Julia chosen by Tanya at Chocolatechic. The story behind these brownies is in the book, but as you can guess from the title, these are the brownies that Rick Katz used to make for Julia Child while they were working on one of her books.

The brownie recipe is unique in the way they batter comes together. While there was some confusion among the group about exactly how they were supposed to come together, I have found with many of Dorie's recipes that if I read her introductions as well as reading the recipe through at least once before I get started, I have much better luck with understanding what I need to do.

As I was thinking about that, I realized that may be a handy tip - that seems obvious, but may not really be, for anyone who is starting out learning how to bake or cook. I always read the ingredient list, any notes, introductions, etc. and the recipe instructions through all the way - at least one time - before I start making the recipe. I didn't used to do this and without exception, the times when I just jumped in without that preparation, were the times that I failed. So, while it isn't really very sage advice, if you are just starting out, it may be some of the best advice for baking success that I can think of.


These brownies were really wonderful. I made mine a little thinner than the original recipe intended by baking them in a larger pan. I know I'm not a fun of brownies that are super fudgey in texture. What was an unexpected bonus for me was that by switching the pan, I ended up with a brownie that was thin and a little chewy - especially on the edges - which I really liked. They ended up having just the right ratio of chewy to fudgey texture for me in this case - with a nice crusty top layer.

The different steps to putting these brownies together, which included whisking the eggs, then adding half to the chocolate mixture, while whipping and then folding in the remaining portion to the chocolate mixture later, then folding the dry ingredients in, etc. - was a bit fussy for me, it wasn't hard and the results were worth it.

Be sure to check out all the other brownie goodness by heading over to the TWD Bakers Blogroll!

Wednesday, August 12, 2009

TWD: Brownie Buttons


Well.... here it is, Wednesday afternoon and I'm finally posting my brownie buttons. They were the pick from Jayma at Two Scientists Experimenting in the Kitchen for this week's Tuesdays with Dorie.

I actually made these last year, but didn't take any pictures. We really liked them then and I actually thought they were even better this time. What's not to love about a little bite-sized chocolatey brownie frosted with a little white chocolate? I used my Wilton Brownie Bites pan to make these since one pan fit all the batter (still only made 16), which was easier for me to deal with than the mini muffin pans since I only have one pan. I skipped the zest this time, just because I didn't feel like dealing with it. I did it last year, and really liked the addition, I just didn't want the extra steps.

I made them again last night because I was serving them this morning at an open house our realtor held to show our home to other realtors in the area, and hopefully get some traffic for the listing.

We had already decided to list our house before all the recent craziness (granted, only by a day or so) but now it is really important that we sell and hopefully we will get an offer within the range that we need to be able to move before we are crushed by all our bills.

I haven't had any luck in the job searching department, mainly because I am too sick still with the pregnancy. I just got some new medication a few days ago that should help with the sickness, but unfortunately its main side effect is causing headaches. Bad news for me since, with my tension headaches and regular migraines, this means that I can either be sick from my stomach or I can be sick and down with a monster headache. Fun times people. Fun times.


The flip side of the job search is the fact that child care costs are so high there is no way I can work and pay for day care. It is an interesting conundrum. I applied for child care assistance from the state so that I could get a job, but I can't get assistance unless I already have the job. Catch 22.

Anyway, I just wanted to thank all of you that stopped by last week to offer well wishes and encouragement. I am trying to keep positive about things and try not to stress myself out more and make things worse. I am also trying to be optimistic. I'll have to keep you posted on how that is going. In the mean time, thank you, thank you, thank you - for coming here in the first place and for coming back! I am going to try to post a couple of times a week still and will most likely only keep up with TWD for now. Other than that, I don't know what I'll be doing. I just wanted to say thank you again and tell you all how much it means to me that you are here!


Tuesday, May 26, 2009

TWD: Chipster-Topped Brownies


Beth of Supplicious chose this week's recipe from Baking From My Home To Yours, by Dorie Greenspan, for our Tuesdays with Dorie escapades.  

Beth, my sincerest thanks go out to you for the choice and especially to Dorie for creating and putting this recipe in the book in the first place.


To say that I loved this recipe is actually putting it mildly.  After all, this recipe basically combines my two most favorite comfort desserts into one insanely delicious and addictive pan -seriously, it is genius.  Chocolaty and delicious brownies topped by incredible chocolate chip cookie dough.  

'Nuff said - well, almost, I will say one more thing for you to wrap your mind around:  Cut a nice square while warm, top it off with some vanilla ice cream and chocolate sauce - yeah, I went there.


Don't forget to check out more chocolaty goodness at the Tuedays with Dorie blogroll!

Sunday, April 12, 2009

Perfect Chocolate Brownies


It has been a couple of wild and crazy weeks around our house! I am looking forward to hopefully there being more springlike weather instead of the perpetual winter here in Utah!

Spring and warmer weather always makes me think of picnics and how I can't wait to start spending more time outdoors!  I am hoping that for my birthday later this month I will be getting a bike and trailer to take the kiddos on some long rides.

Picnics, along with most everything else, make me think of treats and treats always make me think of chocolate!  I have had my eyes on this brownie recipe for a while now and I have to tell you, I really think my search for Perfect Chocolate Brownies is finally over.

You can follow this link to find out more about the recipe and also to check out my new gig writing as the Salt Lake City Baking Examiner for Examiner.com!  I am looking forward to really sharpening my writing skills and having another venue to talk about baking and all the local things I love!  Thanks to Donna over at Spatulas, Corkscrews & Suitcases for telling me about Examiner.com in the first place!  She is the top food writer for them and has some great articles on there as well!

I also wanted to mention that there will be more chocolaty goodness this coming Tuesday for Tuesdays with Dorie.  It was my turn to pick the recipe and I can't wait to tell you all about it!  I will also be making another announcement, so I hope you check back in because it is an important one!

Thanks to everyone for coming to read this blog and see what I've been up to! 

Happy Easter!

Sunday, March 22, 2009

Chocolate Bouchons

Sorry for the delay all! I was just never able to get near the computer yesterday. Sheesh! So, back to these brownie corks - aka Chocolate Bouchons. These are the warm, soft, buttery, chocolatey, most delicious brownies of your dreams.

I made this same recipe a while ago and tried to bake them in a different mold, but since Williams-Sonoma made this pan readily available I couldn't resist trying it again. I have to admit, the pan does make a bit of a difference in how it all worked out. I guess my next attempt with this recipe will be to try a regular pan and see how it works out.

The recipe, the title and the idea of course, all come from Thomas Keller. You can follow this link to see the other attempt and get the recipe.


Chocolate Bouchon pan from Williams-Sonoma

Sunday, March 15, 2009

Loaded Chocolate Brownies - See's Candies Review


It will come as absolutely no shock at all when I make the statement that I love chocolate. What may or may not surprise you is the fact that my absolute favorite chocolates are See's. Some of my very favorite memories of working in Downtown Salt Lake City was visiting the See's shop around the corner from our office about once a week during one of our lunch breaks with my cousin to just 'pick up a few things.' It always made the whole week so much better to go in and choose a few of my favorite chocolates and maybe try a sample of something new.

My all time favorite assortment is the Dark Nuts and Chews - a boxed mixture of dark chocolate covered caramels, Scotchmallows and nuts. I love knowing that I can get a box that every single chocolate in it is going to be something fantastic.

I decided to see what would happen if I made some brownie cupcakes and loaded them with some chopped up chocolates, and then topped them off with some toasted marshmallows. Well. The brownies you see below are what happened - and they are really, really good. I also thought it would be fun to use my brownie bite pan and make some little miniature brownies that were just the right size to snuggle back into the box of chocolates with the remaining chocolates that I didn't chop up. It made for a very fun, and delicious, presentation and treat!

I was contacted recently by a representative of See's asking if I would be willing to make something out of one of their products and then blog about it to help let everyone know that their Easter candy becomes available tomorrow (March 16th). Of course I jumped at the chance, but not only because I wanted the chocolates.

I remember, when I was growing up, that while Valentine's Day was fun to get some chocolates or something fun, it was actually Easter that I always wished I would get a really cool Easter basket. For me, Valentine's was more about flowers, but Easter was the time I really wished I would get one of those cool chocolate bunnies, or maybe even a pretty chocolate egg - better yet, one I could decorate myself. Brightly colored, egg shaped wrapped chocolates would have been great too.

Inevitibly, around our house, it was just the generic jelly beans in plastic eggs - which, don't get me wrong, is great too, but I always wished I would have had something a bit more fanciful. So, as for me, this year, I know exactly what I will be putting in Aidan's Easter basket. He is a chocolate loving kid and every time I see his face light up when he see's those chocolate bunnies, I just know that I am going to have to get one for him.

To see all of See's Easter candies and chocolates, visit them online at See's Candies.


Loaded Chocolate Brownies
By Holly, PheMOMenon

Makes 12 Individual Brownies + 24 Bite Size Pieces


12 Tablespoons unsalted butter, cut into small pieces
3 ounces unsweetened chocolate, chopped
1 1/8 Cups granulated sugar
1/2 Cup packed light brown sugar
3 large eggs
2 teaspoons vanilla
3/4 Cup all-purpose flour
1/4 teaspoon salt
3/4 cup pecans, toasted and coarsely chopped
7 ounces of assorted dark chocolate covered candies with nuts
1 1/2 cups marshmallows

Position a rack in the center of the oven and preheat to 350 degrees F. Line or spray the muffin pan (12 cup or 18 if not making any mini's).

In a heat-proof bowl over a pan of simmering water, melt together the butter and chocolate, stir until smooth. Set aside to cool to lukewarm.

Meanwhile, in the bowl of a mixer with a paddle attachment, mix together the sugars, eggs and vanilla. Beat on medium until well combined and starting to lighten and get fluffy. On low speed, add the cooled chocolate/butter mixture and increase the speed to mix well, about 1 minute.

In a small bowl, sift together the flour and salt. On low speed, add to the mixing bowl and mix just to combine. With a rubber spatula, gently fold in the chopped chocolates and nuts, just to combine. Fill the muffin cups, or whatever molds you are using, just half full with a scoop of batter.

Bake regular size cupcake portions 20 minutes, or until the surface has a glossy, crackled top. For mini's bake, 10 minutes. If you are using the marshmallows, once the brownies are baked, remove them from the oven and, while still in the pan, top them with a few marshmallows and place the pan back in the oven for 2 to 3 minutes - just enough to puff and lightly toast the marshmallows. Transfer the pan to a wire rack to cool just enough to handle, then remove the brownies from the pan and let cool completely.

Friday, August 1, 2008

Chocolate Fudge Brownies

Photobucket

The recipe, mentioned in my Operation Baking GALS post - as promised!

Chocolate Fudge Brownies
(Adapted from this recipe by Martha Stewart - just doubled)

12 Tablespoons unsalted butter, plus more for pan
12 ounces coarsely chopped good-quality bittersweet (or semisweet) chocolate
1/2 cup unsweetened cocoa powder (not Dutch-process)
1 1/2 cups all-purpose flour
1/2 teaspoon baking powder
1/2 teaspoon salt
2 cups sugar
4 large eggs
4 teaspoons pure vanilla extract

Preheat oven to 350 degrees. Line a buttered 9x13-inch baking pan with foil, allowing 2 inches to hang over sides. Butter lining (excluding overhang); set pan aside.

Put butter, chocolate, and cocoa in a heatproof medium bowl set over a pan of simmering water; stir until butter and chocolate are melted. Let cool slightly.

Whisk together flour, baking powder, and salt in a separate bowl; set aside.

Put sugar, eggs, and vanilla in the bowl of an electric mixer fitted with the whisk attachment, and beat on medium speed until pale, about 4 minutes. Add chocolate mixture; beat until combined. Add flour mixture; beat, scraping down sides of bowl, until well incorporated.

Pour batter into prepared pan; smooth top with a rubber spatula. Bake until a cake tester inserted into brownies (avoid center and edges) comes out with a few crumbs but is not wet, about 35-40 minutes. Let cool slightly in pan, about 15 minutes. Lift out brownies; let cool completely on a wire rack before cutting into squares.

Thursday, July 31, 2008

Baking Bars with the GALS for a Great Cause

Photobucket

I'm sure most of you have already seen this lady around in the past few days. She has been making the food blogging rounds at a whirlwind pace as the spokeswoman (ok, the spokes-badge) for Operation Baking GALS (Give A Little Support).

When I received the call to arms - or in this case whisks and spoons - via this email on Sunday from Sus over at She's Becoming DoughMESStic I immediately jumped onboard.

My brother, Jason - fondly known as "Hank the Tank" (outlined in the picture below) by his buddies - is in the Army and has been to Iraq once already. He actually renewed his contract with the Army recently and will most likely be going back to Iraq just in time for Christmas this year (if not much sooner - I can't be sure). I have told him before how proud I am of him, not only for joining in wartime, but for seeing it through. It has not been an easy road for him and he has had to make a lot of personal sacrifices - as do all of our fighting men and women.

So, for obvious reasons, I am a bit chagrined that the thought of doing something like this never occurred to me before. I guess in part it is because when he was in Iraq before I wasn't blogging yet, and for the time being he is in Washington with his family. No excuse for not really finding a good way to do something positive to help before that I could do from home, but there you go.

That is why I am so grateful (actually just one of many reasons) to be a part of this food blogging community. Without it, I don't know when I would have found a way to do something positive and to say "thank you" to all of our soldiers in all the branches of our military. I also owe a big "thank you" to Sus for coming up with this idea in the first place. I look forward to throwing my brother's name in the hat as a recipient for some love when he goes back to Iraq for his second tour.

So, why did it take me so long to get this done since Sunday? Good reasons actually. you see, when my brother was in Iraq before my Mom was the unofficial 'Queen of Care Packages'. I, proud to be like my mother, felt that I needed to do my due diligence in research, on the best way and what to send (hopefully). What you see before you is the last five days worth of questions, research and planning. Whether or not this is the best way, I really don't know, but I really wanted to give it my very best shot so that when Jason, Susan's cousin and our first OP: GALS recipient, receives this package I can feel like and hope that I've done the very best I can to hedge all my bets on it getting there safely.

So, I approached all this a bit more methodically than I normally do because - well - this is so much more important than just my everyday baking for fun.

So, of course, for something so important, I needed help and I only wanted the best. For this project here were my recruits: Aidan "the crazy five-year old" (as he now refers to himself) seen climbing his first tree, and Cole, my sweet little peanut - seen here sitting with me in a parking lot checking out the steering wheel and finally sitting up like a champ.


Cole's duties were simple - sit in the booster chair and play while looking cute. Done. Mission accomplished. Aidan's duties were a bit tougher - play with Cole, help dump in ingredients and sample the baked goods to make sure they pass inspection - it is a tough job, but someone had to do it.

My duties - well, they were all a bit more complicated, but, we'll cover most of that with the recipes. Other than the actual baking though I wanted to share with you my thought process below that took all the planning - using information gleaned from my Mom, as well as the various sources Sus provided on the OP: GALS headquarters and my own (possibly over-analyzed) criteria.

Basically, for just under $10 ($9.80 to be exact) you can ship in a flat rate box a decent amount of baked goods (in this 36 big bars). You have to use the special box from the USPS (I think - at least to get this rate) and you have to complete a customs form. You also have to make sure that the box is packed tight with really no wiggle room.

This led to my mission to figure out, basically, how to get the most bang for the buck, so to speak - thus my criteria - in no particular order:

-- Nothing too soft or squishy - Hopefully something that will stay together
-- Portions that could be individually wrapped for ease of distribution (and hopefully this helps
keep things together) - I went with plastic wrapped, then foil packed groups
-- The most efficient use of space in the box to fill it as completely as possible - this is why I
went with three types of bar cookies (12 generous size servings of each kind)
-- The best ingredients I could get my hands on and generous portions as mentioned above-
because, what if that is the only treat that soldier gets - I want it to satisfy, not tease
-- Some kind of variety of the things I felt would be the most widely popular

UPDATE: I used a local newspaper and the most recent copy of TIME magazine to help fill the little space that was left in the box, as well as a letter from us that included our email address and blog address as suggested on the OP: GALS blog. In the future I want to include a return postcard where the troops can rate the goodies and let me know whether or not the recipe was a winner by the time it gets there


I think that covered all my criteria, which is why it took so long to get all this together. So, you will have to be patient with me because I will be posting these recipes seperately so this excessively long post doesn't become thelongestpostinthehistoryofmankindthankyouverymuch!

UPDATE: The recipes are now posted and you can link to them from their titles below!

So, without further ado, I give you....... [[drumroll please]].........


CHOCOLATE CHIP COOKIE BARS


Photobucket


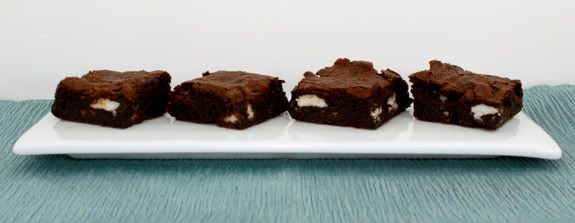
CHOCOLATE FUDGE BROWNIES

Photobucket


CHERRY ALMOND COCONUT BARS

Photobucket

CLICK HERE TO FIND OUT HOW YOU CAN HELP!

Tuesday, March 25, 2008

When Life Gives You Raspberries...


Photobucket

Only in the past few months did I first hear of Donna Hay. While I am glad to have found her, I am still somewhat bummed that I didn't find her a long time ago. I feel slightly jipped by this. Oh well, at least now I know. And I am SO glad!

The last HHDD round was for Coconut Chocolate Tarts and we were to put a twist on them. I chose to add some raspberry flavor and make these Chocolate Coconut Raspberry Swirl Tarts. They were incredible. Since then, it seems like I keep coming back to the chocolate-raspberry connection.

Which brings us to this post. I found this recipe on Epicurious and thought that their photograph was so beautiful that I knew I would have to try this. Now, I am so glad I did. Though my photography skills aren't as good as the pro's at Epicurious, I think these lstill ook pretty fantastic. I have to tell you, they taste even better.

If you love a brownie that is slightly dense, dark and a little cakey, with a little fudgeiness too (is that even a word?), then this is a great choice for you. I will however mention, that, as you can really see in the photo with the Vanilla Frozen Custard below that these brownies are dark. If you aren't into dark chocolate, then I imagine you could easily substitute semisweet. I, however, love dark chocolate, but my husband wasn't as impressed as they were too dark for him.

For some reason I realized that I don't have a 9-inch square baking pan (seriously! what is up with that!?) in my kitchen I had to use a 7-inch dish that I have. Obviously this didn't fit all the batter, so I will show you in another post what I did with the rest of the batter. However, the measurements below are for a 9-inch pan, since I'm sure the rest of the world isn't as lame as I am. (I think I had a pan, and it broke, and I've still never replaced it!)


Anyway, these Raspberry Spiked Brownies were incredible and easy to make, as brownies should be. Yet they look all dressed up and impressive. Since these brownies got all dressed up, I couldn't leave them with nowhere to go and show off, so I am sending them over to the Monthly Mingle for Spring Fruit Sensations, hosted by Abby of Eat the Right Stuff for this round on behalf of Meeta, the event's creator.

I ate my brownie all by itself, because it really didn't need anything else in my opinion. However, since I had just made a batch of Vanilla Frozen Custard (too rich to be just "ice cream") I served a huge bowl of ice cream with one of the brownies to my husband (he is an "ice cream" fanatic). I've given you the recipe for both the brownies and the frozen custard below. They are amazing, together or each on their own.

Photobucket

Raspberry Spiked Brownies

200 grams (7 ounces) dark chocolate, chopped
250 grams (8 ounces) butter
1 3/4 cups brown sugar
4 eggs
1 1/3 cups plain (all-purpose) flour
1/4 teaspoon baking powder
1/3 cup cocoa, sifted
1 1/2 cups raspberries, fresh or frozen* (I used only about 3/4 cup since it was a much smaller pan)

*If using frozen raspberries there is no need to defrost them first. You can also use fresh or frozen blueberries.

Photobucket

Preheat the oven to 180°C (355°F). Place the chocolate and butter in a small saucepan over low heat and stir until melted and smooth. Place in a bowl with the sugar and eggs. Sift over the flour, baking powder and cocoa and mix to combine. Pour into a 23 cm (9 inch) greased square cake tin lined with non-stick baking paper. Top the mixture with the raspberries and bake for 30–35 minutes or until set. Serve warm or cold with thick (double) cream or vanilla bean ice-cream.


Photobucket

Vanilla Frozen Custard (Extra-Rich Ice Cream)
(Adapted from Williams-Sonoma Vanilla Bean Ice Cream Recipe - Book: Ice Cream)
1 1/2 cups half-and-half
1 1/2 cups heavy (double) cream
7 large egg yolks
1/2 cup plus 2 tablespoons sugar
1 tablespoon pure vanilla extract

In a heavy 2-qt saucepan, combine the half-and-half and 1 cup of the cream. Cook over medium heat until bubbles form around the edges of the pan, about 5 minutes.

Meanwhile, combine the egg yolks, sugar, and remaining 1/2 cup cream in a bowl. Whisk until the mixture is smooth and the sugar begins to dissolve.

Remove the cream mixture from the heat. Gradually whisk about 1/2 cup of the hot mixture into the egg mixture, whisking constantly, until smooth. Pour the egg mixture into the saucepan. Cook over medium heat, stirring constantly with a wooden spoon and keeping the custard at a low simmer, until it is thick enough to coat the back of the spoon and leaves a clear trail when a finger is drawn through it, 4-6 minutes, approximately. Do not let the custard boil. Strain through a fine-mesh sieve into a bowl.

Whisk in the vanilla extract. Place the bowl in a larger bowl partially filled with ice cubes and water. Stir occasionally until cool. Cover with plastic wrap, pressing it directly on the surface of the custard to prevent a skin from forming. Refrigerate until chilled, at least 3 hours or up to 24 hours.

Pour the custard into and ice-cream maker and freeze according to the manufacturer's instructions. Transfer the ice cream to a freezer-safe container. Cover and freeze until firm, at least 3 hours or up to 3 days, before serving.

Makes about 1 Quart


Photobucket

Do I have to cut this into bars? I think this one could just be my piece!

Blog Widget by LinkWithin