It's that time again! The fabulous Daring Baker's are once again flooding the foodosphere (I have no idea if that is a real word, but it's late, and there you go). This time it is with lovely little Cheesecake Pops. Yup, yummy goodness of baked cheesecake, scooped, dipped, dressed up and on a stick. What's not to love, right? Right.
As you can imagine, with this past week has been busy with the roundup for the Blogging for Babies Event (and don't forget to check it out and vote for your favorites to help them win some prizes!). Then the March for Babies was held this morning and went really well - but more about that later. You're here for cheesecake, right? Right.
As you can imagine, with this past week has been busy with the roundup for the Blogging for Babies Event (and don't forget to check it out and vote for your favorites to help them win some prizes!). Then the March for Babies was held this morning and went really well - but more about that later. You're here for cheesecake, right? Right.
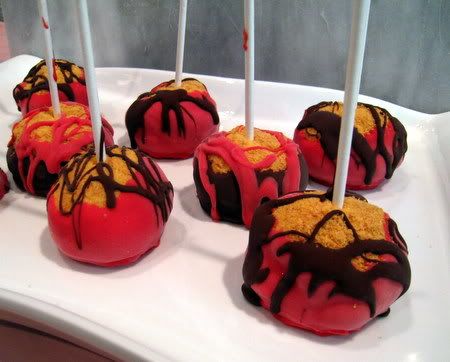
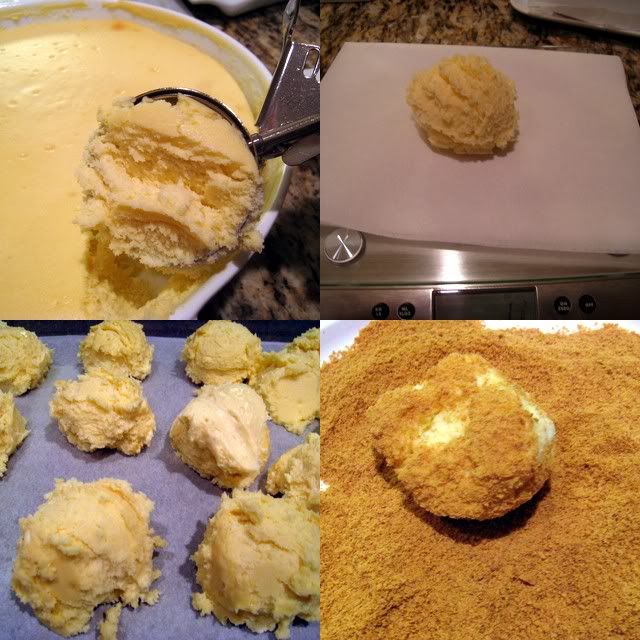
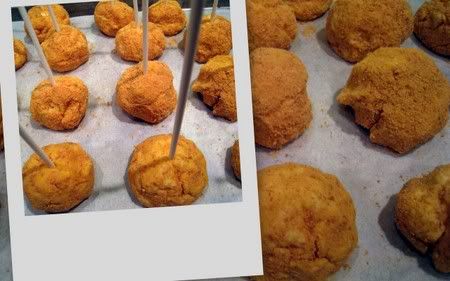
So, a lot of the DB's sounded like they had trouble baking the cheesecake, and I took my cue from them. I didn't deviate from the recipe, but partly by default and an uncooperative baby, ended up letting the cheesecake bake for about 60 minutes, when it still was just barely setting and then it actually had to sit in the water bath while it cooled til I could get back to take it out later - so, because that ended up being perfect (lucky for me and those 40 oz of cream cheese the recipe calls for). The cheesecake consistency was the perfect for scooping. I would say my only "complaint" if any was my utter clumsiness in actually trying to get these babies into a good shape. I used my 2 oz scoop and even weighed them just to be safe, but they were so soft I couldn't work them into nice round balls (or any other shape for that matter). Once frozen there was no shaping either. So, I just scooped and let it take its own rough shape. So, while I'm sure that my Cheesecake Pops aren't the prettiest out there, overall I'm very pleased with how they turned out.
I chose to dip mine in bittersweet chocolate and red candy melt (from Wilton) with a layer of graham cracker underneath. The big surprise (for me anyway) was the fact that I liked a couple that I left with just the graham cracker (no other coating) the very best. I guess I'm a cheesecake purist or something.
So, here you go. The recipe with a few notes from me in italics. Thank you to our lovely hostesses this month, Elle at Feeding My Enthusiasms and Deborah at Taste and Tell. I thought their challenge and recipe was absolutely inspired and definately a challenge. Thanks again!
As always, don't miss out on what all the other Daring Bakers and Alternative Daring Bakers have offered up this time around. Seriously, go check it out!
Cheesecake Pops
Makes 30 – 40 Pops (I got closer to 30 at the almost exact weight of 2 oz)
5 8-oz. packages cream cheese at room temperature
2 cups sugar
¼ cup all-purpose flour
¼ teaspoon salt
5 large eggs
2 egg yolks
2 teaspoons pure vanilla extract
¼ cup heavy cream
Boiling water as needed
Thirty to forty 8-inch lollipop sticks
1 pound chocolate, finely chopped – you can use all one kind or half and half of dark, milk, or white (Alternately, you can use 1 pound of flavored coatings, also known as summer coating, confectionary coating or wafer chocolate – candy supply stores carry colors, as well as the three kinds of chocolate.)
2 tablespoons vegetable shortening
(Note: White chocolate is harder to use this way, but not impossible)
Assorted decorations such as chopped nuts, colored jimmies, crushed peppermints, mini chocolate chips, sanding sugars, dragees) - Optional
Position oven rack in the middle of the oven and preheat to 325 degrees F. Set some water to boil.
In a large bowl, beat together the cream cheese, sugar, flour, and salt until smooth. If using a mixer, mix on low speed. Add the whole eggs and the egg yolks, one at a time, beating well (but still at low speed) after each addition. Beat in the vanilla and cream.
Grease a 10-inch cake pan (not a springform pan), and pour the batter into the cake pan. Place the pan in a larger roasting pan. Fill the roasting pan with the boiling water until it reaches halfway up the sides of the cake pan. Bake until the cheesecake is firm and slightly golden on top, 35 to 45 minutes. (Mine baked for about 60 minutes until it was pretty set if not completely firm and barely golden - as I mentioned above though, I ended it taking it out of the oven and not getting to take it out of the water bath until it had pretty much cooled completely. I think that actually worked in my favor because I was firm and well set, but not browned. It was either end up burning it before I could take it out of the oven though, or take it out before it was completely done. So, there you go, lucky for me the carryover heat really did the trick).
Remove the cheesecake from the water bath and cool to room temperature. Cover the cheesecake with plastic wrap and refrigerate until very cold, at least 3 hours or up to overnight.
When the cheesecake is cold and very firm, scoop the cheesecake into 2-ounce balls and place on a parchment paper-lined baking sheet. Carefully insert a lollipop stick into each cheesecake ball. Freeze the cheesecake pops, uncovered, until very hard, at least 1 – 2 hours.
When the cheesecake is cold and very firm, scoop the cheesecake into 2-ounce balls and place on a parchment paper-lined baking sheet. Carefully insert a lollipop stick into each cheesecake ball. Freeze the cheesecake pops, uncovered, until very hard, at least 1 – 2 hours.
When the cheesecake pops are frozen and ready for dipping, prepare the chocolate. In the top of a double boiler, set over simmering water, or in a heatproof bowl set over a pot of simmering water, heat half the chocolate and half the shortening, stirring often, until chocolate is melted and chocolate and shortening are combined. Stir until completely smooth. Do not heat the chocolate too much or your chocolate will lose it’s shine after it has dried. Save the rest of the chocolate and shortening for later dipping, or use another type of chocolate for variety.
Alternately, you can microwave the same amount of chocolate coating pieces on high at 30 second intervals, stirring until smooth.
Quickly dip a frozen cheesecake pop in the melted chocolate, swirling quickly to coat it completely. Shake off any excess into the melted chocolate. If you like, you can now roll the pops quickly in optional decorations. You can also drizzle them with a contrasting color of melted chocolate (dark chocolate drizzled over milk chocolate or white chocolate over dark chocolate, etc.) Place the pop on a clean parchment paper-lined baking sheet to set. Repeat with remaining pops, melting more chocolate and shortening (or confectionary chocolate pieces) as needed.
Refrigerate the pops for up to 24 hours, until ready to serve.


32 comments:
Oh my, those look so neat. I dig the colors.
I like the graham cracker layer- the colors are striking together too!
Glad the March for babies went well - looking forward to hearing all about it.
I love the contrast of the two chocolate coatings! you did a great job.
Your pops look great!
Oh, don't sweat the shape, they look totally great :) I like the graham cracker idea too! I wonder if there's a way to sneak in a sour cream coating as well? :)
I had to end up shaping mine by hand - although I halved the recipe and mine wasn't really soft... But yours look great! I love the idea of rolling them in graham crackers before the chocolate - great idea!
Yum - they look great! I'm gonna have to try a graham cracker 'middle' next time!
I love the double color ones but I have to admit, I would probably be drawn to the simple graham coating as well! Great job Holly!
I love that you used the graham cracker crumbs they look delicious. I also love the red candy melts, it makes them look so festive. Yumm!
You did a fabulous job on your cheesecake pops. Simply lovely.
Natalie @ Gluten A Go Go
They look great! I'm a cheesecake purist too--I liked your crumbs, but looks like you had fun decorating.
Mmmm! I love your pops! Too cute!
Love the colour contrasts...especially the melted red choc..
I agree they were hard to get perfectly round but the coating smoothed things out nicely for you. They look delightful! I'm going to try it with the graham crackers next time.
wow, what colors! :)
I had issues with getting them perfectly round too, which is why I opted for squares! Yours look awesome, though, and I love the red candy coating. I think next time I'll definitely do a layer of graham cracker crumbs...sounds yummy!
Oooh, that looks so cool with the red candy melt against the dark chocolate! I like that you rolled yours in crumbs first. Great job! They are beautiful.
Great idea with the graham cracker crumbs! Your pops look great!
pyschadelic
Cute pops! The only way I could get fairly round pops was to wash the scoop off after each use...slow and all that yummy cheesecake down the drain...but it worked. The combo of graham cracker crumbs first, then chocolate is inspired. Great job!
Oh, nicely done!
I agree, very nice colors!
Your pops look beautiful. I agree that they were quite difficult to shape into neat round balls. But they look pretty good once they're covered. =)
Great idea to dip them in the graham cracker and then in a beautiful pink chocolate. Amazing!
Holly, your cheesecake pops look yummy and very colorful! I like the contrast between the chocolate and pink colors; great job!
Your cheesecake pops look fantastic. I've been seeing a lot of great ones, but I love what you did with the coloring!
So were they so delicious!? They look so delicious!
Nice looking pops. I like the red.
Very cool color combinations! Great job!
Great job Holly! I love the mod colors, great choice!!
They look beautiful. I love the color you chose. I don't know why I didn't think to use crumbs. What a great idea!
I really like the red and black theme, Holly. Very edgy! I wish I had thought of the colored candy melts.
My favorites were the ones I covered with toffee bits. Like a Heath bar stuffed with cheesecake! ;)
Post a Comment