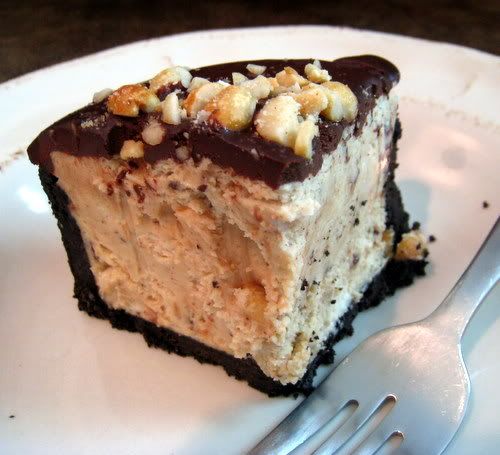
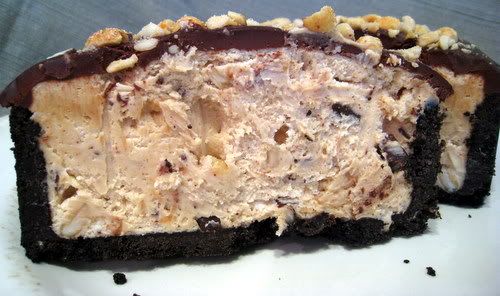
Since I am writing this after midnight when everyone else is asleep (as I should be) I'm going to keep all my craziness to a bare minimum (ok, minimum for me). So, if you haven't heard about Tuesdays with Dorie yet, then check it out in much better detail than I can provide here. This week's challenge was for Dorie's Peanut Butter Torte and was chosen by Elizabeth of Ugg Smell Food. I actually made the Torte on Sunday afternoon, but didn't get to cut into it until Monday afternoon. It was very, very yummy. I really enjoyed it. It was also very rich. This was a great dessert to make and if someone loves PB+Chocolate. If they do, then this is a definate winner. Me? I'm more of a chocolate purist (ok, fine, just a flat out chocoholic), so while I enjoyed this thoroughly, unless I'm making it for someone else I don't know that I would get around to making the Torte again... as a Torte anyway. Muawhahaha!
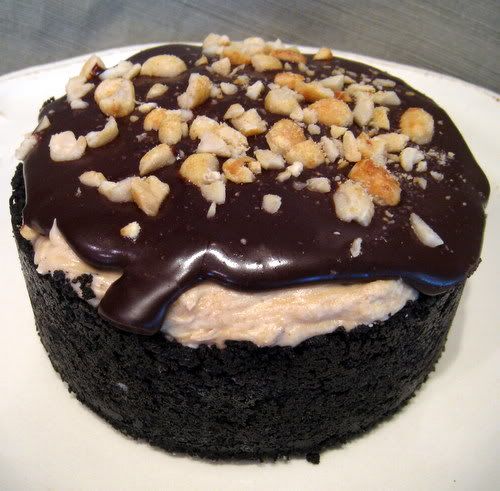
This brings me to my craziness. I knew I couldn't eat this entire Torte and had no one I could take it to, so I decided to cut the recipe in half and make it in a 4.5-inch Springform pan - afterall 4.5 is half of 9 - right? Hmmm, apparently not for the filling. While the crust ingredients halved perfectly for the pan size, I ended up with about 1 1/2 cups of mousse left over. I could have spooned it into glasses and made it look pretty, but at the time I was finishing this up the Baby Cole had had it with Mama being in the kitchen and demanded (fairly loudly) my undivided attention. In other words, it was all I could to to throw the remaining mousse into a bowl and slap some plastic wrap over it. Of course I didn't have the heart to just discard it, but I couldn't decide what to do with it since it wasn't going to be so "spooning into glasses" pretty by the time I could return to it.
This brings me to my craziness. I knew I couldn't eat this entire Torte and had no one I could take it to, so I decided to cut the recipe in half and make it in a 4.5-inch Springform pan - afterall 4.5 is half of 9 - right? Hmmm, apparently not for the filling. While the crust ingredients halved perfectly for the pan size, I ended up with about 1 1/2 cups of mousse left over. I could have spooned it into glasses and made it look pretty, but at the time I was finishing this up the Baby Cole had had it with Mama being in the kitchen and demanded (fairly loudly) my undivided attention. In other words, it was all I could to to throw the remaining mousse into a bowl and slap some plastic wrap over it. Of course I didn't have the heart to just discard it, but I couldn't decide what to do with it since it wasn't going to be so "spooning into glasses" pretty by the time I could return to it.
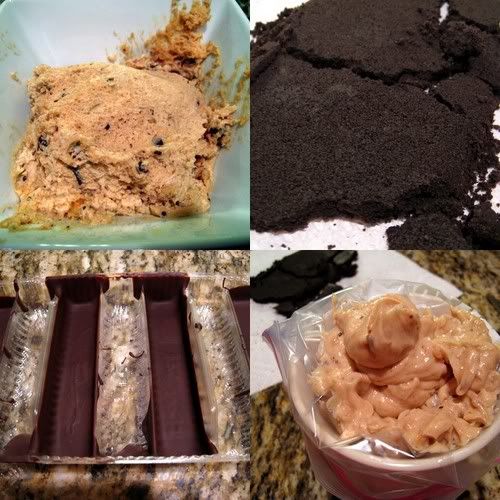
I was able to return finally, this afternoon and I still wasn't sure what to do. Then, I remembered some wild-hair I had last week. You see I made manicotti and was feeling rather "green" and thinking about recycling and as I took the noodles out of the box I was looking at the cool little trays they came in and, I decided to keep them. Just in case I could use it for something later on... as a marshmallow mold was actually what I was thinking of at the time.
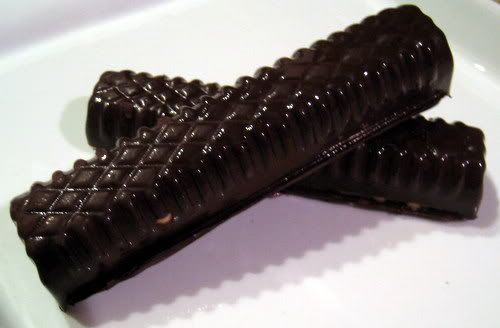
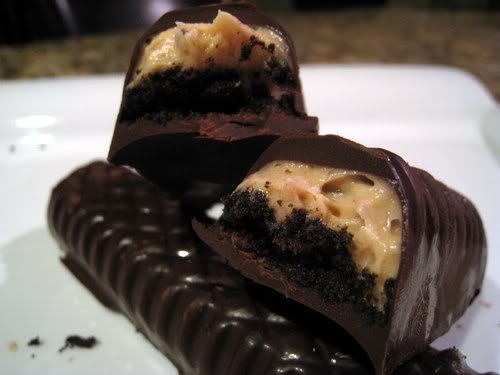
Anyway, as I was cleaning out the 'fridge this afternoon there was the bowl of unused mousse, staring at me and making me wonder again what I was going to do with it. Then, it hit me. I remembered the molds and thought, "why not make candy bars out of the leftovers." So, that is what I did. I've added the directions for how I did it at the end of Dorie's original recipe.
Anyway, as I was cleaning out the 'fridge this afternoon there was the bowl of unused mousse, staring at me and making me wonder again what I was going to do with it. Then, it hit me. I remembered the molds and thought, "why not make candy bars out of the leftovers." So, that is what I did. I've added the directions for how I did it at the end of Dorie's original recipe.
While this dessert isn't necessarily something I will make again in full size, I think I may invest in a real mold for future use, because making these and then freezing these bad boys as sneaky little "ice cream bar" treats was, basically, genius if I do say so myself. And, I do (say so myself that is... yeah, it's late, I'm feeling a little schitzo, but sleep depravation will do that to you!).
So, my lovelies, I'm off to bed and leave you with all this deliciousness. Make sure to check out all the other TWDer's and see what else this simply fantastic group has been up to this week. Oh, and seriously, if you still don't have this book, go and get it. Now. Seriously, we'll wait. ; )
So, my lovelies, I'm off to bed and leave you with all this deliciousness. Make sure to check out all the other TWDer's and see what else this simply fantastic group has been up to this week. Oh, and seriously, if you still don't have this book, go and get it. Now. Seriously, we'll wait. ; )
Peanut Butter Torte
1 ¼ c. finely chopped salted peanuts (for the filling, crunch and topping)
2 teaspoons sugar
½ teaspoon instant espresso powder (or finely ground instant coffee) (I omitted this)
¼ teaspoon ground cinnamon
Pinch of freshly grated nutmeg
½ c. mini chocolate chips (or finely chopped semi sweet chocolate) (I used bittersweet here)
24 Oreo cookies, finely crumbed or ground in a food processor or blender
½ stick (4 tablespoons) unsalted butter, melted and cooled
Small pinch of salt
2 ½ c. heavy cream
1 ¼ c confectioners’ sugar, sifted
12 ounces cream cheese, at room temperature
1 ½ c salted peanut butter – crunchy or smooth (not natural; I use Skippy) (I used Creamy Jif)
2 tablespoons whole milk
4 ounces bittersweet chocolate finely chopped
Getting ready:
Center a rack in the oven and preheat the oven to 350°F. Butter a 9-inch Springform pan and place it on a baking sheet lined with parchment or a silicone mat. (I actually used a 4.5-inch Springform pan).
Toss ½ cup of the chopped peanuts, the sugar, espresso powder, cinnamon, nutmeg and chocolate chops together in a small bowl. Set aside.
Put the Oreo crumbs, melted butter and salt in another small bowl and stir with a fork just until crumbs are moistened. Press the crumbs evenly over the bottom and up the sides of the spring form pan (they should go up about 2 inches on the sides). Freeze the crust for 10 minutes.
Bake the crust for 10 minutes, then transfer it to a rack and let it cool completely before filling.
Working with a stand mixer fitted with the whisk attachment or with a hand mixer in a large bowl, whip 2 cups of the cream until it holds medium peaks. Beat in ¼ cup of the confectioners’ sugar and whip until the cream holds medium-firm peaks. Crape the cream into a bowl and refrigerate until needed.
Wipe out (do not wash) the bowl, fit the stand mixer with the paddle attachment if you have one, or continue with the hand mixer, and beat the cream cheese with the remaining 1 cup confectioners’ sugar on medium speed until the cream cheese is satiny smooth. Beat in the peanut butter, ¼ cup of the chopped peanuts and the milk.
Using a large rubber spatula, gently stir in about one quarter of the whipped cream, just to lighten the mousse. Still working with the spatula, stir in the crunchy peanut mixture, then gingerly fold in the remaining whipped cream.
Scrape the mouse into the crust, mounding and smoothing the top. Refrigerate for at least 4 hours, or overnight; cover with plastic wrap as soon as the mousse firms.
To Finish The Torte:
Put the chopped chocolate in a heatproof bowl and set the bowl over a saucepan of simmering water. Leave the bowl over the water just until the chocolate softens and starts to melt, about 3 minutes; remove the bowl from the saucepan.
Bring the remaining ½ cup cream to a full boil. Pour the cream over the chocolate and, working with a rubber spatula, very gently stir together until the ganache is completely blended and glossy.
Pour the ganache over the torte, smoothing it with a metal icing spatula. Scatter the remaining ½ cup peanuts over the top and chill to set the topping, about 20 minutes.
When the ganache is firm, remove the sides of the Springform pan; it’s easiest to warm the pan with a hairdryer, and then remove the sides, but you can also wrap a kitchen towel damped with hot water around the pan and leave it there for 10 seconds. Refrigerate until ready to serve.
To make the “bars”:
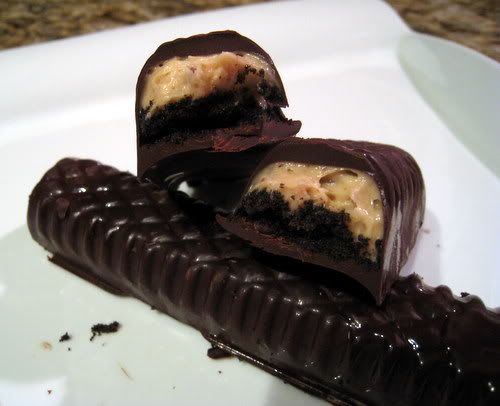
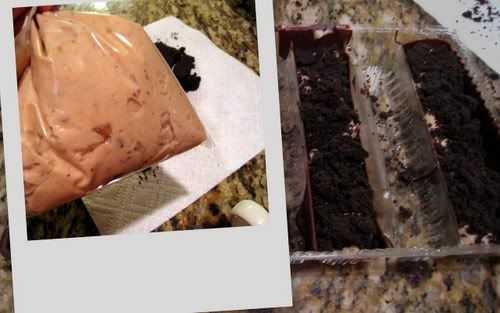
I melted more bittersweet chocolate over a double boiler and stirred until smooth (about 4 oz, it will depend on how much filling you have left over if you do the halved mini pan like I did – I had enough mousse to fill probably about 8 bars - approximately 1 1/2 cups of mousse). Allow the chocolate to cool until it is just warm, but not hot. Pour into the molds and allow to sit for about 10-15 seconds, then pour the chocolate out of the mold and back into the bowl. Place the mold into the refrigerator and allow the chocolate to harder (at least 15 minutes).
Remove from refrigerator and pipe the mousse into the mold on top of the chocolate. At this point I topped the mousse with finely crumbled Oreo cookies and gently pressed that into the mousse. Place this back into the refrigerator while you remelt the remaining chocolate. Once the chocolate has cooled to warm (not hot) again, pour it over the bars and smooth off the excess or spread to cover the bottom of each bar (depending on what you are using for the mold).
Again, whether it was just cheap of me or ingenious is yet to be decided (or a little of both) but since I don’t have molds I actually used the cleaned out trays from a box of manicotti noodles that I decided to save last week for some kind of future use. The extra mousse I ended up with from halving the recipe gave me that opportunity. Make sure to keep the bars chilled until ready to serve, the chocolate melted very easily. I imagine that you could make it more meltable or friendly to work with by making it more “candy-like” as in the Cheesecake Pop recipe from April’s DB Challenge, but I didn’t really think of that until my little brainstorm project was already underway.
Oh, and the next time I try this, I kind of want to try a Cashew / Cashew Butter version with some Dulce de Leche mixed in. I think that would rock!

Oh, and the next time I try this, I kind of want to try a Cashew / Cashew Butter version with some Dulce de Leche mixed in. I think that would rock!

Other Tuesdays with Dorie:
Fluted Polenta & Ricotta Cake
Bill's Big Carrot Cake
Marshmallows - Dark & White Chocolate






56 comments:
Okay, so I know that it's barely even Tuesday and I've only seen a couple of posts for this week's recipe, but you soooo have my vote for OSI this week. BRILLIANT!
Those candy bars are too fabulous for words! I think that is the best idea ever.
That's an absolutely inspired way to use up leftovers! I thought they must be commercially prepared bars when I saw the photo as they looked so professional!
Love your bars!!!!!!!!!
Wow...these look fab! I didn't like the chilled version of the torte but reckon I would love the frozen version. Oh how I wish I hadn't thrown it away! Fabulous idea! Hx
Oh my goodness! What creativity! I love your candy bar idea! I have leftover mousse as well, but no manicotti tray! :( Great job Holly...pure genius!
You rock! What an original idea!
Wow - candy bars are just inspired! Awesome!
i love, love the candy bar idea... translates perfectly! :) your photos look so yummy! also i think 6.5" would be closer to half of 9" because of the pan volume.
Those candy bars are fantastic! What a great (and so cute!) way to use the extra mousse.
AAAAAAAAAAAAAAAAGH! The manicotti mold/candy bar idea is AWESOME. Way to go!
Oh. My. Send some my way! Genius idea to make the candy bars, they look like they came out of a professional bake shop! Great job Holly!
i'm utterly amazed at both your torte and bars! to say they're picture perfect would be an understatement because i'm sure they taste like manna from heaven too. nice work! :)
I am so in awe of your homemade candy bars! I didn't think my multiple food allergy child would ever eat one, but there may be some in his future after all! Thanks for sharing your ingenuity! Libby
I agree, you're a genius! =) I would probably try it with milk chocolate instead, though, since I prefer that with peanut butter. Fabulous idea!
Sheer genius!! And likely a much more palatable size than the original torte. I'm going to try this one out soon!
You are genius! I think I might try that with my leftovers...I was actually thinking of replacing the oreo filling with the mousse and then dipping THAT in chocolate! You've got my vote!
Amazing, you should mass produce them and make a million dollars.
This is fantastic! I am a huge fan of PB & chocolate and these pictures are making me crave it badly! I love your idea for the bars...pure genius!
Absolutely genius!!! Great job!
the candy bar version in the mancotti mold? GENIUS.
you are the macguyver of desserts.
By god...I agree with everyone, you are a genius. Super brownie points in my book for enginuity and creativity.
These look like a spectacular dessert! And the manicotti mold was a great touch--I never would have known that's what you used!
Those bars are crazy cool!! I never want to spend the money on fancy pans - thanks for the tip on using the manicotti trays!!!
I forgot to tell you a while back that i nominated your for a Blogging with a Purpose award. Congrats!!!!!!!
I think that's pretty genius of you, those look awesome!
Wow Holly,
This is gorgeous! Beautiful job, it all looks incredible!
The candy bar version was a brilliant idea! The cake looks amazing and mine tasted delicious but I really want the candy bar!
Fabulous idea... I mean fabulous idea. It was so rich that my kids could not eat more than a couple spoonfuls. I am quite sure they would love it as a little frozen treat!
I am impressed with your resourcefulness and creativity.
Best idea ever! Wow. I now want to run out and buy manicotti just so I can make something using the carton.
I absolutely LOVE the candy bars you made with the leftover mousse. That is genius, and they look so perfect! I love your blog.
wow! The bars are genius! Great job! Looks delicious!
This is the first time I've seen your blog. Those bars look incredible!! It was absolutely pure genius (and not cheapness) of you to save those manicotti trays. I love that you added the crushed oreos also. You've inspired me! I'll be checking back again to see what other wonderful stuff you've made. Thanks! Tracey
I am so jealous that I didn't get one of those candy bars! They look better than the torte! Mmmm
I have to give you the award for most creative in this event. OMG... you are such a smart cookie! What a perfectly wonderful idea. Brilliant!
you have absolutely outdid yourself!! these candy bars are awesome!! really great idea, they look so yummy.
totally ingenious!! crap--those candy bars look amazing!!
I think I could eat a lot of those candy bars...fabulous idea!
Oh my! What an incrediblely great idea. Now I am going to have to use my manicotti shells soon so I can try something like this!! Too Awesome!
OK! So how much do you rock?????!!!! You SO have my vote for OSI! The candy bars are geinius!!!!!!!
Carrie
OMG, you are brilliant! I love it!! You definitely need to be win OSI this week (even if you've already nabbed this one in the past month). Do you work for Kraft, because they just redesigned Oreos for the China population that look like yours, though I'm sure they're not as tasty. Check it out.
I love the candy bars! That is such a fabulous idea! Everything about this post looks wonderful :)
That is fantastic!
What a neat idea!
For what it's worth, a 4.5-inch pan has one quarter of the area (and volume) of a 9-inch pan. So that's quite a bit of extra filling!
Oh Wow!
Like a Twix but sooo much better!
Genius!! Those candy bars look awesome! Now I want to make some manicotti so I can try this out.
Love your blog...you're so creative. :) I love PB & chocolate and I bet I'd eat way too many of those candy bars if they were put in front of me.
Holly, you're a genius! I'm not kidding, those candy bars are such a great idea, I would have never thought of it. I swear, I want to make that mousse right now, with something other than PB, and make those candy bars! If only I had moulds!
Candy bars = ingenious!!!
I have a silicone ice cube tray from IKEA that makes long thin ice cube rods. I think I'll try making candy bars in it. Thanks so much for the idea. You're a genius.
ohhh those look yummy! and using the manicotti tray, super great idea!!! totally not cheap of you- brilliant i'd say! :)
Holly, those bars are a stroke of genius! Seriously, what a terrific idea! It has taken me a while to make the blog rounds lately (company & work pressures), but I'm so glad I stopped by today to see this. Great job!
geeesh, that's smart. I knew I joined TWD for a reason - my in-laws will think I am a genius! (i don't think I will be able to give you credit, tho...Just kidding)...seriously brilliant!
Holly, I know I'm late commenting -- sorry, but I only just saw your bars and I'm knocked out by them. They're fabulous! Such a great idea and soooooooo beautiful. Who wouldn't want to have a stack of those tucked away in the freezer for midnight snacking?
My gosh! That is the nices looking thing I've seen in a long time!
How I wish we were neighbours. I've be at your house in a flash for those bars!
This may be a stupid question, but I am not much of a baker so don't have a good eye for these things... is the recipe you've posted here the original, or have you already halved the amounts there? (I'm guessing it is the original and the amounts are correct for a 9" pan, but like I said... :)
Hi Carly! I've always figured there is no such thing as a stupid question if you don't know the answer! You are right - I did post the full sized recipe here. Thanks for stopping by!
Holly
Post a Comment