PheMomenon has moved!

You should be automatically redirected in 5 seconds.

If not, please visit http://www.phemomenon.com and update your bookmarks and RSS feed.

Showing posts with label candy. Show all posts

Friday, December 31, 2010

FFwD: Sweet and Spicy Cocktail Nuts - Sugared Pecans


One of the recipes from Around My French Table chosen for this month's French Fridays with Dorie was for Sweet and Spicy Cocktail Nuts - a mixture of nuts, tossed in egg white and a combination of sugar and spices.  I only had pecans around the house, but wanted to try the recipe because I've never seen or heard of tossing them in egg white first.  My favorite way to make candied pecans up till now - which is a bit of a process and a bit of a mess, but oh so good - is to boil them, then let them dry a bit, then toss them in powdered sugar, and then they are deep fried, then allowed to cool (a method we used long ago from the Sky High cakes book for The Cake Slice Bakers).  While they are crazy good that way, as you can imagine, they are definitely a treat and not anything I feel good about snacking on.  That is why Dorie's method seemed like an interesting and worthwhile alternative.

That said, you know I never leave well enough alone, and since the only cocktails involved around our house involve juice boxes, I bagged the spices in our version.  I used the same amount of sugar called for, then just upped the amount of cinnamon and added a small splash of vanilla.  I have to admit, I'm sure the nuts would have looked nicer had I followed Dorie's directions to remove them from the egg whites individually to get rid of the excess.  Let's face it though.  With three small kids around, there was no time for that.  I tossed, mixed, stirred, dumped and baked.  I did give them a stir in the oven about half way through to help break up all the extra sugar and egg white I dumped in there with them, which was bubbling a bit more than I expected, but didn't seem to do any harm.  So, bottom line, when my pecans were all done they were just a bit clumpier and not as pretty, but they still tasted really good!  

This recipe and method is a definite keeper - we love tossed candied nuts in our salads and this ended up being a lot less messy and not as labor intensive (at least when done the lazy way like me!).

Happy New Year everyone!  Visit the French Fridays with Dorie site to see all the links to this month's recipes under the LYL posts.  I hope you all had a wonderful 2010 - now on to 2011!

Tuesday, July 13, 2010

TWD: Brrr-ownies

Photobucket

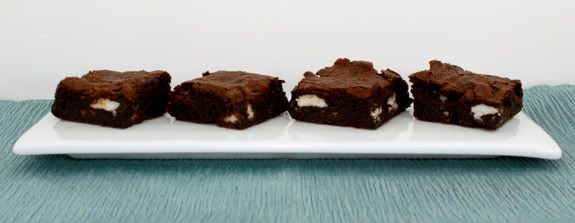
Tuesdays with Dorie this week was a pretty lucky pick for me since I just made these brownies a few weeks ago for a friend to celebrate the birth of her first baby - she is a peppermint patty lovin' fiend.  I knew the brrr-ownies time would come someday, so I went ahead and took pictures then VOILA! There time is already here!

Photobucket
The brownies were much like most other brownie batters, with the addition of chopped up peppermint patties.  Many other bakers ran in to problems with the peppermint patties melting into goo and disappearing in the batter.  I'm not sure why this didn't happen to me, but I did make sure to chop my candies in fairly large pieces for the most part - I really wanted there to be chunks of candy in the brownies.

Photobucket

These brownies were a hit with my friend and here at our house, so thanks go out to Karen at Welcome to our Crazy Blessed Life for choosing this one! Make sure to check out the TWD Blog for more brownie posts!

Photobucket

Thursday, December 10, 2009

Chocolate Fudge Butterfinger Cookies


To say it is absolutely the worst kept secret ever that I am a fan of chocolate would be the most obvious statement I could make. It should come as no surprise whatsoever then that ever since Jenny at Picky Palate shared a recipe for Chocolate Fudge Butterfinger Cookies back at the beginning of November I haven't been able to get them out of my mind. My only problem has been actually remembering to grab some candy bars at the store. For some reason, I could never remember until I was already back in the truck and on the way home. As you can imagine, since I'm into the homestretch of this pregnancy, and always have to overly energetic, wild little boys with me, the idea of taking them back to the store just for candy bars - no matter how bad I wanted to try making those cookies!

When I was at the store earlier this week and in the checkout line I happened to glance over and notice the candy bars and finally grabbed them! I didn't have the recipe in front of me and couldn't remember how many I was supposed to get, so I grabbed four of them (they were 2/$1 anyway, so not too bad).


I got home and looked over the recipe more thoroughly, and since I know I can never leave well enough alone, I just had to fiddle with the recipe a bit. I'm sure that Jenny's version is perfectly fantastic, but for my purposes I knew I had something slightly different in mind. If you look at Jenny's cookies they look thicker and slightly fluffier. When I thought of these cookies all I could think about was having lots of spots of melty, chewy candy bar in the cookie, in addition to just a few melty spots of chocolate. Overall I wanted a chewier cookie and thought that incorporating as much candy bar into the cookie as possible would get the result I wanted, while still giving me a huge hit of chocolate flavor in the cookie.

So, while Jenny's cookies look to be a lighter textured version, have no doubt that I made my version a little thinner, chewier and chock full of melted and gooey candy in the cookie. I did taste the cookie dough when I had only added two of the candy bars and thought that the Butterfinger flavor wasn't as pronounced as I wanted it to be, so throwing caution to the wind I went ahead and added double the amount originally called for. To offset that a bit I cut the amount of chocolate chips I added to the dough in half from the original recipe. I also increased the amount of vanilla extract and salt (and used fine sea salt) added to the recipe to just boost those flavors a bit more. The only other change I made was to increase the amount of cocoa powder slightly and used a Dutch processed cocoa - mainly because that is what I prefer and have on hand.

So, whichever way you like them, my thanks go out to Jenny for a wonderful recipe that gave me a great time playing around with - without failing miserably on me because I fiddled so much! Please be sure to check out Jenny's original post for her version as well.


Chocolate Fudge Butterfinger Cookies

Adapted from Picky Palate

1 cup unsalted butter

1 cup sugar


3/4 cup light brown sugar, packed


2 large eggs


1 1/2 teaspoon pure vanilla extract


1 3/4 cups flour


1 1/3 cups unsweetened cocoa powder, preferably Dutch processed


2 teaspoons baking soda

1/2 teaspoon fine sea salt

4 Full size Butterfinger Candy Bars

¾ cup good-quality chocolate chips

Preheat oven to 350 degrees F and line baking sheets with parchment or silicone mats (like silpat). Set aside.

Remove the Butterfinger Candy Bars from their wrappers and place in a large plastic zip top bag. Using a rolling pin gently smash and crush the candy bars by tapping them in the bag until broken up into pieces of all sizes – you want some crushed and some bigger pieces to remain (largest pieces about the size of large chocolate chips). Set aside.

In a medium-sized bowl whisk together the flour, cocoa powder, baking soda and sea salt until well combined. Set aside.

In a large mixing bowl, preferably with a paddle attachment, beat the butter, sugar and brown sugar until light and fluffy, 2 to 3 minutes, scraping down the sides of the bowl as needed.

Add the eggs to the butter mixture one at a time, beating for 1 minute until well incorporated. Add the vanilla and mix well. Scrape down the sides of the bowl as needed.

Add the flour-cocoa mixture a little at a time to the butter mixture on the lowest speed until all the dry ingredients are incorporated.

Still on the lowest speed add in the Butterfinger pieces and the chocolate chips and stir together until well incorporated.

Scoop cookies onto prepared baking sheets into about 1-inch sized balls (a small cookie scoop is perfect for this – they will be about the size of a generously rounded teaspoon).

Place the baking sheets, one at a time, in the oven to bake for 8-10 minutes until just set, but still soft in the center. Allow cookies to cool on the baking sheet for 5 minutes before removing to a wire rack.

Makes 60 cookies

Wednesday, June 25, 2008

Cookie Carnival: Snickerdoodles

Photobucket

It's actually pretty surprising that snickerdoodles haven't ended up on this blog before now. I love them! I have tried a few recipes and while they are all tasty, my favorite kind is more on the chewy to cakey side. These cookies (recipe from Martha Stewart) are not that. They do taste good, but they are more of the crisp to crumbly type cookie and for snickerdoodles that just isn't my favorite. So, if you like your cookies more on the crisp than tender side, then this is a good recipe for you. I'll keep looking for one that is a bit softer and chewier. As I said, they really taste good - but the texture just isn't quite how I like them.


The snickerdoodles this month were the winning vote for the Cookie Carnival - that monthly celebration of cookie goodness created by darlin' Kate over at The Clean Plate Club. Thanks again Kate for another fun round!


Oh, and you'll also notice that I got a little bit silly and decided to just mix in some M&M's to half of the dough, just for fun. Easy to do and a yummy cookie besides!

Photobucket

Snickerdoodles
(Source: Martha Stewart)

Ingredients
Makes 4 dozen

2 3/4 cups all-purpose flour
2 teaspoons cream of tartar
1 teaspoon baking soda
1/4 teaspoon salt
8 tablespoons (1 stick) unsalted butter
1/2 cup pure vegetable shortening
1 3/4 cups sugar, plus more if needed
2 tablespoons ground cinnamon, plus more if needed
2 large eggs

Directions

Preheat the oven to 400 degrees, with one rack in top third and one rack in bottom third of oven. Line baking sheets with Silpat baking mats or parchment paper; set aside.

Sift together flour, cream of tartar, baking soda, and salt; set aside. In the bowl of an electric mixer fitted with a paddle attachment, combine butter, shortening, and 1 1/2 cups sugar. Beat on medium speed until light and fluffy, about 2 minutes. Scrape down sides of bowl. Add eggs, and beat to combine. Add dry ingredients, and beat to combine.

In a small bowl, combine remaining 1/4 cup sugar and the ground cinnamon. Use a small (1 1/4-ounce) ice-cream scoop to form balls of the dough, and roll in cinnamon sugar. Place about 2 inches apart on the prepared baking sheets. Bake until the cookies are set in center and begin to crack (they will not brown), about 10 minutes, rotating the baking sheets after 5 minutes. Transfer the sheets to a wire rack to cool about 5 minutes before transferring the cookies to the rack. Store in an airtight container up to 1 week.

Blog Widget by LinkWithin