Long ago I worked at a couple of restaurants. Both of them happened to specialize in pies. At one of the restaurants they served Boston Cream Pie, which I love, but they served it with a twist on the old cake version. They actually had a pie crust on the bottom. It was extremely tall and I loved it.
As I was thinking about what to make for my contribution to my
Pies as a Fashion Statement Theme for this month's
You Want Pies With That? Event, I kept coming back to that pie. I've always had an issue with the fact that it seems like when people are looking for a dessert to be a show stopper for an event it doesn't seem like pie gets enough attention. Since that is what this event is all about to me, I decided to make my take on the Boston Cream pie, with some more fall-like colors and flavors.
As for the fashion part of things, with me, it is all about layers really, and solid colors. I'm not really much for patterns or prints. If you look in my closet, you might find a few, but not really. More likely you'll find a lot of dark colors and solid fabrics. Fall is especially my favorite time of year for fashion because this is when I can really layer a bit more and bring out some more colors that work together. Among my favorites are creams, dark browns, reds, whites. So, that is what you get here.
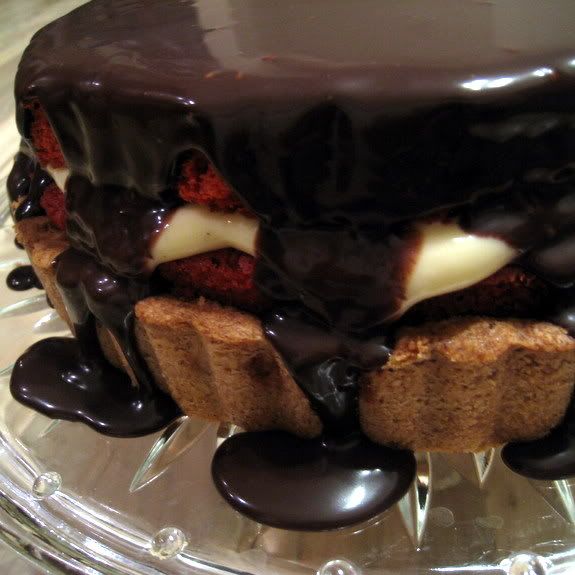
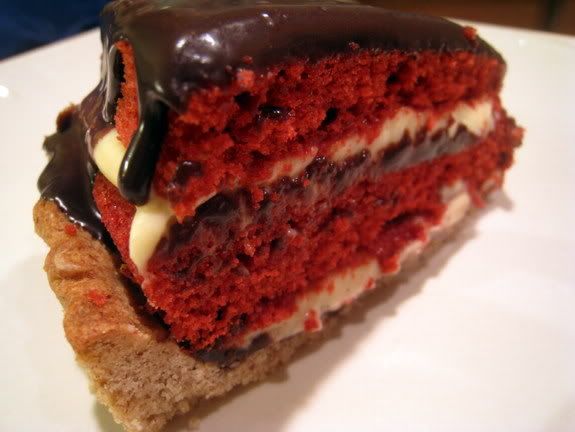
To reinvent my Fashion Pie I went with lots of layers of flavor too. This pie, I must say, turned out really fantastic. As you can see from the lame interior pictures I had no patience and had to dig in. If you make this, just let it chill for a couple of hours before cutting into it... or accept the fact that it is going to ooze all over itself and cut away. Either way, I guarantee this is one delicious show stopper of a pie.
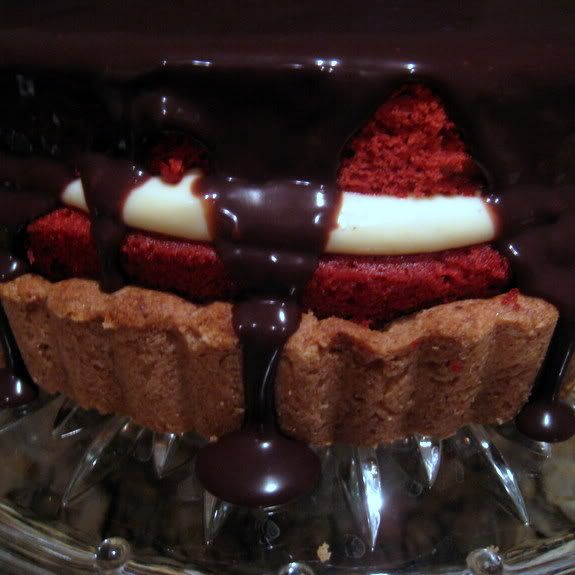
So, here are the layers. This pie was a bit involved to make, but all the different components can be made ahead at different times, then held and assembled when you have time.
Top Layer: Chocolate Ganache
Layer 5:
Red Velvet CakeLayer 4: Vanilla Bean Pastry Cream
Layer 3:
Red Velvet CakeLayer 2: Vanilla Bean Pastry Cream
Layer 1: Chocolate Ganache
Bottom Layer:
Pecan Tart ShellThe recipes aren't in order of how I made them, but below is the order I think is best to make the components in. I actually did this over a couple of days to break up the work. I'm also posting the actual assembly of all the components at the end so that it makes sense as to how this works.
Day 1:Make first: Vanilla Bean Pastry Cream (because it has to chill)
Make second: Chocolate Ganache (because it has to chill)
Day 2:
Make first: Pecan Tart Shell (because it has to chill, bake and cool)
Make second: Red Velvet Cake Layers (because they have to bake and cool)
Pecan Tart Shell
(Adapted from Epicurious)
1 cup pecans
2 tablespoons sugar
1 1/4 cups all-purpose flour
6 tablespoons cold unsalted butter, cut into bits
1/2 teaspoon salt
3 tablespoons ice water
raw rice for weighting the shell
Make the shell:
In a food processor grind coarse the pecans with the sugar and transfer the mixture to a bowl. In the food processor blend together the flour, the butter, and the salt until the mixture resembles meal and add the flour mixture to the pecan mixture. Add the ice water, toss the mixture until the water is incorporated, and press it onto the bottom and up the side of a 9-inch (1-quart) tart pan. Chill the shell for 1 hour, prick it all over with a fork, and line it with foil. Fill the foil with the rice, bake the shell in the lower third of a preheated 425°F. oven for 10 minutes, and remove the foil and rice carefully. Reduce the heat to 375°F., bake the shell for 12 to 15 minutes more, or until it is golden brown, and let it cool on a rack.
Chocolate Ganache
(Adapted from Epicurious) 6 ounces fine-quality bittersweet chocolate (not unsweetened)
1/4 cup heavy cream
For the Chocolate Ganache:
In a small metal bowl set over a pan of barely simmering water melt the chocolate with the cream, stirring until the mixture is smooth, spread the mixture in the bottom and halfway up the side of the shell, and let it cool. Chill the shell.
Vanilla Bean Pastry Cream
(Source: Dorie Greenspan, Baking From My Home To Yours) -
Recipe coming soonChocolate Ganache(Source: Dorie Greenspan, Baking From My Home To Yours) - Recipe coming soon
Red Velvet Cake
(Adapted from Paula Deen)
1 cup sugar
1 stick butter (1/2 cup), at room temperature
1 large egg
1 tablespoons cocoa powder
1 ounce red food coloring
1 1/4 cups cake flour
1/2 teaspoon salt
1/2 cup buttermilk
1/2 teaspoon vanilla extract
1/4 teaspoon baking soda
1 1/2 teaspoons vinegar
Preheat oven to 350 degrees F.
In a mixing bowl, cream the sugar and butter, beat until light and fluffy. Add the egg and mix well. Mix cocoa and food coloring together and then add to sugar mixture; mix well.
Sift together flour and salt. Add flour mixture to the creamed mixture alternately with buttermilk. Blend in vanilla.
In a small bowl, combine baking soda and vinegar and add to mixture. Pour batter into 2 (8 -inch) round greased and floured pans. Bake for 15 to 20 minutes, or until a toothpick inserted into the center comes out clean. Remove from oven and place in pans on a rack to cool completely.
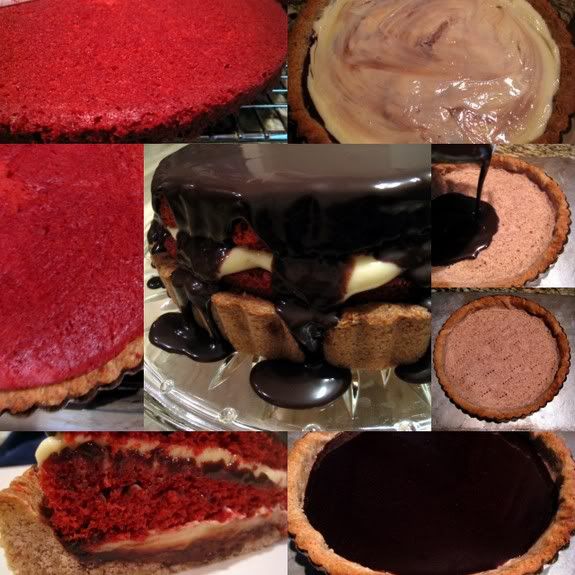
Assembly:
Measure about 3/4 cup of the chocolate ganache into a small heatproof bowl. Leave the remaining ganache out to come to room temperature or loosen enough to be spreadable. Heat over a small pan of simmering water, enough to loosen it and make it pourable. Pour the warmed ganache into the tart shell. Place the shell into the freezer to chill and harden, about 3o minutes (more if you want very defined layers).
When the shell is well chilled, remove it from the freezer and remove the outer ring of the tart shell and place the shell onto your dessert platter, with a good sized rim to catch any excess ganache.
Measure about half of the pastry cream into the tart shell on top of the chilled ganache and spread evenly.
Place one of the cake layers on top of the pastry cream. Gently spread a thick layer of the remaining pastry cream on top of the cake layer and top with the remaining cake layer, placing the layer with the bottom of the cake at the top for the most smooth surface.
Gently stir the remaining ganache a few times with a rubber spatula to make smooth and spreadable. Pour gently onto the top of the cake and gently spread to almost the sides of the cake layer. Push just to the edge to let it slowly glaze down the sides a bit.
Place the whole thing in the refrigerator to set before serving, at least 1 hour (or, as I mentioned before, cut and take the messy consequences).










 Posts