PheMomenon has moved!

You should be automatically redirected in 5 seconds.

If not, please visit http://www.phemomenon.com and update your bookmarks and RSS feed.

Showing posts with label food blog event. Show all posts

Tuesday, October 14, 2008

TWD: Lenox Almond Biscotti

Photobucket


This week's TWD pick was for the Lenox Almond Biscotti as chosen by Gretchen of Canela & Comino. I must say a heartfelt thank you to Gretchen because I have been meaning to make biscotti for a while now, but never get around to it.

I have to admit, I wanted to make it more out of curiosity, not so much out of a great love of biscotti or anything. All the biscotti I have had before now has been pretty much drier than dust and tasted about the same. I know that biscotti is supposed to be dry and firm, I don't believe that it was ever intended to translate to being so rock hard that the edges could cut the roof of your mouth. Either way, I've just never been a big fan and kind of wondered what the fuss was really all about.

So, again, thanks to Gretchen and of course, Dorie, now I know what the fuss is about. I also know I will never try to purchase biscotti again - I'll just make it myself. The recipe is absolutely delicious. The dough was sticky and a little difficult to work with, but I solved that by dumping the dough into a gallon plastic bag and cutting a large hole in one corner to pipe the dough out onto the sheet in the logs as directed.

Photobucket

I actually doubled this recipe to make quite a bit of biscotti, which were actually smaller than what I thought they might be. I realized making these for Aidan's school was a bit of a gamble since I didn't know what to expect. I decided to just trust in Dorie and everyone loved them. I just figured that the fact that it was a Dorie recipe gave me confidence to just go for it and make these as their little gift.

I also altered the recipe a bit, mainly because I didn't realize I didn't have enough cornmeal. I subbed a bit more flour and some ground toasted almonds in place of the remaining missing cornmeal and it seemed to work out just fine. I also used half brown sugar in the biscotti, mainly just because when it comes to sugar I really love brown sugar!

Photobucket


Anyway, this recipe is a real winner and I will definitely make it again often. I enjoyed mine once baked, twice baked and even dipped in hot chocolate a couple of days later. I even made more since then and am hoping to just keep some on hand.

Make sure to check out the Tuesdays with Dorie blogroll to see all the other yummy biscotti out there today!

As always, you really should get the book (and if you want to play along with the TWD group, get it before Oct. 31st! )

Friday, September 12, 2008

Almond Glazed Sugar Cookies

Photobucket

Recently, due to Susan's announcement that she is holding a bloggy-bash for the blogiversary of Sticky, Gooey, Creamy, Chewy (to which the award for best bloggy title goes by the way) where she invited others to submit their favorite party foods to the fun I have been trying to think about A) when was the last time I went to a party and B) what would I take if I were going to a party.

Well, strangely (and pathetically enough) the answer to both questions was not readily obvious to me. In fact, I couldn't remember or think of either one. So - now that that embarassing detail is out of the way, I guess it is a good thing y'all throw these virtual parties so that I still get to socialize sans-baby and kindergartener. OK, maybe people just don't like me and I am a downer at parties - I don't know - but I'm going to blame it on always being in mommy-land and not that I am completely lame - please excuse me now - my insecurity is showing. ANYWAY...

Actually, I did finally think of the last "party" I really went to and it was a wedding shower. This got me thinking about what the standard things that are always at the wedding and baby showers I attend. One thing that immediately came to mind was frosted sugar cookies - not glamorous, but I think they are usually quite pretty and who doesn't love them? I can't actually remember a party recently that I've gone to where there weren't frosted sugar cookies.

I found this version over at Leigh Ann's blog (great blog!) that was found for her by Melanie (another fantastic blog!) and had to give it a try - Leigh Ann's description of the method, flavor and everything sounded just too perfect to pass up. An almond flavored cookie with no chilling, no rolling, no waiting. I have admitted it here before, but my favorite treats are pretty much the ones that are instant gratification - I love making the more complex treats for their own wonderful attributes - but with kids in the house (me included) it is nice to have great treats that there isn't a lot of waiting til I get to eat them - ummm, I mean WE get to eat them.

So, were they all they were cracked up to be...? Yes actually. To give you an idea of the level of love there was for these cookies at our house - well, Aidan (the kindergartner / chocolate lover in the house) turned down a Chocolate Peanut Butter Chipster because he wanted another one of these Almond Sugar Cookies - in fact, both times when faced with the "you can only have one" choice he negotiated straight for these cookies. Thanks to Leigh Ann and Melanie for the recipe! I can't wait to try these again with other flavors - I see vanilla, orange, lemon, raspberry, and lime, and snickerdoodle in my future to start with - seriously, I think this recipe would be amazing in any flavor).

They truly are delicious so I wouldn't hestitate to take them to a party - virtual or real. So, I am sending these over to Susab for her blogiversary! Happy Blogiversary SGCC!

Photobucket

Almond Glazed Sugar Cookies

1 cup butter, softened
3/4 cup sugar
1 tsp. almond extract
2 cups flour
1/2 tsp. baking powder
1/4 tsp. salt

Combine butter, sugar and almond extract in a large mixing bowl, beat until creamed - about 1 to 2 minutes. Add the remaining ingredients and beat 1 to 2 minutes more. Scoop the dough into balls and roll (should be about 1 inch). Roll in sugar and place 2 inches apart on cookie sheet and flatten balls to 1/4 inch thickness with the bottom of a glass.

Bake at 400 for 7-9 minutes or until edges are very lightly browned. Cool 1 minute more to set then move the cookies to a wire rack to cool completely.

Glaze:
1 1/2 cup powdered sugar
1 tsp. almond extract
4-5 tsp. whipping cream

Stir together glaze ingredients with a wire whisk. Decorate cooled cookies with glaze and sliced almonds (optional).

Saturday, May 31, 2008

Chocolate Oatmeal Cake with Vanilla Bean Buttercream and a Book Review

Photobucket

Recently I was invited to join a small book club with a few other food bloggers (being called The Edible Word - and how perfect is that?!) by the lovely Cath of A Blithe Palate and wonderful Stephanie of Dispensing Happiness. The idea was to get together with a few others who like to cook or bake and who also love to read. You already know how I feel about food, but you may not have known that I come from a long line of avid readers. I pretty much go crazy if I don't have something to read.

For our first book we read the new book by Kate Jacobs called Comfort Food. Kate has a lovely website and you can even get a chance to win a tote bag, sign up for her newsletter and even see if she is going to be in a city near you.

I thoroughly enjoyed reading Comfort Food. It naturally combined two of my favorite things and pulled it all into an engaging read. It is the story of a woman who is approaching her 50th birthday - and she isn't too thrilled about it. On top of that she is a food television star and life is getting a bit shaky there as well. It is a story about family, love, humor and grief - all mixed in with a great helping of lots of good talk about food and the passion for cooking.

The book follows Gus, our heroine, but it also follows the stories of the characters swirling around her as well so the pace never really feels like it bogs down at all. I'm not going to tell you much more because I don't want to ruin it, but I will say that it didn't take me long to read this book at all, just a couple of days, because I really didn't want to leave the story. I was enjoying being a part of their world too much!

You should definitely read this book if you are looking for an entertaining story with lots of emotion and passion, as well as interesting characters. If that doesn't sound like your kind of story, well, then, I don't know what is wrong with you! ; )

Now, the second half of the fun of being a part of The Edible Word is that, since the book we reviewed has so much great food in it, there is plenty of good culinary scope for the imagination too - so, we all had the challenge to make something from the book or inspired from the book.

I actually didn't have a hard time deciding what I wanted to make because I knew what it would be from the first line in the book (which you can read the first chapter on Kate's website). I just didn't know what kind it would until almost the end of the book. A birthday cake! A Chocolate Oatmeal Cake with Vanilla Bean Buttercream to be exact.

Now, the surprise here is that I'm not going to tell you who the birthday cake actually ends up being made for. It isn't who you think from anything I've written so far though. As I mentioned, I knew it was going to be a birthday cake, just not what kind. Since it is supposed to be a dressed up celebration cake it is a decorated with cute little chocolate curls and white beaded frosting).

Photobucket

How did I decide on a Chocolate Oatmeal Cake with Vanilla Bean Buttercream? In the book, there is an important scene which includes this cake. So, in Kate's own words straight from the book - here is the basis for the cake recipe I decided to create:
"What do you think?" Gus said, looking expectantly into their faces.

"Of what?"

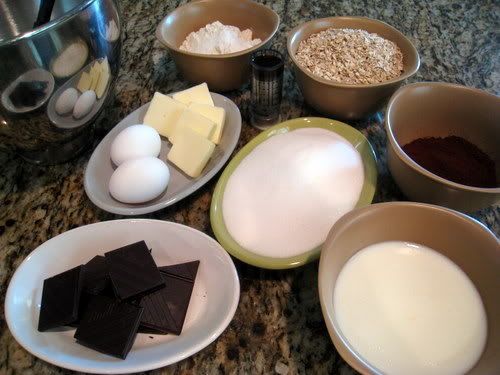
"This," she said. "It's Sunday dinner like we used to have it." She led Aimee and Sabrina over to the counter, which was covered with mixing bowls holding oats, cocoa, chocolate chips, flour, and eggs at room temperature.

"We're going to make a birthday cake," said Gus... "
Now, I didn't have a recipe for any kind of cake even remotely like this to go off of since I've never had a cake with oats in it before, but I put my trust in Kate here, and she didn't lead me wrong with the cake idea (or her book)! I decided to try to come up with a recipe that included all the ingredients she named (and of course a few more) to make the cake.
Photobucket

The icing recipe comes from Gale Gand, but the idea also comes from Comfort Food and Kate.
" Together, as a family, they mixed the ingredients and greased the pans, put the batter in the oven, and then made a simple icing out of butter, confectioners' sugar, and vanilla beans. "

So, how was it? This cake was actually pretty perfect! Nothing about this was remotely fussy to make and the results were wonderful. The cake itself was dense and not too rich (but just rich enough) and had a great texture, not crumbly really at all. It doesn't rise much because it is a heavy batter, but it isn't dry at all. The icing was heavenly and could very well be my new easy go to recipe for a simple vanilla buttercream. When I started out to try to create this cake, I really had no idea what it would be like, but I am very happy with it. You could easily make this into a snacking cake for an afternoon treat or cupcakes too (oh, and I stole a little nibble still warm from the oven while the chocolate bits were still melty and let me just tell you, it was ridiculously good)!

It is definitely a new comfort food! Thanks to Kate Jacobs - for a great book, and a great new recipe idea! Thanks to Cath and Stephanie for inviting me in on the fun! Can't wait to get together again!

Now, you (yes, you) - go get Comfort Food by Kate Jacobs, then come home, make this cake and enjoy a nice big slice with a tall glass of cold milk and spend your afternoon sitting in a nice cozy chair reading and eating cake. Seriously, can life get much better?

Photobucket

Chocolate Oatmeal Cake
1/2 cup unsalted butter, room temperature
1 1/2 cups sugar
2 eggs
2 teaspoons pure vanilla extract
1 cup all-purpose flour
1/2 teaspoon salt
1 teaspoon baking soda
1/3 cup cocoa powder (preferably, Dutch processed)
1 cup buttermilk, well shaken
2 cups quick/instant oats (1-minute NOT old-fashioned)
3.5 ounces bittersweet chocolate (1 bar of 70% Lindt Bittersweet is perfect), chopped into "chip" sized chunks - or the equivalent of your favorite chocolate chips)

Grease and flour two 9-inch cake pans (or one 9x13-inch pan) well. Preheat oven to 350 degrees F.

In a stand mixer with a paddle attachment (or with a hand-mixer fitted with beaters in a large mixing bowl) cream together the sugar and butter until well combined and the sugar is mostly absorbed into the butter - will still be crumbly and somewhat dry looking. Add the eggs one at a time and mix in well, beating on medium-high speed for 1 minute after each addition. Add the vanilla and continue beating for 1 minute, or until mixture is well combined, light and fluffy.

In another bowl, sift and whisk together the flour, salt, baking soda and cocoa powder. Add the flour mixture and the buttermilk to the sugar mixture in alternating additions: flour, milk, flour, milk, flour. Mix until just combined after each addition, finishing the last addition of flour by hand with a rubber spatula while you fold in the oats and chocolate chunks.

Divide the batter evenly between the two pans and spread with the spatula to even out the batter. This batter will be very thick, more like brownie batter. Bake for 20 to 25 minutes for the two round pans, or 35 minutes for the 9x13 pan, or until a toothpick comes out clean. The batter will have risen only slightly and will be very dense and heavy.

Remove the pans from the oven and place on a rack to cool completely. Remove the cakes and frost as follows: cake, approximately 1 cup of buttercream spread on top, layer with the other cake, frost with enough of the remaining frosting to cover the top and sides. Decorate as desired. I used some grated bittersweet chocolate (from another Lindt bar).

Easy Vanilla Bean Buttercream
(Adapted from this recipe, by Gale Gand)

Makes just enough for a not too thick layer (as shown) on this cake - if you like more frosting, you could make an additional half recipe of the frosting quite easily by using the alternate measurements in italics. There wasn't that much frosting to decorate with, so if you like decorating with frosting instead of chocolate shavings, use the alternate).

1 cup unsalted butter, room temperature (1 1/2 cup)
3 cups confectioners' sugar (4 1/2 cups)
1 teaspoon vanilla bean paste or extract (1 1/2 teaspoon)
1 to 2 Tablespoons heavy cream (1 1/2 to 3 Tablespoons)

In a standing mixer fitted with a whisk, mix together sugar and butter. Mix on low speed until well blended and then increase speed to medium and beat for another 3 minutes.

Add vanilla bean paste or extract and cream and continue to beat on medium speed for 1 minute more, adding more cream if needed for spreading consistency.

Photobucket

Monday, May 26, 2008

Lime White Chocolate Almond Cakes with Sunken Raspberries

Photobucket

Although I have been following the Royal Foodie Joust for the past few months, I keep missing the boat to participate. This challenging event is the creation of Jenn the Leftover Queen and is celebrating it's 12th edition this month. Each month the previous month's winner chooses three ingredients and those that want to brave participation can create and post a recipe to be voted on by other food bloggers.

If you still haven't checked out Jenn's Forum, you really should - she is also the creator of the Foodie Blogroll. To be included on the Foodie Blogroll or participate in the Royal Foodie Joust yourself - or to be able to vote for your favorite creation - you'll need to be a member of the Forum - so check it out. It is a seriously fun place and I'm sure you'll see some familiar faces there!

When this month's ingredients came around, I knew that this time I was going to have to participate. You see, I've been obsessing over a certain flavor combination for the past three months for a project I am still trying to perfect. The project itself keeps on flopping in function, but tastes insanely good - I haven't given up on it yet, but in the meantime...

So, here I am faced with the ingredients for this month - raspberry, lime and almond. Raspberry-Lime is the combination I've been crazy about, so I decided to try to make something that added in the almond as well. This flavor combination was chosen by last month's winner, Elle of Elle's New England Kitchen.

These cakes are made in the same style as a molten cake, but the almond meal and flour bakes into more of a custard / souffle type of texture instead of staying molten in the center. The result, with the raspberries "sunken" into the batter is a warm, lime white chocolate cake with a hint of almond flavor and a raspberry surprise. The flavors blend and work together beautifully.

Photobucket

Lime White Chocolate Almond Cakes with Sunken Raspberries
MAKES FOUR 6-OUNCE CAKES
1 stick (4 ounces) unsalted butter
6 ounces white chocolate
2 eggs
2 egg yolks
1/4 cup sugar
zest of 2 limes
Pinch of salt
1/2 teaspoon almond extract
2 tablespoons almond meal
2 tablespoons all-purpose flour
6 teaspoons of Raspberry Lime Sauce (recipe below), plus more for garnish
lime zest to garnish

Preheat the oven to 450 degrees F. Butter and lightly flour four 6-ounce ramekins. Tap out the excess flour. Set the ramekins on a baking sheet.

In a double boiler, over simmering water, melt the butter with the chocolate. In a small bowl rub together the sugar and the lime zest until moist and fragrant.

In a medium bowl, beat the eggs with the egg yolks, sugar and zest, and salt at high speed until thickened and pale. Whisk the chocolate until smooth. Quickly fold it into the egg mixture along with the flour and almond meal.

Spoon the batter into the prepared ramekins and place one teaspoon of the raspberry sauce into the center of the batter - do not stir. Bake for 13 minutes, or until the sides of the cakes are firm but the centers are still slightly soft. Let the cakes cool in the ramekins for 1 minute, then cover each with an inverted dessert plate. Carefully turn each one over, let stand for 10 seconds and then unmold. The cakes will sink. Garnish with Raspberry Lime Sauce and lime zest. Serve immediately.

Raspberry Lime Sauce
1 1/2 cup fresh raspberries
2 tablespoon sugar
juice of 1 lime, or to taste
1/4 cup seedless raspberry preserves

Combine all ingredients in a small saucepan and stir gently over medium heat to bring just to a gentle simmer.

Photobucket

Thursday, May 15, 2008

Red Velvet Whoopie Pies & Raspberry Spiked Orange Soda

Photobucket

I have a confession to make. Remember the TV show, Buffy the Vampire Slayer? Well, I came into it late in the game (pretty much the last three seasons) and was completely and totally hooked on this show. Loved it, had to watch it, got very involved with the plotline - and therefore, severely upset when the end of the show came around.

Imagine my joy when Stephanie over at Dispensing Happiness (who certainly was dispensing some my way) announced that this month's Blog Party was going to be all about creations inspired by none other than the Buffster herself. Not the movie for heavens sake, but the fabulous TV show.

I knew that I couldn't pass this one up. So, for my contribution to this Buffy and Scooby Gang party are these little Red Velvet Whoopie Pies. Obviously, my choice is because what vamp lovin' girl wouldn't like a soft red, can't-quite-put-your-finger-on-it-is-it-chocolate-or-vanilla kind of treat?

My very favorite episode of Buffy actually ended up being an episode of its spin-off show, Angel. It's the one where Angel becomes human, "for like 5 minutes." Anyway, it was just long enough for Buffy and Angel (who was, in case you didn't know, a vamp with a soul and the epic love of the Slayer's life) to finally be together - and then they took it away because he had to save the world and help fight the fight to keep her safe. It was completely epic- as in Romeo and Juliet have nothing on Buffy and Angel.

Anyway (you were warned I obsessed over the show, right). I wanted to make a very simple, but pretty red drink to go with this but that also had some fizz to it. I decided to spike (haha, get it all you Buffy fans) an orange soda drink with some raspberry syrup and fresh raspberries. The orange soda since it seemed appropriate somehow to Buffy's home in California.

Photobucket

Oh, and as an added bonus, this recipe (as noted below) translates easily into Red Velvet Cupcakes with the cream cheese frosting on top and some pecans - it's a two-fer.

Photobucket

Thanks to Stephanie for coming up with such a fun Blog Party idea!

Now, don't forget that today is your last chance to enter to win the Sur la Table gift card I'm giving away. Just check out my Mother's Day post to comment on why you read blogs and enter yourself in the giveaway.

Raspberry Spiked Orange Soda
(4 servings, depending on size of glass)
2 cans of your favorite orange soda
1/4 cup of fresh raspberries
1 orange, sliced for garnish
Crushed ice
3 Tablespoons seedless red raspberry preserves
1/4 cup water
1/4 cup sugar

Combine the water and sugar in a small saucepan and heat on medium heat until simmering. Simmer until all the sugar has dissolved and the mixture has a syrupy consistency. Add in the raspberry preserves and stir well to combine. Allow to simmer together barely for 1 minute. Remove from heat and transfer to small cup or pitcher to cool and be able to pour into glasses.

Once the syrup is cooled, fill glasses with crushed ice and pour about 1 Tablespoon of raspberry syrup into each glass. Fill the rest of the glass carefully with soda and top with raspberries and orange slice.

Red Velvet Whoopie Pies
1 cup + 1 Tablespoon all-purpose flour
2 Tablespoons cocoa powder
1/2 teaspoon baking soda
1/2 teaspoon salt
1/3 cup well-shaken buttermilk (+ 2 Tablespoons for cupcakes)
1/2 teaspoon vanilla
6 Tablespoons unsalted butter, softened
1/2 cup granulated sugar
1 large egg
1 Tablespoon red food coloring

Preheat oven to 350°F.

Whisk together flour, baking soda, cocoa and salt in a bowl. Stir together buttermilk and vanilla in a cup.

Beat together butter and sugar in a large bowl with an electric mixer until pale and fluffy, about 3 minutes, then add egg, beating until combined well. Mix in flour mixture and buttermilk mixture alternately in batches at low speed (scraping down side of bowl occasionally), beginning and ending with flour mixture. Mix until smooth.
Spoon about 1 Tablespoon of batter about 1 1/2 inches apart onto a buttered large baking sheet. Bake in middle of oven until tops are puffed and cookies spring back when touched, 10 to 12 minutes. Transfer with a metal spatula to a rack and chill (to cool quickly), about 5 minutes.

Make filling/frosting while cookies chill. Once they are completely cool, frost the flat side of a cookie with a generous amount of frosting and sandwich with another cookie.

Brown Sugar Cream Cheese Frosting recipe from Joy the Baker
(1/2 recipe below)

3/4 cup butter, softened
4 oz cream cheese, softened
1/8 cup light brown sugar, packed
1/2 teaspoon vanilla extract
1-2 tablespoons milk
2-4 cups powdered sugar
depending on desired consistency

Cream the butter and cream cheese together in an electric mixer. (Be sure that the two are at room temperature, but not melted. Cold cream cheese or butter can make your frosting lumpy.) Add the brown sugar and vanilla extract, and beat for about 2 minutes. Turn off mixer and add 2 cups of powdered sugar. Turn the mixer on a low speed so the sugar doesn’t fly out of the bowl. Slowly add more sugar alternately with the milk until you reach your desired consistency.

Photobucket

Photobucket


Wednesday, May 7, 2008

Cookie Carnival: Blueberry Drop Cookies

Photobucket


After April's busy/crazy schedule it is good get back to something a little more simple, let no less sublime, as cookies. Darling Kate over at The Clean Plate Club is the lovely creator and host of a monthly event called the Cookie Carnival (and check out the seriously cute badge there). Each month Kate comes up with a delicious cookie recipe that she has been wanting to try and emails it to the group and we all make the recipe. The idea is to all make the recipe as is, but if tweaking is needed or done, that is ok too. Which is a very good thing for me this month, because what started out fairly innocently with the change I was going to make to the recipe, turned into several changes in ingredient and a little in the method as well.

So, that is why you see below two versions of the recipe. It isn't that I had any kind of issue with the first recipe, so much as I just had a few other things on hand that I wanted to try. So, while the original uses almond extract, lemon and no butter (just shortening), as well as regular sugar, that isn't what you see here.

Yeah, as I warned Kate, I am a "fiddler" (as evidenced by the new header on the blog... again). Sometimes, even when a recipe looks absolutely great to me as is, something just seems to come over me and I just can't stop myself from tweaking. As in this case. It started out innocently enough, then it just snowballed.

In the beginning I was just going to substitute half the shortening with some butter, just for flavor, just because. Then, I got thinking about how much I love orange with blueberry, so I switched out the lemon. Well... then I kept reading and realized I was out of almond extract and, since I couldn't go to the store at the time, I decided to add in vanilla instead... umm... vanilla bean extract that is, since I had it and all.

Oh, I'm not done yet. Sometimes the fiddling that takes place is a sickness! Told you it snowballed! So... I kept reading the list and got to the sugar and really wanted to switch out part of the sugar for brown sugar because, well, I seriously love brown sugar and would probably add it to absolutely everything if I could. I didn't want to switch out all the sugar though, because I really wanted to rub the orange zest into the white sugar like in Dorie's Perfect Party Cake I made for the Daring Baker challenge back in March. I would seriously love to wake up every day and do that. It is heavenly and totally therapuetic.

The last change I made to the ingredients was the milk. Yeah, I pretty much didn't leave anything alone here. I switched to buttermilk because I had some that needed to be used and also added a little baking soda just in case I had now completely torpedoed the chemistry here somehow.

The end result of all the crazy, can't-leave-well-enough-alone fiddling that went on here? These cookies were completely awesome! As I mentioned above, I'm sure that the original recipe is fantastic too, and I will probably try it as well, but in the meantime, you get two versions.

Oh, and since we all know I have a penchant for eating cookies for breakfast, since these were so much like the orange blueberry muffins in BFMHTY, I passed these off as 'biscuits' (fair enough right, our friends in other lovely areas of the world call cookies biscuits - right? Right.) and scarfed a few. And, yes, I feel fine about it. You should too!

Photobucket

BLUEBERRY DROP COOKIES
(Revised Version)

Ingredients:
1/4 cup shortening
1/4 cup unsalted butter, softened at room temperature
2/3 cup sugar
1/3 cup light brown sugar, packed
1 egg
1/4 cup buttermilk
1/2 teaspoon pure vanilla bean paste or pure vanilla extract
1 1/2 teaspoons grated orange zest
2 cups all purpose flour
2 teaspoons baking powder
1/2 teaspoon salt
1/4 teaspoon baking soda
1 cup blueberries, rinsed and picked over

Instructions:

1. In a small bowl, combine the 2/3 cup sugar with the orange zest and rub together until moist and fragrant. Place sugar and zest mixture in a large mixing bowl with the shortening, butter, and brown sugar. Cream together well. Add the egg and mix well. Add the buttermilk and vanilla paste or extract, and continue to mix well. In a separate bowl, whisk together the flour, baking powder, salt and baking soda. Slowly add the flour, baking powder and salt to the butter/sugar mixture and mix until combined. Fold in the blueberries gently and mix until well blended.


Photobucket


2. Cover and chill for 4 hours. Preheat oven to 375 degrees. Drop the dough by teaspoonfuls, one and one-half inches apart onto greased cookie sheets. Bake 12 to 15 minutes. Remove from the oven and let cool for a few minutes before removing them with a spatula.

Makes about 4 dozen.


Photobucket


BLUEBERRY DROP COOKIES (The original recipe)
Ingredients:
1/2 cup shortening
1 cup sugar
1 egg
1/4 cup milk
1/2 teaspoon almond extract
1 1/2 teaspoons grated lemon zest
2 cups all purpose flour
2 teaspoons baking powder
1/2 teaspoon salt
1 cup blueberries, rinsed and picked over

Instructions:
1. In a large mixing bowl, cream the shortening, sugar, egg, milk, almond extract and lemon zest, mixing well after the addition of each ingredient. Slowly add the flour, baking powder and salt. Fold in the blueberries and mix until well blended.

2. Cover and chill for 4 hours. Preheat oven to 375 degrees. Drop the dough by teaspoonfuls, one and one-half inches apart onto greased cookie sheets. Bake 12 to 15 minutes. Remove from the oven and let cool for a few minutes before removing them with a spatula.

Makes about 4 dozen.

Photobucket


Friday, May 2, 2008

AYE: Go Local! Blackberry Peach Clafoutis


Yes, I know, another clafoutis. It is becoming a bit of a new obsession around our house. What can I say? Is it because it is A) Delicious, B) Easy, C) Versatile, D) All of the Above. Yup, you guessed it. The answer is "D" - all of the above. Seriously, what's not to love. You can put just about anything in it you want, be traditional, or not. I think that next I want to try a savory version, but I promise that in the future, I will group any more clafoutis posts together before this becomes the All Clafoutis, All the Time Blog!

So, the reason I'm posting this one so quickly on the tail end of my previous posts is two-fold. One, is that if you haven't gone and drooled over the incredible round-up of clafoutis on Bron's site right now for the Hay Hay It's Donna Day - #19 Clafoutis Edition, then you need to. You can look through all the amazing entries from many lovely bloggers and even email a vote for your favorite to Bron before May 9th. If, by chance, you aren't familiar with this wonderful event - well, then you should be! This event was created by the so lovely Barbara of winosandfoodies. It was the first food blogging event I participated in and it has been such fun to participate every month.


Photobucket

As I mentioned, Bron Marshall was the host (again) for this last round and now, in case you didn't hear, Bron is adopting the HHDD Event in the future as requested by Barbara. You can read more about that here and here.


Photobucket

The second reason you are getting another one is that because Mrs. W and I hosted the Art You Eat #3 Event this past month with a theme of Go Local! to help celebrate Earth Day. We chose to concentrate on not only sustainability, but the use of local produce and other products. The point was to become more aware of where our food comes from and to try to focus on "local" (within 7 to 8 hours away) products.

For me, that ended up being Tuesday morning's breakfast of a Blackberry Peach Clafoutis. The blackberries are leftovers frozen from last summer's farmers markets and the peaches come from local growers nearby as well. I bottled the peaches last summer when and the eggs and flour both came from a local farm and mill, respectively. The milk and butter also come from a local dairy. I also used dark brown sugar, which of course, is not local, but the point is to use as much local as possible. So, while my ingredients were not "fresh" I wanted to go that route to show that you can preserve items that you use yourself and control what goes into it and have local accessibility more.

For anyone in the Salt Lake City area, just an FYI that the Live Green - Downtown Sustainability Festival is coming up next Saturday (May 10th). It looks like it should be interesting, educational and fun.


Photobucket


So, on to the recipe. Make sure you check out the Art You Eat blog for the round-up of this event and vote for your favorite.

Blackberry Peach Clafoutis
1 cup blackberries (fresh or if using frozen, do not thaw)
1/2 cup canned peaches (or fresh) cut into small bite size pieces
1/3 cup dark brown sugar, packed
2 teaspoons sugar
300 ml whole milk
3 large eggs
pinch of salt
1 cup all-purpose flour
2 Tablespoons butter

Preheat two 6-inch cast iron skillets in a 375 degree F oven on a baking sheet. In the meantime, whisk together the dark brown sugar, milk, eggs, and pinch of salt together in a pourable bowl or pitcher. When they are well combined and the sugar is fairly dissolved whisk in the flour.

Remove the skillets from the oven and melt 1 Tablespoon each of butter in the hot pans. Once the butter has melted, distribute the blackberries and peaches evenly between the two pans. Sprinkle with 1 teaspoon of sugar in each pan over the fruit. Pour equal amounts of batter into each pan over the fruit.

Place the pans on their baking sheet back into the oven and bake for 20-25 minutes, until puffed and golden. Allow to cool for a couple of minutes before serving (can also be served at room temperature).

Enjoy!


Photobucket

Wednesday, April 23, 2008

EVENT ROUND-UP: Little Wonders Made By Lots of Wonderful People!!


Here it is! The Blogging for Babies - Little Wonders Event Round-up! Enjoy browsing the amazing little creations made by all the wonderful bloggers who were able to participate in this little event. These fabulous people are helping me spread the word and raise awareness about the March of Dimes and their March for Babies fundraiser. Their mission is all about research and advocacy for mom's and babies - they are working so that one day, every baby can be born healthy - but as they say, we have to walk to get there.

These wonderful friends below helped me spread the word about our family's participation in the March for Babies this coming Saturday and we are very excited. There are scheduled to be almost 2,000 people at the walk being held at Wheeler Farm here in Utah. To add to our excitement we have family coming from out of town to walk with us and my husband's skydiving team are going to be jumping in with the American flag at the opening ceremonies during the national anthem. We are excited that we can help make the event a little bit more exciting for all the wonderful participants that are coming to walk for this amazing cause.

Again, the whole purpose of this event was to get the word out about the March of Dimes and the work that they do. If you are able to donate to sponsor our family in the march, please just click on the banner at the top of the page (or click here) and donate any amount that you can. For the back story on why we are so passionate about this, you can read the full story or even check out our little family blog.

For my little contribution to the little wonders madness, here is a picture of the Dulce de Leche Duos out of BFMHTY. They are amazing! I will post the recipe with the announcement of the winners next week (just so I can get this roundup posted)!


I have some prizes for the top three "people's choice" winners of the event.
So, make sure to check out everyone's posts and then email me to tell me your favorites.
The top three will win their choice of three "prize packages" that I have.

Email your votes for your favorites to me at phemomenon AT gmail DOT com
Voting closes on April 30th.

Thank you again (and again and again) to everyone who participated for
your support of our little family and such a good cause!


LITTLE WONDERS ENTRIES!!!!


Photobucket
Eve from Berkeley, California in the Garden of Eating sent this
Tropical Fruit Baby Bib that looks good enough to eat.


Photobucket
Melissa from Atlanta, Georgia of the Mighty Muffin Blog made Mini Lemon Glazed Madeleines


Photobucket
Stephanie, at Dispensing Happiness who "Plays well with food" made these amazing and delicious looking little Bite-Sized Vanilla-Hazelnut French Toast, with Nutella. She has also very kindly donated a brand new copy of Small Bites, Big Nights as a prize for this event.

Photobucket


Photobucket
Angel, another Utahn, from American Fork and Angel's Bento Blog
made these cute little Heart and Star Shaped Cakes.


Photobucket
Libby, fabulous Mom of the Allergic Kid made these absolutely wonderful
Apple Baby Cakes as a special favor for all of us preemie Moms who wonder what
to give a one-year old who developmentally isn’t one yet, as a birthday cake.


Photobucket
Susan from Florida at Sticky, Gooey, Creamy, Chewy made these
simply beautiful Lemon Yogurt Cakelets.


Photobucket
Smita from New York of Traveling Tummy made these yummy Mini Matza Pizzas.


Photobucket
Elly from Chicago at Elly Says Opa, after eating something similar at a restaurant, created her own version and made Baby Pistachio Cheesecakes with Cherries on top that look marvelous.


Photobucket
Lysy at Munchkin Mail made Tiny Turkish Delights which look like
such a tempting and lovely little treat.


Photobucket
Harini, aka the lovely Sunshinemom, blogging at Tongue Ticklers from India sent
two wonderful little creations she made, Mango Cream Shortcakes and Besan ka Chilla.

Photobucket


Photobucket
Rachel, another lovely blogger from India, at Tangerine's Kitchen Hangout
made this vibrant homemade Strawberry Jelly.


Photobucket
Chris from Atlanta, Georgia, at Mele Cotte made these darling little cannoli
Sweet Gondolas that look almost too cute to eat - almost.


Photobucket
Priya in California at 365 Days of Pure Vegetarian made the cutest little Lunchbox Mini-Sandwiches that anyone would be thrilled to find at lunch time or any other time.


Photobucket
Madhuram over at Eggless Cooking made these sweet treat little Mini Chocolate Pizzas.


Photobucket
Helen, the one and only, lovely and delightful Tartelette made these
simply perfect Ispahan Cupcakes in honor of a friend and her preemie baby.


Photobucket
Chriesi, from Zurich, Switzerland, and the beautiful, Almond Corner made
a delicious creation of Polenta and Feta with Baby Eggplants.


Photobucket
Arfi, of wonderful HomeMadeS made these darling little
Peanut Butter Cookies as “Biscuits for Cole.”


Photobucket
Barbara, blogging from the Gold Coast, Queensland Australia, and of course,
the fabulous blog winos and foodies made Moroccan Haloua with Dates
that look like a perfect little confection to make, and share
(if you don’t eat them all yourself like I would).


Photobucket
Y in Sydney, Australia at Lemonpi made these fun and delicious
looking little cupcake called Lumberjack Cupcakes.


Photobucket
Aran from Florida, at the beautiful Cannelle Et Vanille made darling little
Mini Carrot Cupcakes as a great healthy snack for her darling
preschooler neighbor to share with her classmates. Lucky kids!


Photobucket
Melanie, my good friend and go-to gal for great ideas for dinner, at My Kitchen Cafe,
made these really neat and seriously delicious looking Solid Peanut Butter Cups.


Jen, blogging from one of my favorite cities, Boston, is the Beantown Baker.
She had me at mini cupcakes, but then she added chocolate - twice - and there are
even sweet surprises inside - check out her Chocolate Chocolate Cupcakes.


Special Mentions:
Kate, at the Clean Plate Club, wasn’t able to make anything for the event, but she did make this absolutely adorable shirt which she has kindly and generously donated as one of the prizes for this event. You should check out her website to see all the other darling baby/toddler clothes she illustrates. Thanks again Kate!

Gabi, my food blogging friend and fellow Utahn, of The Feast Within, was also kind enough to help spread the word about the March as well.

Also, Michael, from Buttons of Hope, makes buttons for special causes. If you have need of his services, go check out his blog at Behind the Button.

Blog Widget by LinkWithin